Are you looking to replace the rear-facing camera module on your Samsung Galaxy S20? We provide step-by-step instructions and guidance on how to replace the camera module yourself. Get your Galaxy S20’s camera working perfectly again with our helpful guide.
The rear camera of the Samsung Galaxy S20 is very famous for taking amazing pictures and videos. However, if you’re experiencing issues like blurry images or problems with autofocus, it may be necessary to replace the camera module. We will show you how to replace the rear-facing camera on your Samsung Galaxy S20. By following these steps, you can fix the camera and start capturing great photos again.
Let’s start, our Samsung Galaxy s20 rear-facing camera module replacement guide.
Step 1 Get All Camera Repairing Tools

Before you begin replacing the rear-facing camera module on your Samsung Galaxy S20, it’s essential to gather the necessary equipment. Here’s a list of items you’ll need:
- Replacement Camera Module: Make sure to acquire a compatible replacement camera module specifically designed for the Samsung Galaxy S20.
- Suction Cup: It is typically used to provide a firm grip and lift smooth surfaces, such as the back cover of the phone.
- Small Screwdriver Set: You will need a set of small screwdrivers to remove the screws securing the camera module.
- Hair Dryer: By directing warm air onto specific areas of the device, a hair dryer can help soften the adhesive, making it easier to pry open or remove components.
- Spudger: It is made of plastic and has a flat or pointed end, which helps in prying open components, disconnecting connectors, and manipulating small parts without causing damage.
- Tweezers: Tweezers can be handy for handling small parts and cables during the replacement process.
- Plastic Picks: When working on a Samsung Galaxy S20 or any other smartphone, plastic picks can be particularly useful for tasks like lifting connectors, removing adhesive, or carefully separating parts.
- Adhesive Glue: It will help you stick the back cover of your phone to the frame of the Samsung s20 firmly.
Step 2 Power Off The Device


Simply press and hold the power button until a menu appears on the screen. From the menu, select the option to power off the phone. Wait for the device to completely shut down before proceeding with any repairs or adjustments.
Step 3 Eject The SIM Tray
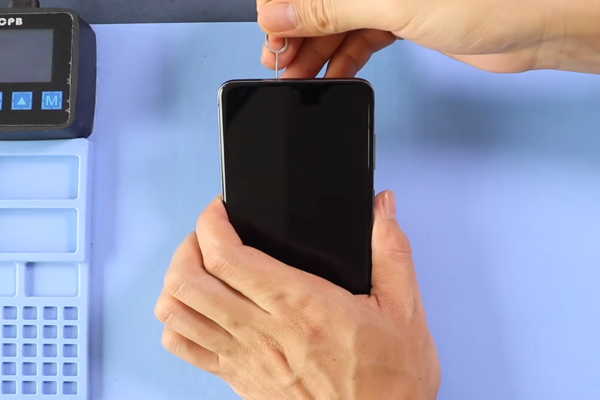

- There is a small hole near the SIM card slot at the top of your phone.
- Find a SIM ejecting tool or a small pin and insert it into the hole.
- You should encounter slight resistance as you push the tool or pin into the hole.
- When you gently press on the SIM tray, you will feel it pop out partially or fully.
- Use your fingers carefully to pull out the SIM tray from the phone.
Step 4 Heat All Sides Of The Phone

- Take a heat gun or hair dryer and set it to a low or medium heat setting.
- Hold the heat gun or hair dryer at a safe distance from the back edges of the phone, about 5–10 centimeters away.
- Start heating one of the back edges of the phone using a sweeping motion. Keep the heat focused on the area for about 3 minutes, moving the heat source back and forth to distribute the heat evenly around all four corners.
Step 5 Slice Adhesive At The Bottom Edge


- Fix a suction cup on the lower side of the phone. Gently pull the suction cup to create a small gap between the back cover and the frame of your Samsung Galaxy S20.
- Once you have created the gap, swiftly insert a plastic pick of around 5 mm in size into the gap.
- Slide the plastic pick from one lower corner to the other, moving it along the edge. This motion helps to cut through the adhesives that hold the back cover in place.
Step 6 Cut The Left Side Adhesives


- Start in the bottom left corner of the Samsung S20. Use a thin pick and insert it carefully between the back frame and the body of the phone.
- Slide the pick from the bottom left corner to the top left corner, applying light pressure. Be careful because the rear cameras are located in the top left corner, so don’t push too hard there.
- Repeat this sliding motion back and forth 3 to 4 times to make sure that the pick has cut all the adhesive on the left side.
Step 7 Remove The Upper Edge Adhesives


- Continue moving the pick from the top left corner to the top right corner, applying steady and gentle pressure.
- Repeat this sliding motion with the pick three times, making sure it effectively cuts through the adhesive glues.
Step 8 Slice Adhesives On The Right Side


- Move the tool from the top right corner to the bottom right corner by applying a controlled and gentle force.
- Repeat this slicing motion along the right side of the phone, ensuring the tool effectively cuts through the adhesives.
- The adhesive along all four edges of the Samsung s20 is very strong. You may have to heat the phone again to soften the adhesives if it is not easy to cut these adhesives.
Step 9 Remove The Back Cover


- With your fingers, hold the edges of the back cover of your Samsung Galaxy S20. Carefully lift the back cover upwards, away from the phone’s frame.
- You will notice the back cover is gradually detaching from the frame as you pull it outward with your fingers.
- Once the back cover is fully separated, keep it in a secure location.
Step 10 Unfasten The Motherboard Bracket


- Get a Phillips screwdriver that matches the size of the Samsung Motherboard Bracket screws.
- With the screwdriver, gently loosen and remove the five 4 mm-long screws that hold the Motherboard Bracket in place on the phone frame.
- As you take out each screw, be careful to keep them in a secure location to avoid misplacing them.
Step 11 Disconnect The Wireless Charging Coil


- Find the wireless charging coil which is clipped on the left side of the Samsung Galaxy S20.
- Use a plastic tool or spudger and delicately lift the wireless charging coil by gently pushing it upwards.
- Apply moderate force to disconnect the wireless charging coil from its connector by unclipping it.
Step 12 Take Off The Wireless Charging Coil


- Use either a pair of tweezers or your fingers to securely and softly grasp the wireless charging coil.
- With caution and care, gradually lift the wireless charging coil, ensuring that you apply gentle and consistent pressure to detach it.
Step 13 Disconnect The Battery


- Find the battery press connector. Using a spudger with a pointed edge, carefully slide it beneath the battery connector press.
- Gently raise the spudger to detach the battery connector press.
Step 14 Unscrew And Disconnect The Loudspeaker


- To remove the loudspeaker, use a Philips screwdriver to loosen and unscrew the five screws that measure 4mm in length.
- Once the screws are removed, use your fingers or a pair of tweezers to carefully remove the loudspeaker from its position.
Step 15 Disconnect And Remove The Flex Cables


- You can choose to either use your fingers or a spudger to disconnect and separate the flex cables.
- Exercise caution as you gently lift the flex cables with a spudger to disconnect them.
Step 16 Disconnect The Display Screen Cable


- Gently hold the sides of the connector using your fingers or a spudger, and carefully lift the display cable connector to detach and unclip it.
Step 17 Unscrew And Separate The Upper Mid-Frame


- Using a Phillips screwdriver, unscrew the four screws that measure 4 mm in length from the upper mid-frame of the Samsung Galaxy S20.
- After removing all the screws or unfastening the clips, carefully lift and separate the upper frame from the rest of the phone.
Step 18 Disconnect The Side Cable


- Grab a spudger, a tool with a flat or pointed end. Delicately slide the spudger beneath the side button flex cable.
- With caution, lift the flex cable using the spudger to detach it from the motherboard.
Step 19 Detach The Front Camera


- Using a spudger or a pair of tweezers, carefully pry up and disconnect the front camera.
- Next, remove the front camera from the frame and set it aside in a secure location.
Step 20 Disconnect The Front Facing Sensor Array


- Detach the front-facing sensor array by disconnecting its connector with a pointed-edge spudger.
- Carefully unplug the connector to separate the front-facing sensor array from the device.
Step 21 Unscrew And Remove The Motherboard Assembly


- The Samsung S20 motherboard is held in place by two screws of different sizes. One screw measures 3mm in length, while the other is 4 mm long. Unscrew these screws using a screwdriver.
- With either a pair of blunt nose tweezers or your fingers, gently lift the motherboard assembly upward and separate it from the phone.
Step 22 Take Off The Ultra Wide Camera Module


- With the flat end of the spudger pull up and disconnect the Ultra Wide Camera Module of Samsung S 20 from the motherboard.
- Now, with your fingers, take out the ultrawide camera module.
Step 23 Remove The Rest Of The Cameras


- To disconnect the wide-angle camera connector from the motherboard with the help of a spudger.
- After this, remove the rest of the back camera module.
- Replace the damaged back-facing camera module of your Samsung s20 with a new, functional Rear-Facing Camera Module.
After successfully replacing the Rear-Facing Camera Module in your Samsung Galaxy S20, it is time to reassemble the phone. Begin by reattaching the rear housing and securely tightening the screws. Apply high-quality adhesive to the four corners of the back cover to ensure a secure fit. Finally, snap the rear cover back onto the phone until it fixes into place.
Once the reassembly is complete, power on your Samsung Galaxy S20 and test the functionality of the new rear camera by taking a picture. If everything is working properly, then you have accomplished the task of replacing the Rear-Facing Camera Module in your Samsung Galaxy S20. Now you can enjoy capturing high-quality photos and videos with your device once again.
Admin


