Is the earpiece speaker of your Google Pixel Pro 8 not working? Don’t worry! Follow our easy step-by-step guide to replace the defective earpiece speaker of your Google Pixel Pro 8.
Here is a simple step-by-step guide to replacing the Earpiece Speaker of your Google Pixel Pro 8.
Step 1 Collect Necessary Tools

Gather all these handy tools to replace the Earpiece Speaker of Pixel Pro 8:
*Heat gun or Hair Dryer
*A Suction Cup
*Opening Picks
*A set of screwdrivers (Phillips or Torx)
*A Spudger
*A pair of tweezers
Step 2 Prepare Your Pixel Pro 8 For Disassembly
![]()
![]()
*Detach and disconnect all cables from the phone.
*Press the power and volume up button together. A Shutdown menu will appear.
*Select the power off option to turn off your Pixel Pro 8.
Step 3 Heat All The Sides Of Your Pixel Pro 8
![]()
![]()
![]()
*Take a hot air gun or hairdryer. You can also use a Hot plate to heat the phone.
*Adjust medium heat settings on your hot gun or hairdryer.
*Heat the phone for 5 to 10 minutes.
*Do not overheat your Pixel Pro 8.
Step 4 Use a Suction Cup


*Heat will melt the adhesive glue present on all the edges of the phone. It becomes easy to slice the adhesive and separate the screen from the phone frame.
*Attach a suction cup to the bottom of the phone screen.
*Pull up the suction cup handle until a gap forms between the screen and the phone frame.
Step 5 Insert An Opening Pick

*Take a plastic opening tool.
*Mark 3mm on the opening pick.
*Now, insert the pick into the gap up to 3mm.
*If you insert the pick more than 3mm, the screen cable might be damaged.
Step 6 Remove Bottom Adhesive


*Cut the bottom adhesive by moving the pick from the lower right corner to the lower left corner.
*Repeat this movement 2 to 3 times to cut all the bottom adhesives.
Step 7 Cut The Left Side Adhesive


*Slide the opening pick from the lower left to the upper left corner to slice the adhesive.
*If you find it difficult to slice the adhesive, heat the phone for 2 to 3 minutes.
Step 8 Remove Upper Edge Adhesive


*Keep moving the opening pick from the upper left corner to the upper right corner of the phone. It will cut the upper Adhesive.
Step 9 Cut Right Side Adhesive


*Move the pick from the upper right corner to the lower right corner of the phone to remove the right-side adhesive.
Step 10 Prop Up The Screen


*Hold the screen in your fingers and slowly pull it up.
*Do not pull it quickly because the screen is still attached to the phone frame.
Step 11 Remove The Screen Cable Cover


*Take a spudger and use it to pry up the screen cover.
Step 12 Disconnect The Screen


*Disconnect the screen press connector with a prying tool.
Step 13 Separate The Screen


*Separate the screen from the phone frame with the help of your fingers.
Step 14 Disconnect The 5G mmWave Antenna.

*If your phone has a 5G mmWave Antenna, follow these steps to disconnect it
*Use a spudger to pry up the antenna press connector.
Step 15 Peel Up The 5G mmWave Antenna


*Heat the Antenna for 2 minutes to soften the adhesive.
*Now, slowly peel it.
Step 16 Separate The Graphite Black Tape


*Insert a spudger under one of the corners of the graphite sheet.
*Pry it up with a spudger.
*Peel the black graphite sheet with the help of your fingers.
Important Tip
Do not use this graphite sheet again.
Replace this graphite sheet with a new sheet while reassembling your phone.
Step 17 Remove USB-C Cover Tape


*Insert a spudger under the plastic shim present on the USB-C port.
*Hold it with the help of your fingers or a pair of tweezers to peel it.
*Peel off this cover tape.
Step 18 Unfasten USB-C Port Cover


*There are two 5mm long screws securing the USB-C Port.
*Unscrew these screws and keep them in a safe place.
*Use a pair of tweezers or your fingers to remove the USB-C Port Cover.
Step 19 Unfasten The Midframe

*Unscrew the seven 5mm long screws to unfasten the midframe.
Step 20 Remove The Midframe


*Hold the midframe with a pair of tweezers or your fingers.
*Remove it from the phone frame.
Step 21 Disconnect The Battery

*Pry up the battery press connector with a spudger to disconnect it.
Step 22 Disconnect The Front Camera

*Use a spudger to pry up and disconnect the selfie camera.
Step 23 Remove The Front Camera

*Use a pair of tweezers or your fingers to remove the front camera.
Step 24 Disconnect The Rear Camera Assembly


*With a spudger, pry up all three rear camera press connectors to disconnect them from the logic board.
Step 25 Unfasten The Rear Camera Assembly

*Hold the Antenna Cable to unfasten the two screws securing the rear camera assembly.
*One 3.5 mm long screw is securing the top left corner, and one 5 mm long screw is securing the top right corner of the rear camera assembly.
Step 26 Remove The Rear Camera Assembly

*Use a spudger to pry up and remove the rear camera assembly.
Step 27 Disconnect The Antenna Cable

*Disconnect the antenna cable from the logic board using a spudger or a pair of tweezers.
Step 28 Unfasten The 5G mmWave Antenna Bracket
*Unscrew the two 5mm‑long screws securing the 5G mmWave antenna bracket.
*Enter the tip of a spudger in one of the screw holes to pry up the bracket.
*Remove the antenna bracket.
Step 29 Detach The Antenna

*Slowly lift the 5G mmWave Antenna and remove it.
Step 30 Unclip The Antenna Cable

*Pull the black antenna cable gently out of its clips, present on the phone’s left side.
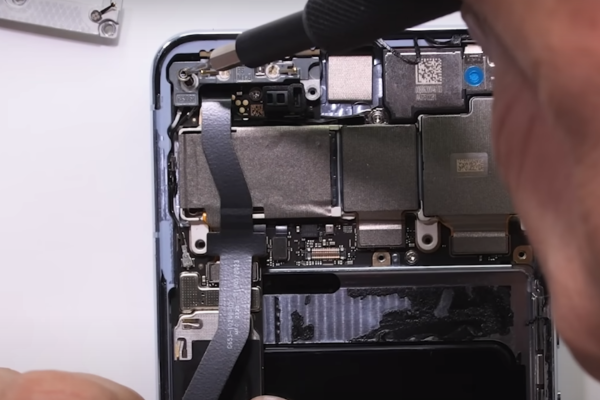
Step 31 Unscrew The Earpiece Speaker

*Unscrew the 3.5 mm‑long screw securing the earpiece speaker.
Step 32 Remove The Earpiece Speaker

*Pry up the speaker with a spudger.
*Hold it in your fingers and remove it.
Step 33 Unplug The Antenna Cable

*Insert a spudger or one arm of a pair of tweezers under the coaxial connector of the black antenna cable.
*Disconnect the Antenna cable from the bottom of the earpiece speaker.
Step 34 Remove The Antenna Cable Tape

*Unclip the antenna cable to disconnect it from the earpiece speaker.
*Use your fingers to remove the yellow tape securing the antenna cable.
*Smoothly pull the antenna cable and remove it from the earpiece speaker.
Step 35 Remove The Antenna Board

*There is an L-shaped antenna board attached to the bottom of the earpiece speaker.
*Pry off the antenna board with a spudger and remove it from the speaker.
*No, only the faulty earpiece speaker remains.
Step 36 Take a New Earpiece Speaker

*Take a new functioning earpiece speaker for Pixel Pro 8.
*Connect and clip the Antenna Cable.
*Place and fasten the Earpiece Speaker into its recess.
Step 37 Reassemble Your Pixel Pro 8
![]()
*To Reassemble your Pixel Pro 8, repeat all the above steps in reverse order.
Final Verdict
Excellent job! You have successfully learned how to replace the malfunctioning earpiece speaker of your Pixel Pro 8. Turn on your Pixel Pro 8 and enjoy voice calls without any interruption.
Admin


