Do you own a Samsung Galaxy S22 Ultra? Accidents can happen; if your screen gets cracked or damaged, it can be unpleasant. But don’t worry! We have a guide that will help you replace the screen of your Samsung Galaxy S22 Ultra. Just remember the S22 Ultra is a bit different from previous models. Following our easy step-by-step instructions you can fix your phone’s screen and enjoy its amazing display again.
Don’t let a broken screen ruin your Samsung Galaxy S22 Ultra experience. Let’s learn how to replace the screen of your Samsung Galaxy S22 Ultra together. Get ready to bring your phone back to life and enjoy all its great features!
Essential Tools and Materials to Replace Samsung Galaxy S22 Ultra Screen
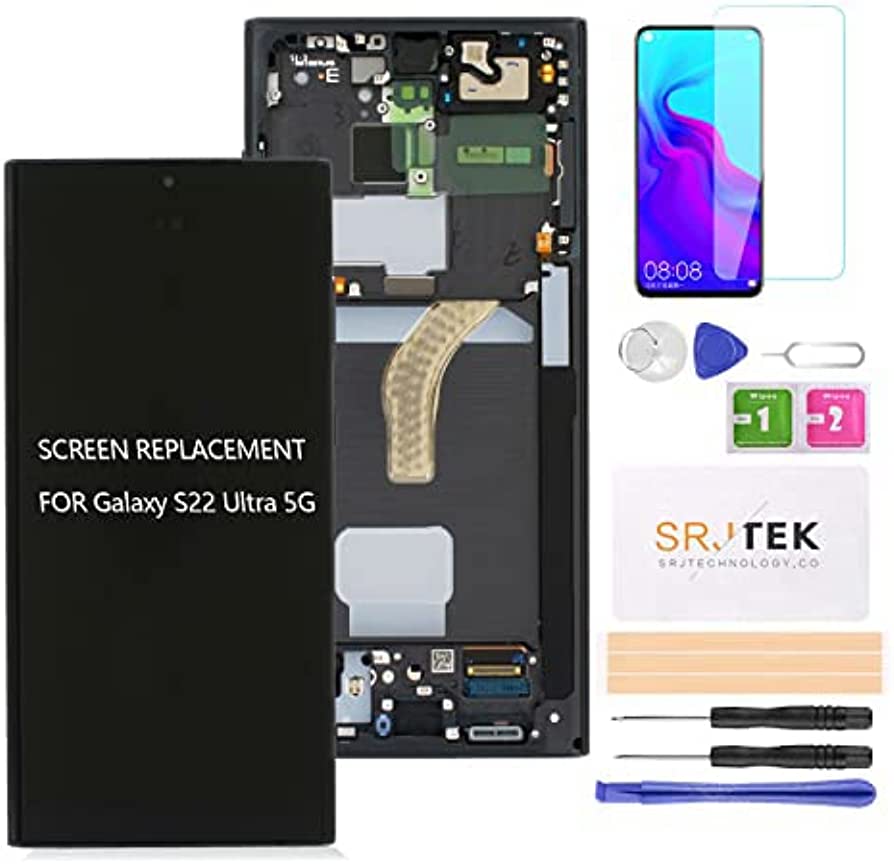
You’ll need to gather a few essential tools to ensure a successful screen replacement for your Samsung Galaxy S22 Ultra. Here’s what you’ll need:
Replacement Screen
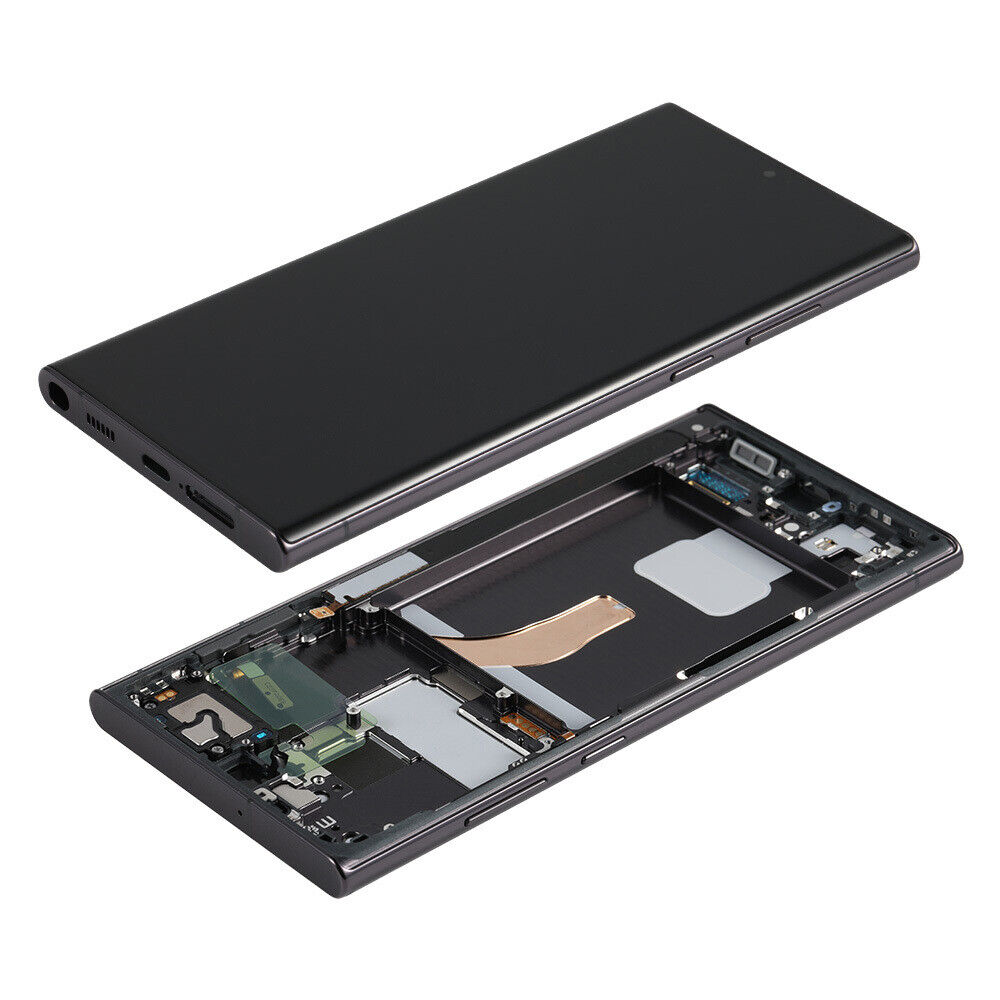
Purchase a high-quality screen designed for the Samsung Galaxy S22 Ultra.
Screwdriver Set
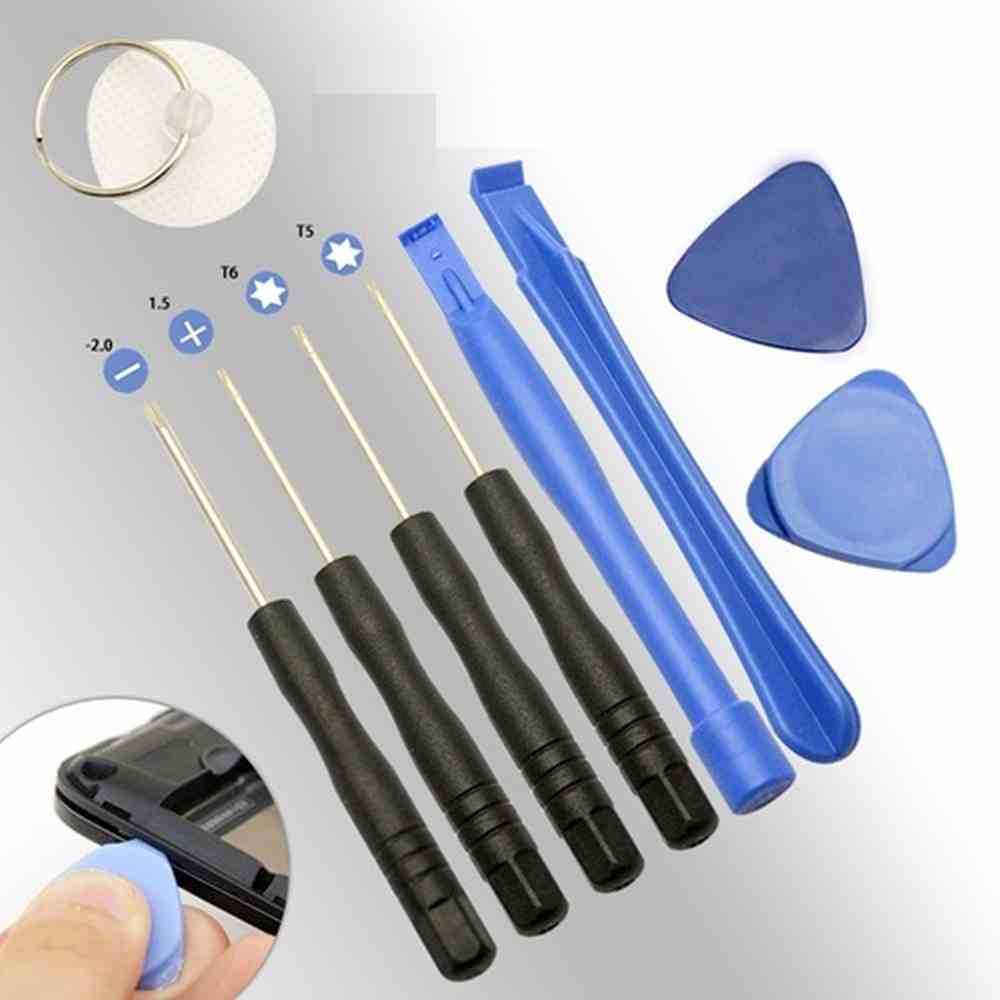
Get a screwdriver set with the necessary tools for opening the phone and removing screws.
Plastic Opening Tools
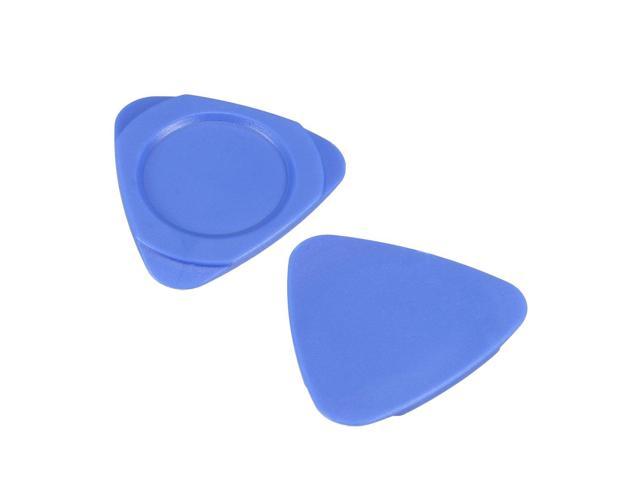
These non-metallic tools are essential for safely prying open the phone’s casing without causing damage.
Tweezers
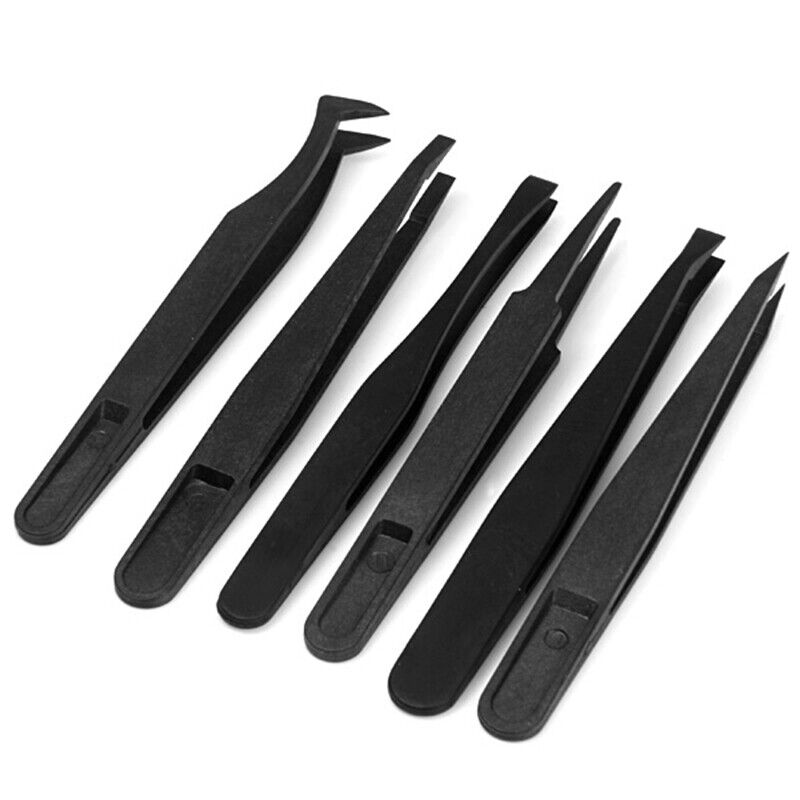
A pair of tweezers will be useful for handling small components and connectors during the replacement process.
Adhesive Strips

Make sure to have adhesive strips or tacky glue to secure the new screen.
Microfiber Cloth
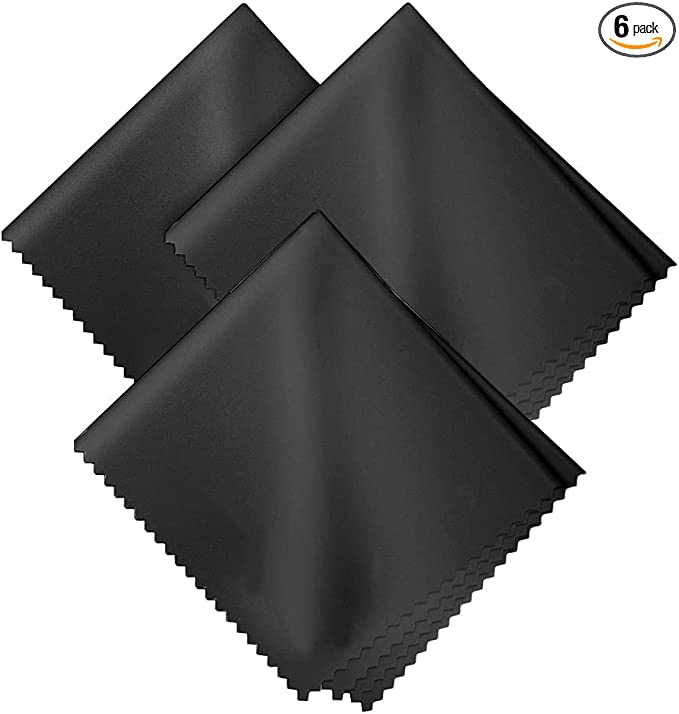
Keep a microfiber cloth nearby to clean the phone’s surfaces and remove dust or fingerprints.
Heat Gun or Hair Dryer
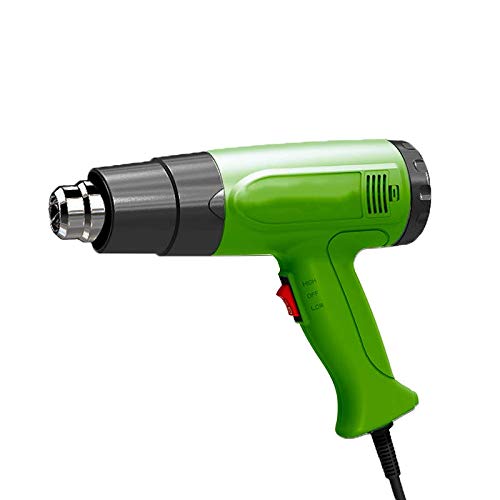
You may need a heat gun or hair dryer to soften the adhesive holding the old screen in place.
When purchasing tools and components ensure they are compatible with the Samsung Galaxy S22 Ultra. It’s important to use tools designed for this model to prevent damage or compatibility issues. Having all the necessary tools and materials ready will streamline the screen replacement process. And it will also ensure a smooth transition to your new screen.
Step#1 Powering Off The Samsung Galaxy S22 Ultra
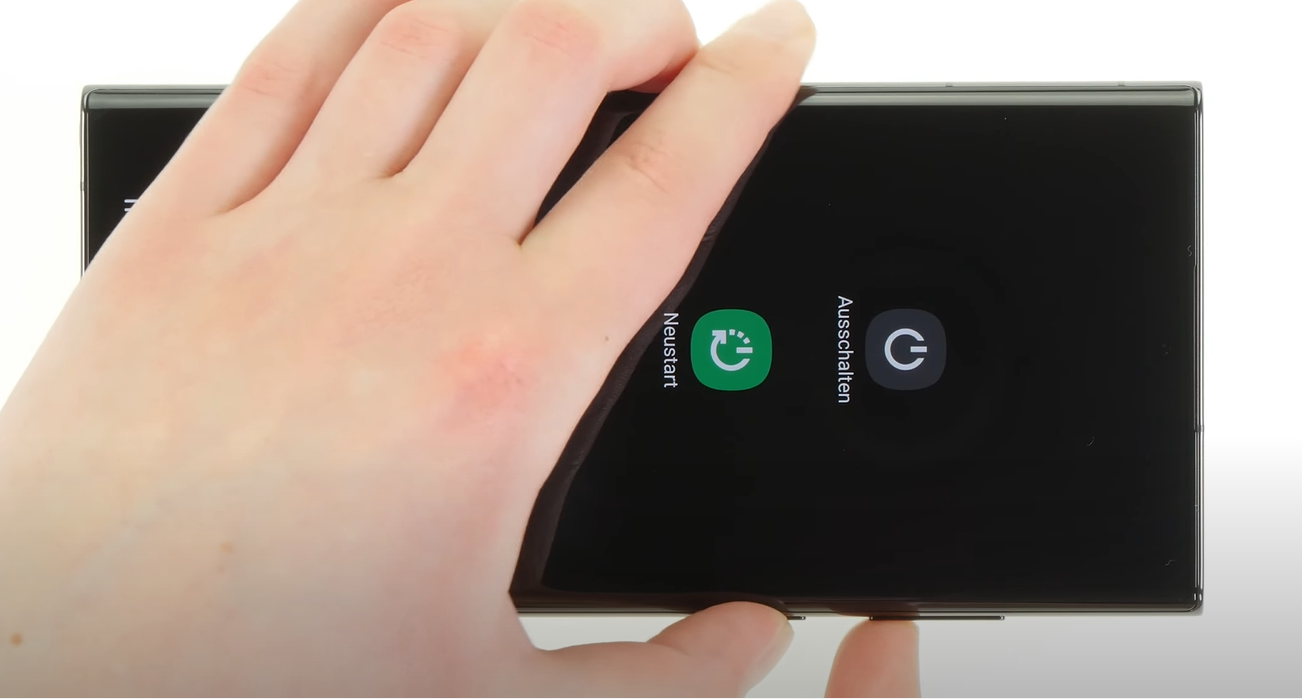
You have two options: software or buttons to power off your Samsung Galaxy S22 Ultra.
Power Off Using Software:
Swipe down the quick settings pane from the top of the screen.
Tap the power icon in the quick settings menu.
In the screen that appears choose the “Power off” option.
Power Off Using Buttons:
Press and hold the power/standby and volume-down buttons simultaneously.
Hold the buttons until the power-off options window appears.
Select the “Power off” option to turn off your Galaxy S22 Ultra.
Step#2 To remove the SIM card tray from your Samsung Galaxy S22 Ultra follow these steps
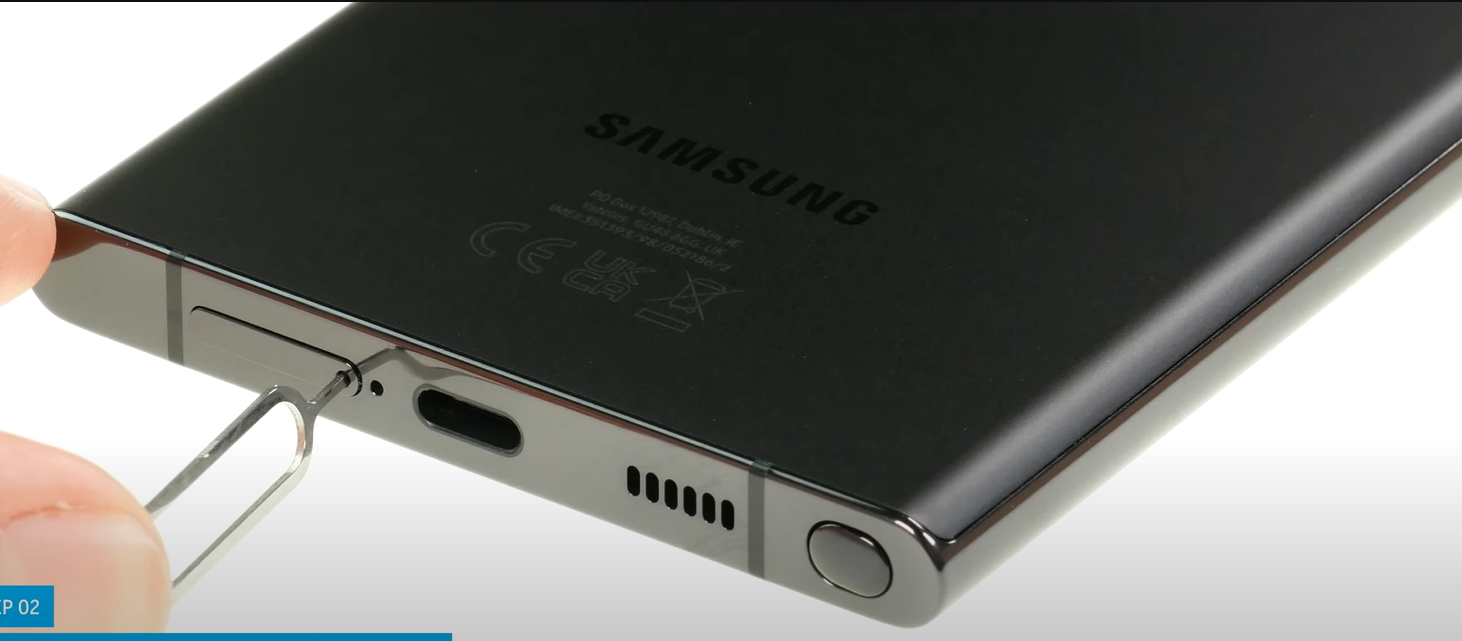
- Locate the SIM card tray slot at the bottom of your S22 set.
- Insert the SIM eject tool or a paperclip into the small hole next to the tray.
- Apply gentle pressure to push the tool into the hole until the tray pops out slightly.
- Carefully pull the tray from the slot using your fingers or the tool.
- Remove the SIM card from the tray.
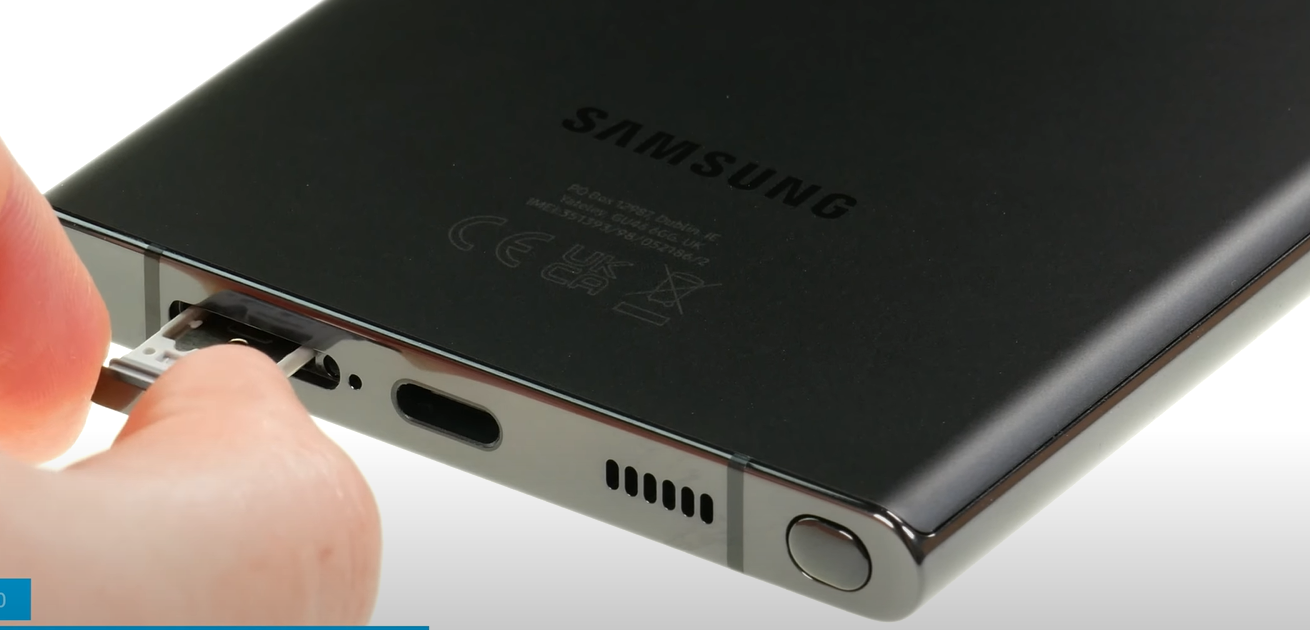
Handle the SIM card tray carefully to avoid bending or damaging it. If you accidentally put the SIM eject tool in the wrong hole like a microphone hole don’t worry! You probably didn’t harm the microphone. Just be more careful next time and insert the tool in the correct slot when removing the SIM card tray.
Step#3 Remove the Stylus
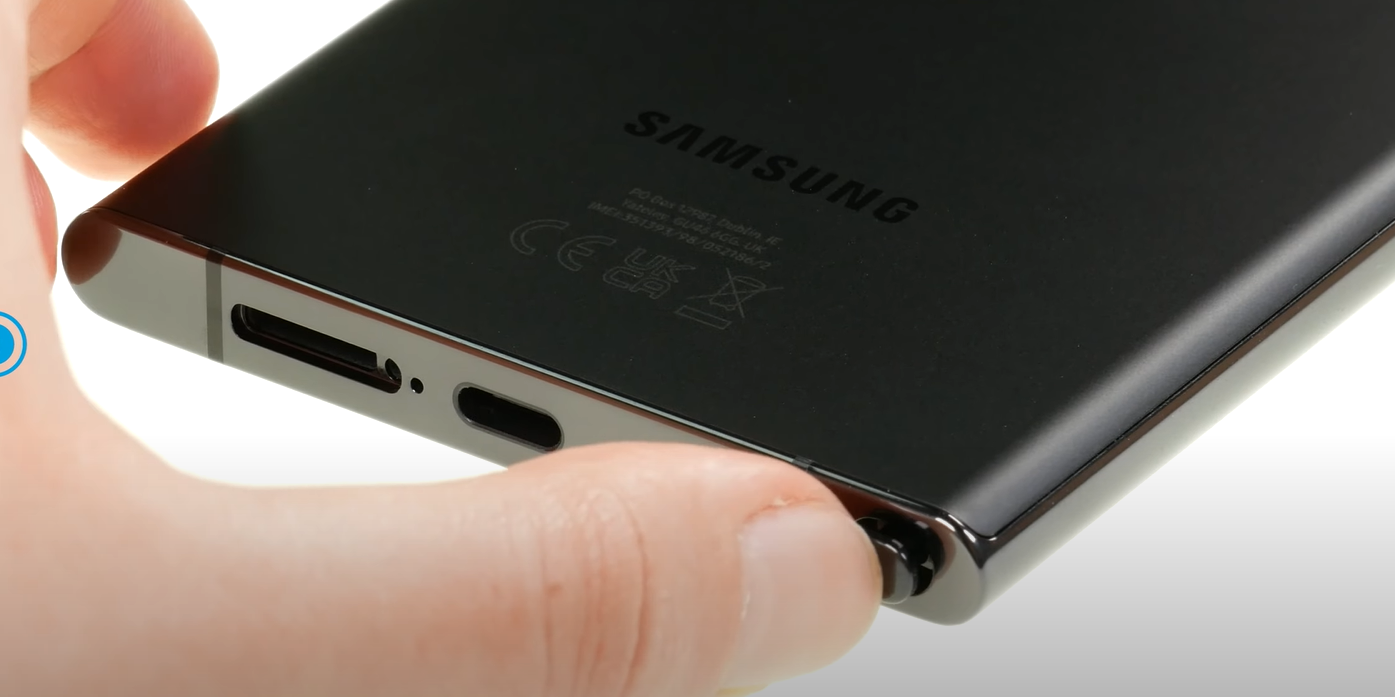
Press the button at the bottom of the stylus to activate the ejection mechanism. This will cause the stylus to come out of its slot partially. Carefully remove the stylus from the device ensuring a gentle and steady motion. Keep the stylus safe to avoid misplacement during the screen replacement process. These steps will allow you to proceed with the screen replacement smoothly and effectively.
Step#4 Start Heating
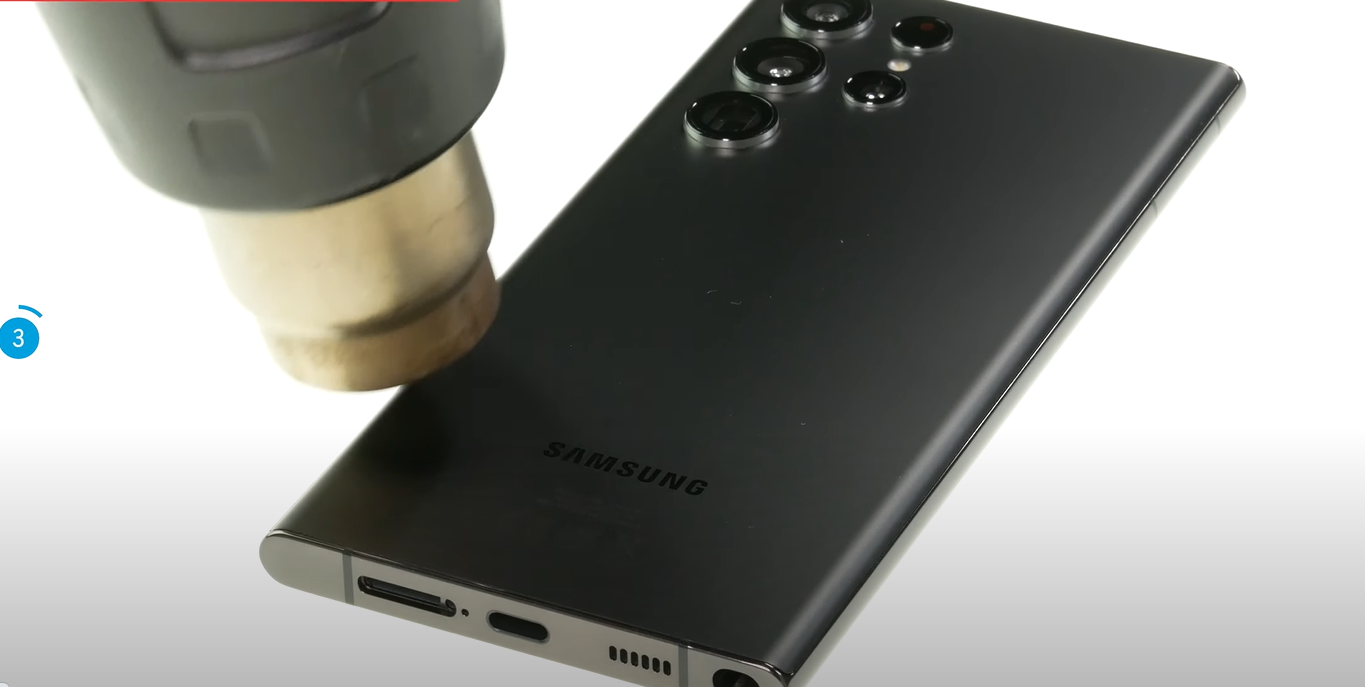
Begin heating the right side of the Samsung Galaxy S22 Ultra using a heat gun or hair dryer. Apply heat evenly and gradually to loosen the adhesive that secures the screen. Make sure to keep the heat source at a safe distance to prevent damage. The heat will help soften the glue and make separating the screen from the phone easier. Take your time and ensure that the heat is evenly distributed along the right side of the S22 Ultra. This step is crucial in preparing the screen for removal and replacement.
Step#5 Remove the Cover By Using the Opening Tool
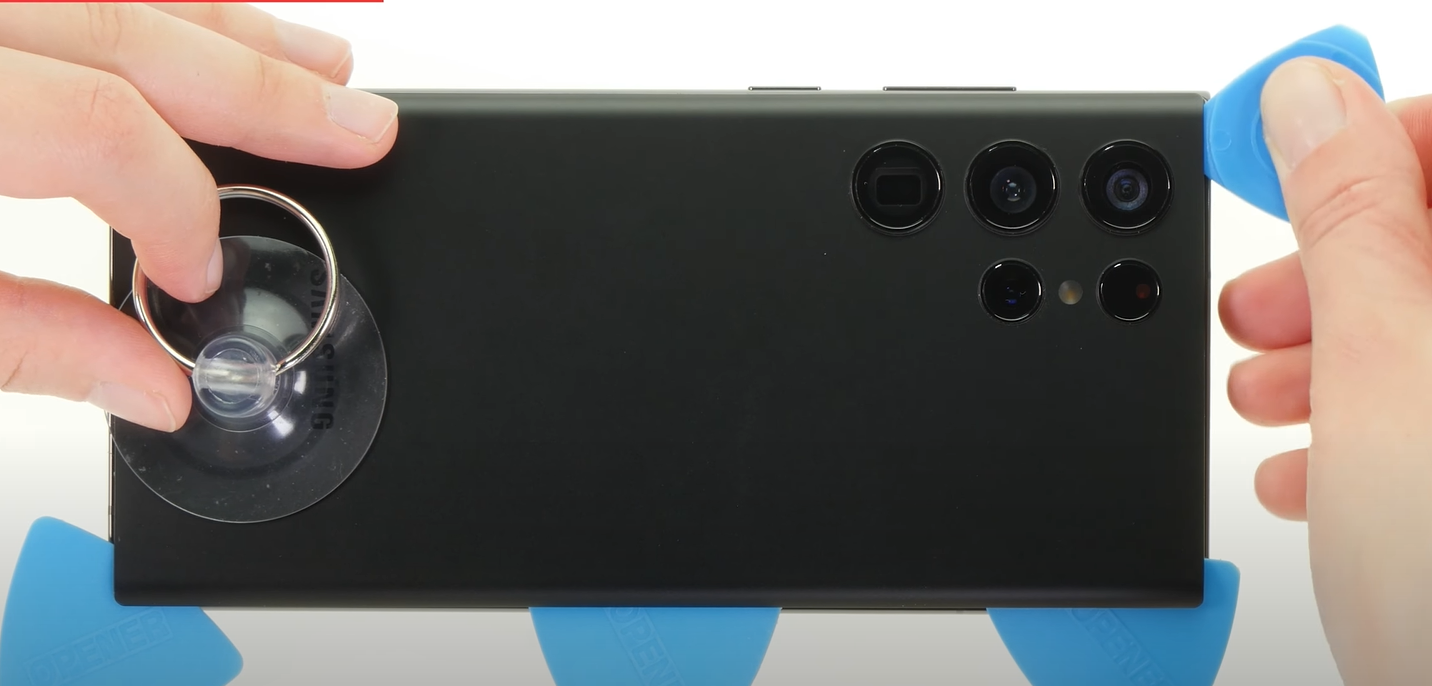
Attach a suction handle to the back cover near the right edge’s center. Apply firm and steady upward force to create a gap between the cover and frame. If you encounter resistance reapply the heat or follow the heating instructions to prevent overheating. Once a gap is created carefully insert an opening pick into the hole. Move the selection along the edge applying gentle pressure to separate the back cover from the frame gradually. Take your time and be cautious not to damage any components. This step allows access to the interior features and prepares the mobile phone for further disassembly.

While You Wait For The Glue To Soften Remember The Following
- The back cover is stuck to the phone’s edges with strong adhesive.
- The adhesive is toughest in the bottom right and top left corners.
- Being aware of this will help you handle the phone carefully during disassembly.
- Take extra caution when working around these corners to avoid any accidental harm.
- Remembering these points you can confidently replace the screen without any issues.
Slice The Right Adhesive
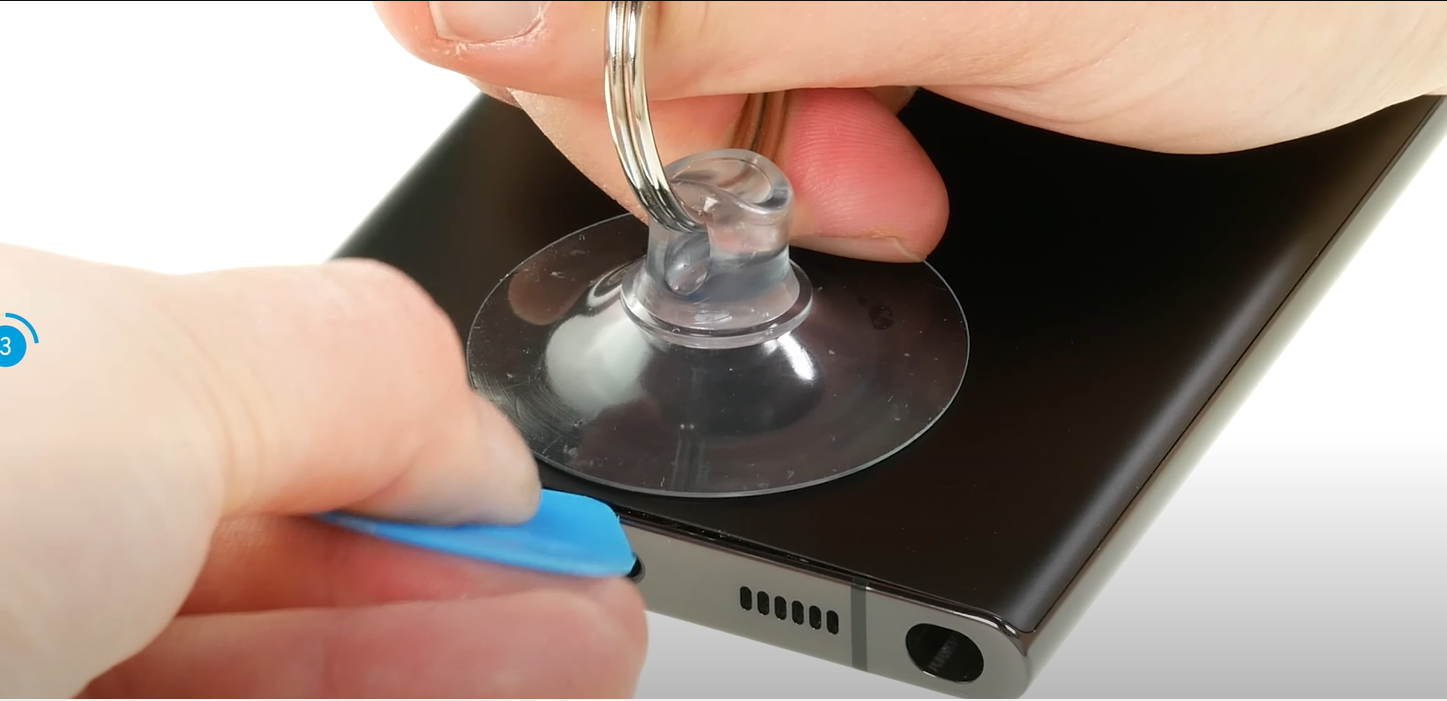
Carefully cut through the adhesive by sliding the pick back and forth along the right edge.
To prevent the adhesive from resealing insert the pick near the right edge’s bottom.
Doing this ensures that the back cover remains separated and can be easily removed for screen replacement.
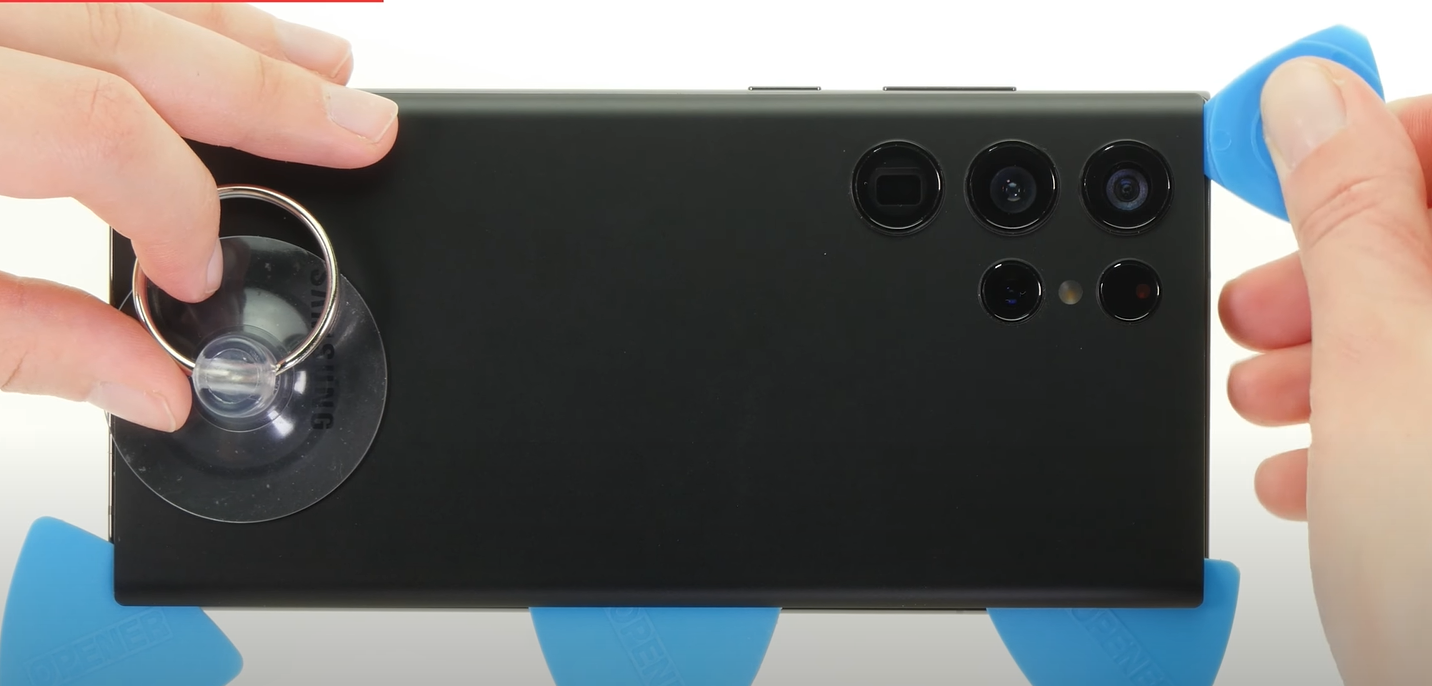
This step is important in maintaining the goodness of the adhesive and avoiding any unnecessary damage.
With the pick in place you can proceed with confidence to the next steps of the screen replacement process.
Heat the Bottom Edge Of The Galaxy S22 Ultra
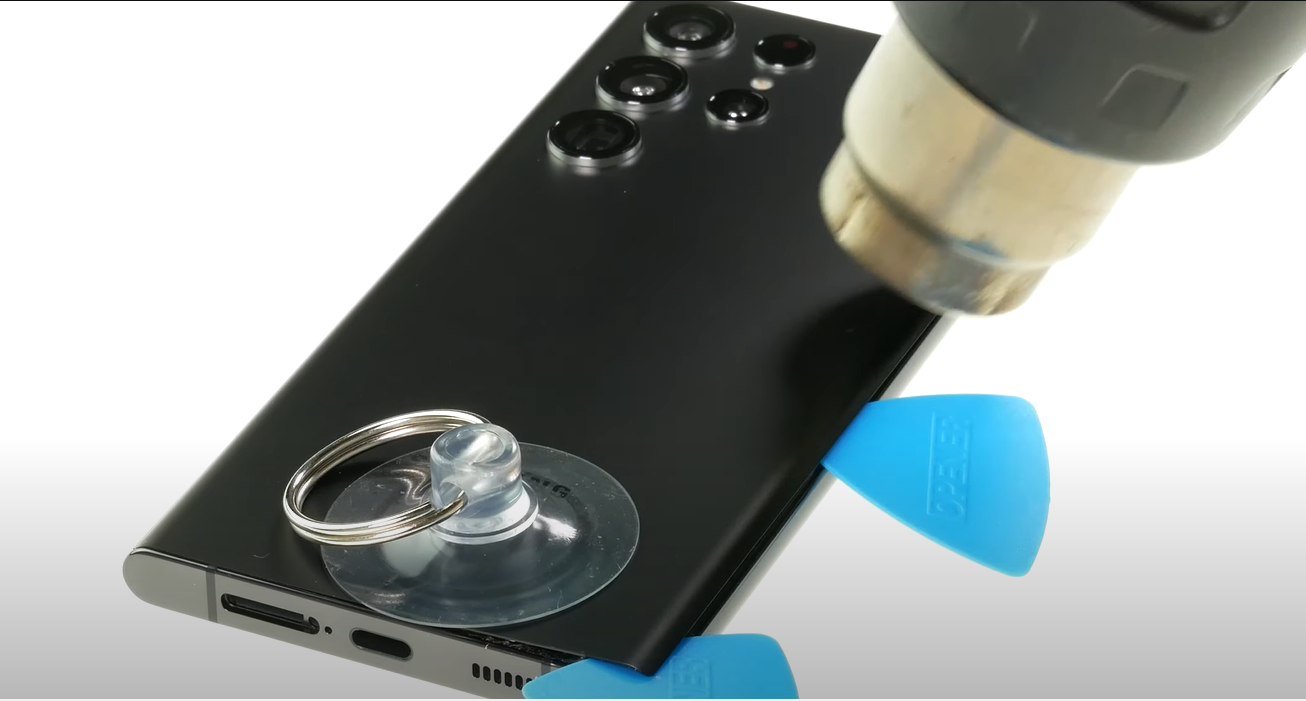
Apply heat to the bottom edge of the Galaxy S22 Ultra using a heat gun or dryer. Gently move the heat source back and forth to distribute the heat evenly. Be cautious not to overheat the mobile as excessive heat can damage the components.
Separate The Corner Adhesive
Carefully insert a second opening pick into the bottom right corner of the device. Adjust the angle of the pick to match the curved edge and gently rotate it around the corner. Practice caution when slicing around the corners as the glass in this area is extremely delicate. Take your time to ensure the glass does not crack during the process.
Use the opening pick to slide along the bottom edge carefully. It is then reaching the bottom left corner to cut through the adhesive. Keep the pick at the bottom left corner to prevent the glue from sticking again. This will ensure a smooth and successful removal process.
Heat The Left Edge
Now gently give heat to the left edge of the back cover using a heat gun or dryer. This will help soften the adhesive and make separating the cover from the device easier. Take care to apply heat evenly and avoid overheating.
To ensure a smooth separation and prevent damage repeat the heating process. Use the opening tool on all sides of the phone. This step-by-step approach will help you separate the corners smoothly. It will also minimize the risk of harm to the device. Take your time carefully to achieve the best results during the disassembly process.
Step#6 Removing The Back Cover
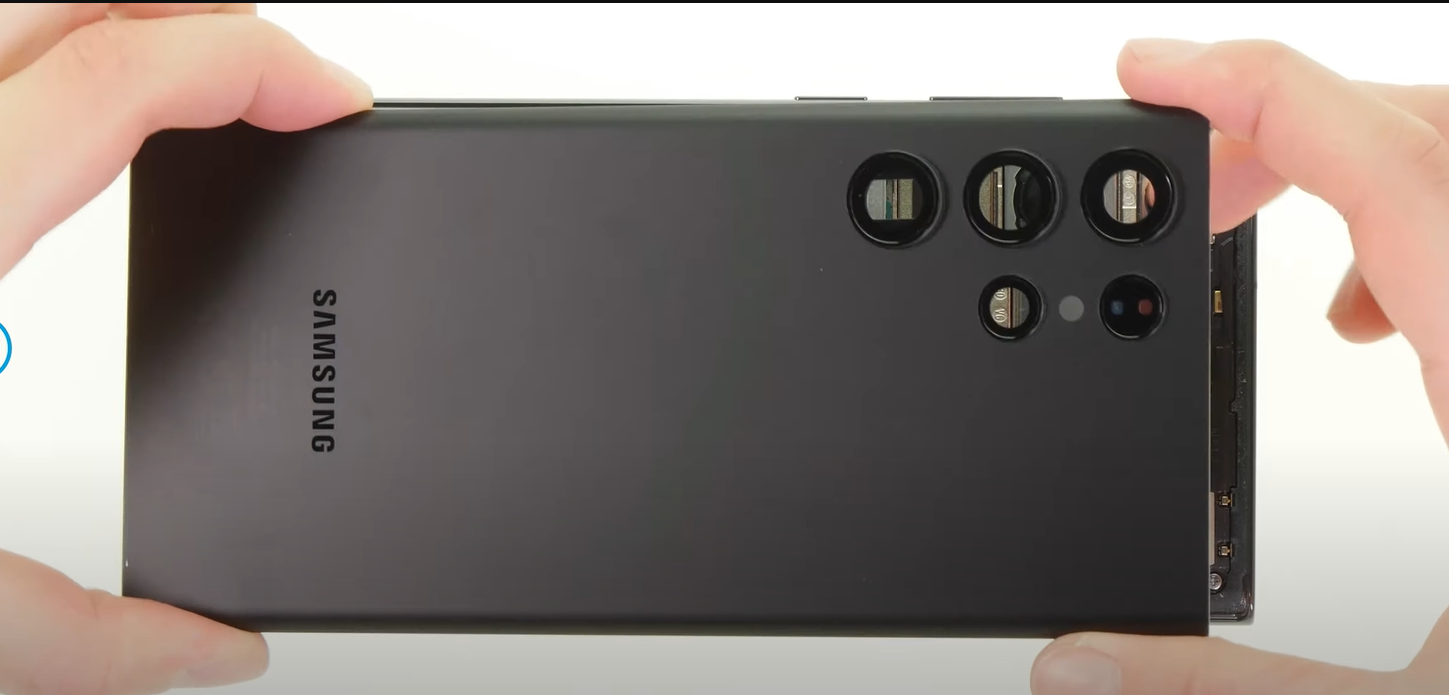
Gently grasp and lift off the back cover of your phone. If the cover is stuck carefully insert an opening pick along the edges to release it completely. This step ensures safe access to the internal components for further repairs or replacements. Make sure to handle the back cover with care to avoid any damage.
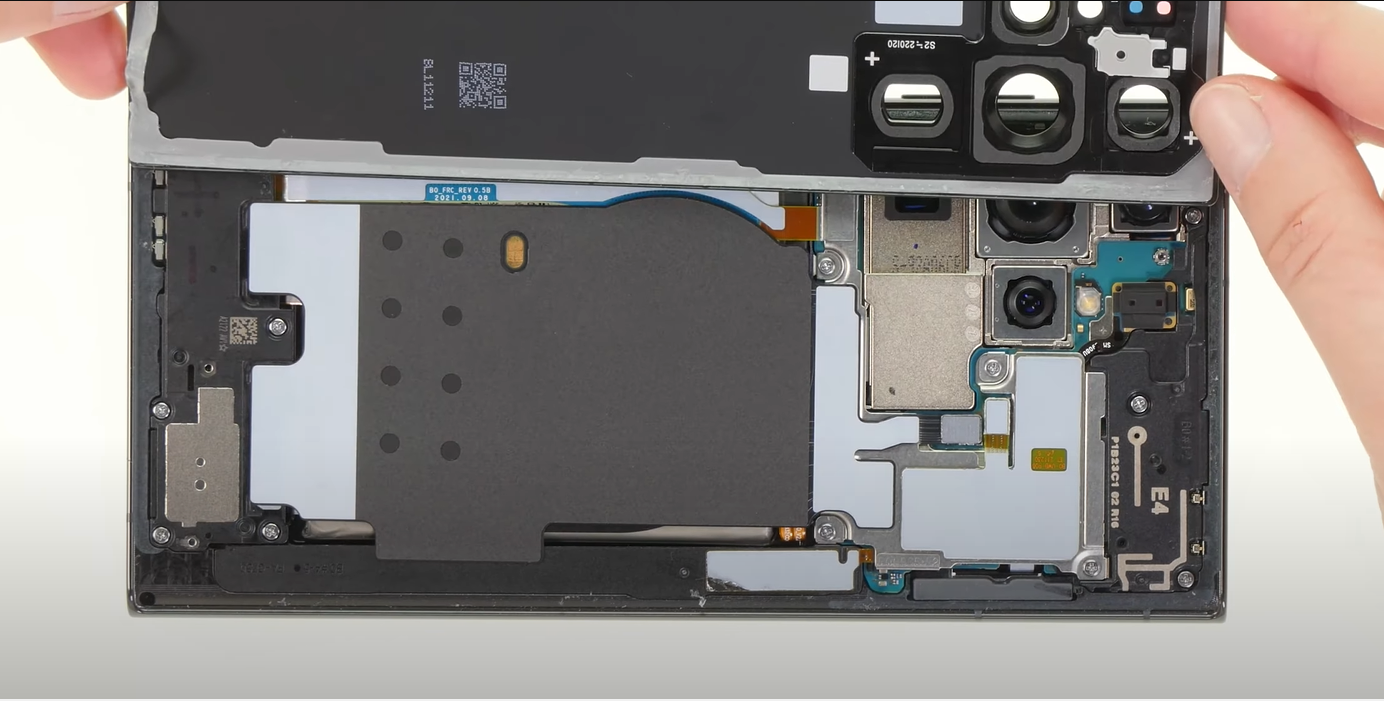
Now that the back cover is removed you can proceed with the screen replacement process.
Step#7 Remove Wireless Charging Coil
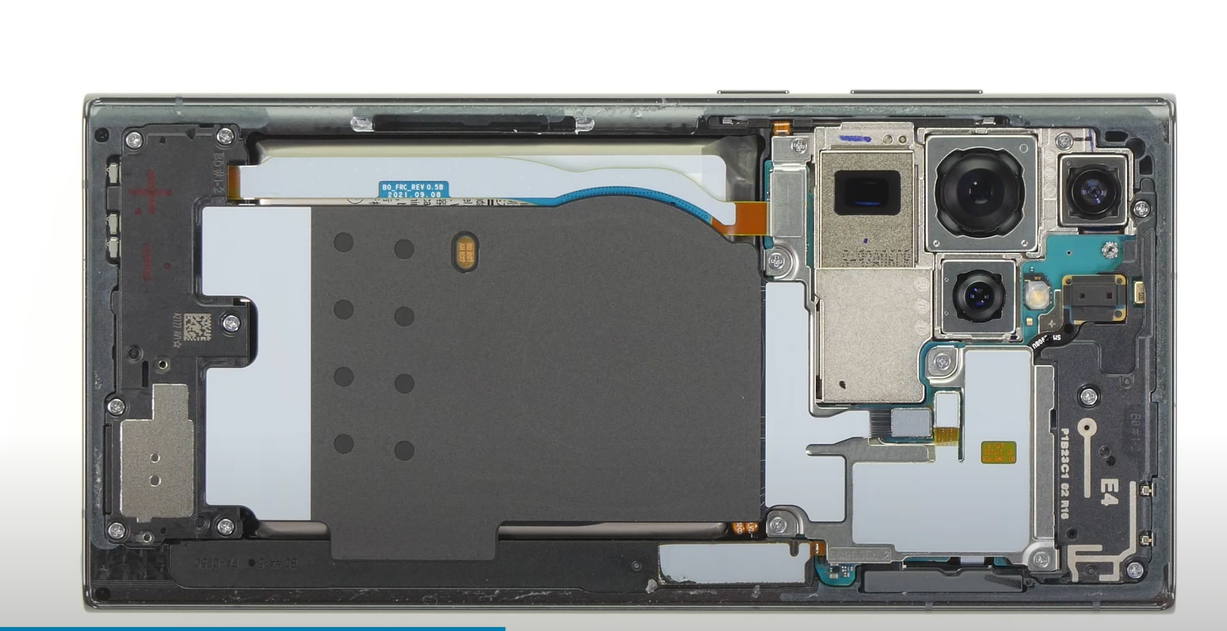
Gently insert an opening pick between the right edge of the wireless charging coil and the battery. Slide the pick along the right edge carefully separating the adhesive that holds them together. This step allows for safely removing the wireless charging coil without damaging the battery.
Step#8 Disconnect The NFC Antenna
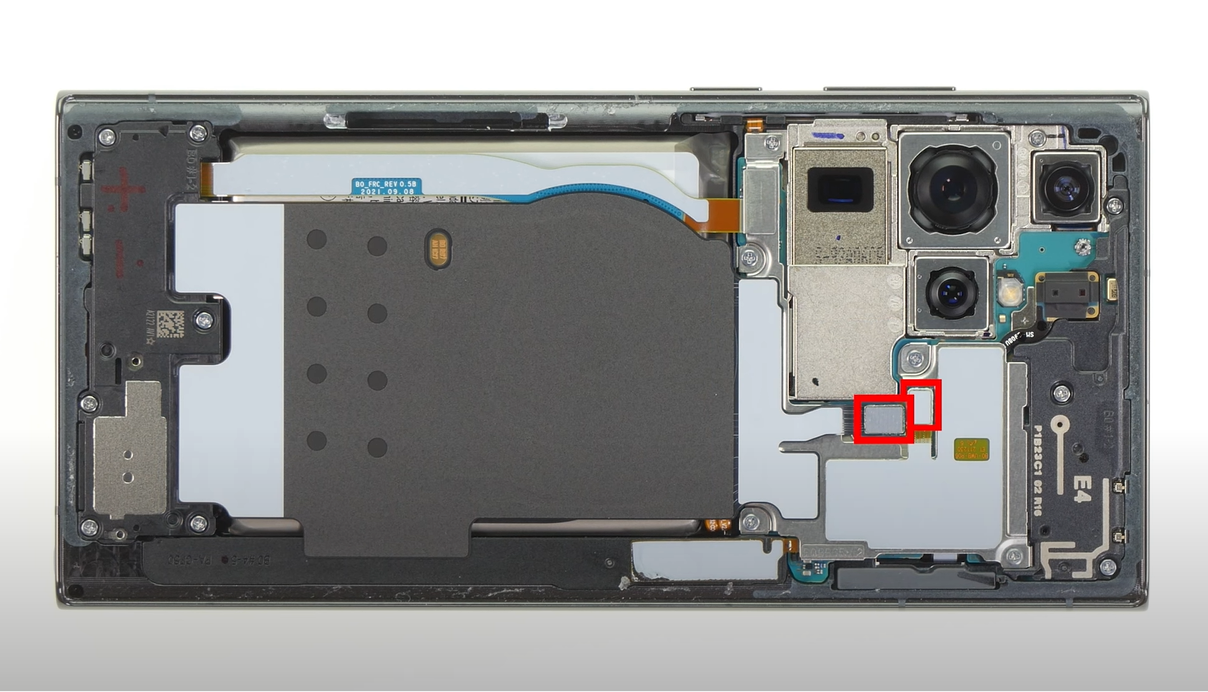
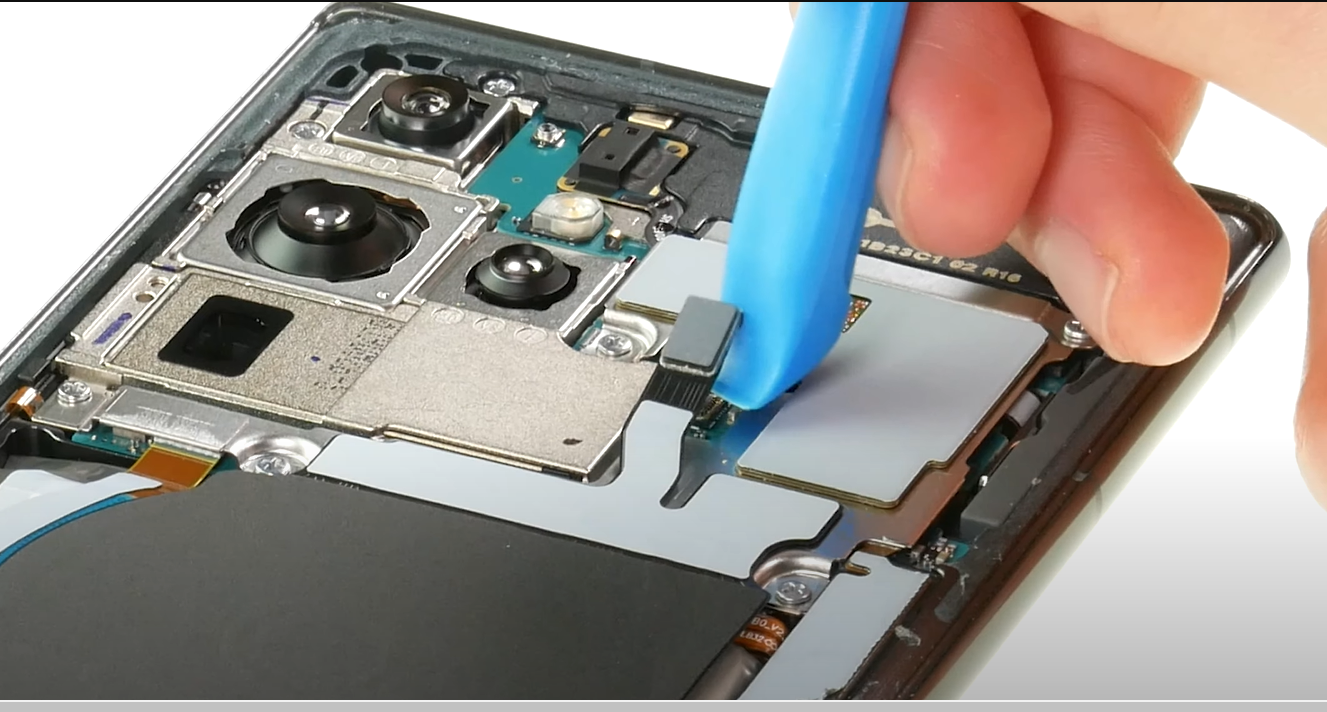
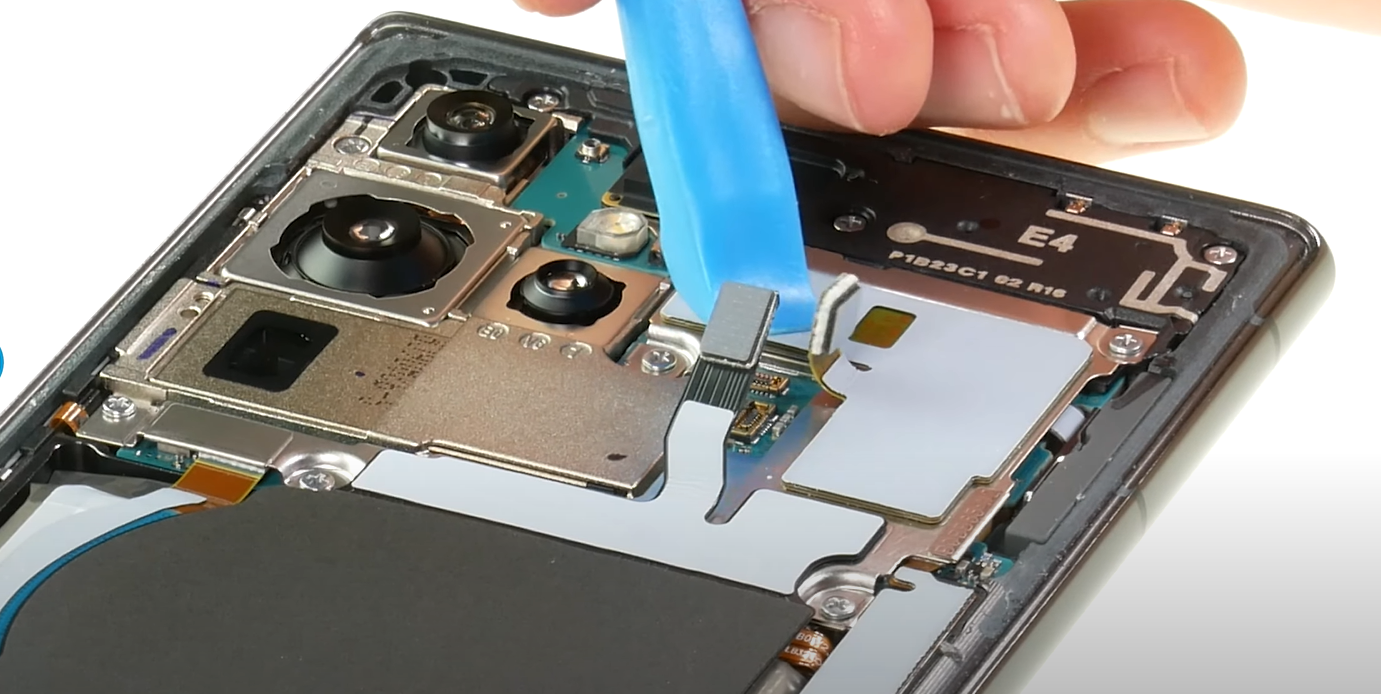
Carefully use a spudger to pry and disconnect the press connector of the NFC antenna from the motherboard. Be gentle and apply consistent pressure to ensure a safe disconnection without causing any harm. By completing this step you will be able to safely remove the NFC antenna and proceed with replacing the screen.
Step#9 Unscrew The Mobile Phone
Unscrew Nfc Antenna And Charging Coil
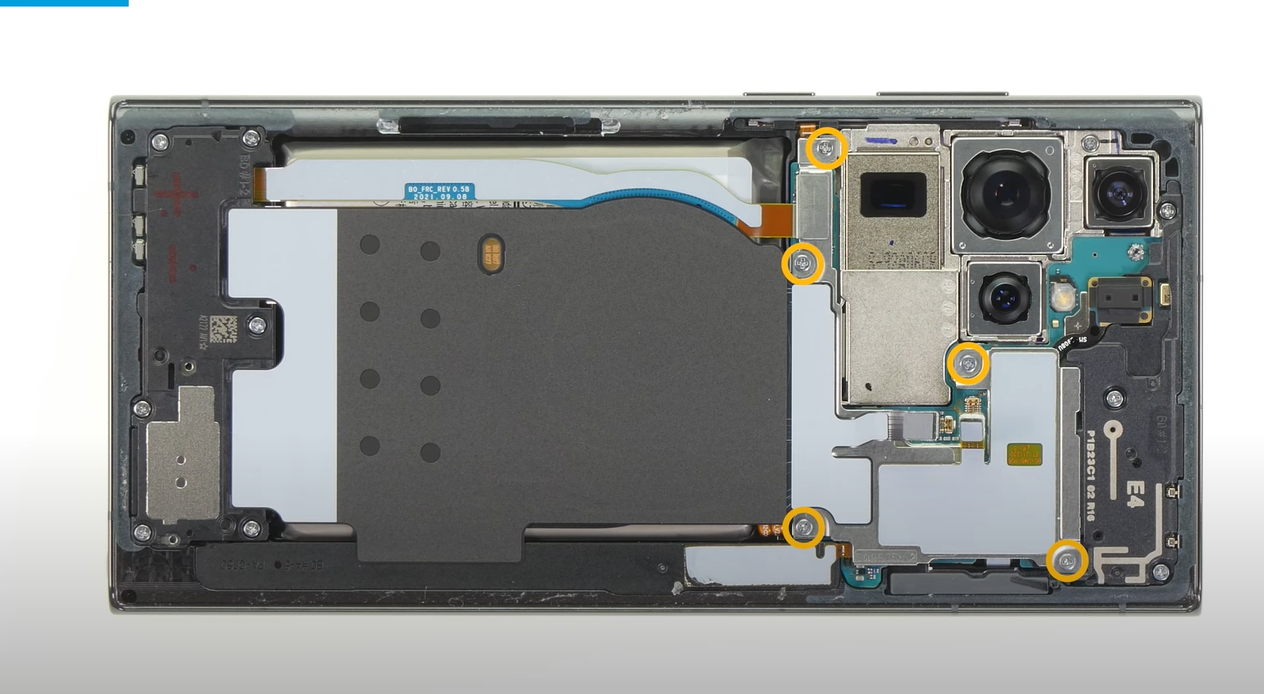
Grab your Phillips screwdriver and unscrew the five 3.5 mm-long screws holding the NFC antenna and charging coil. With a firm grip carefully turn the screws counterclockwise until they are fully loosened and can be easily removed.
Open Loud Speaker’s Screws
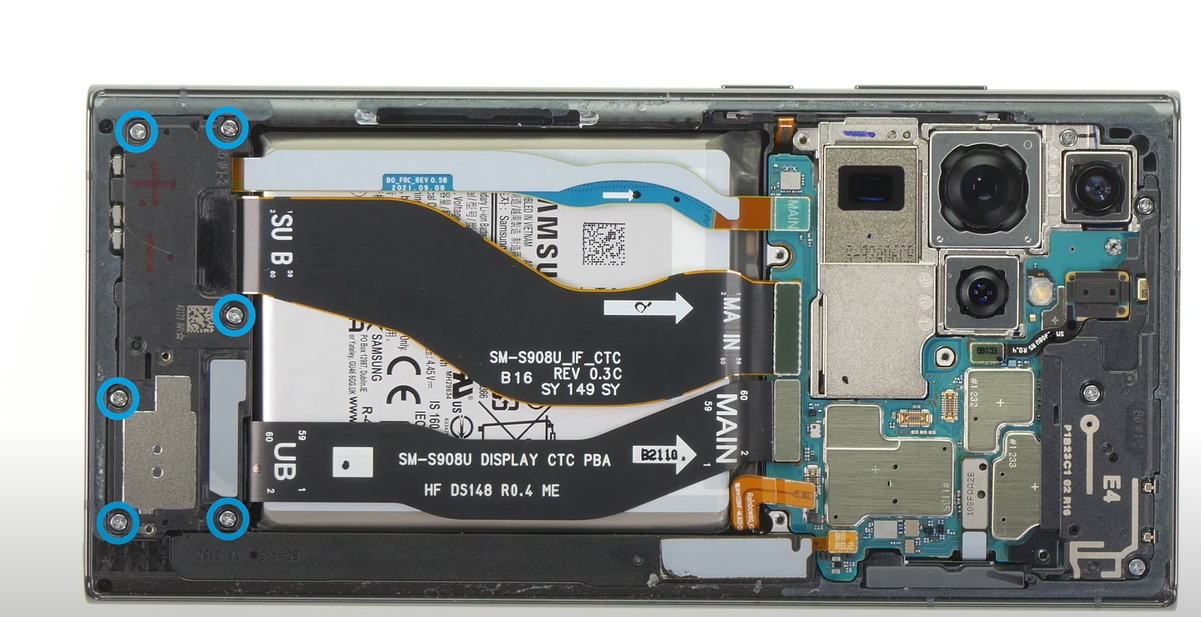
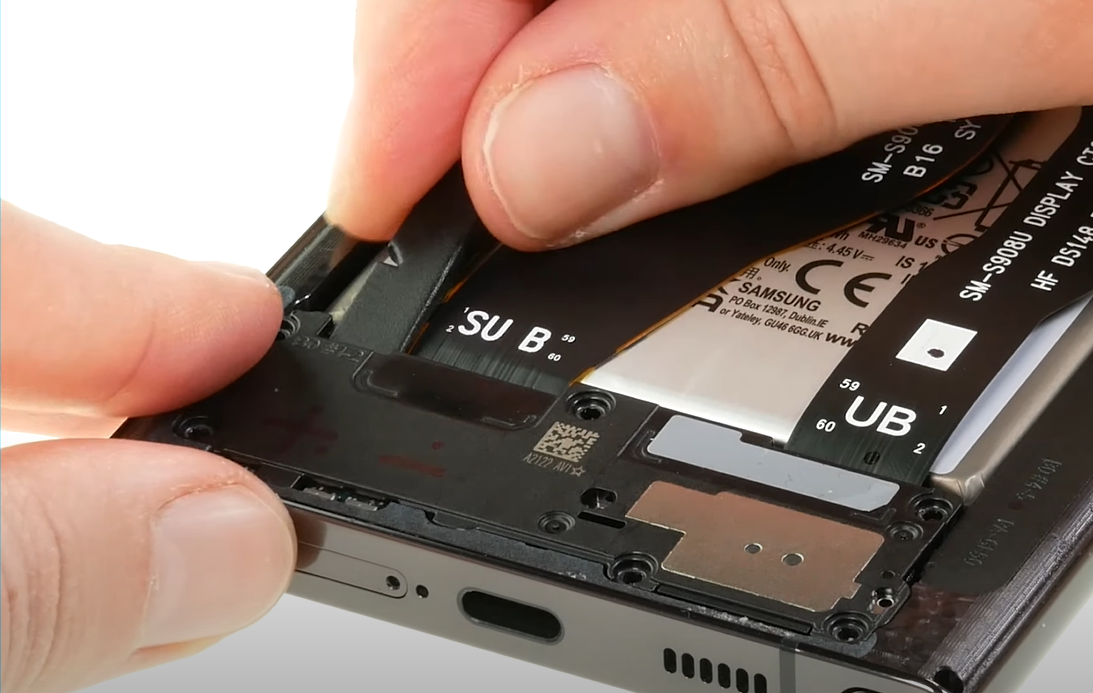
Take your Phillips screwdriver and remove the six 3.5 mm screws that hold the loudspeaker.
Unclip the Loudspeaker
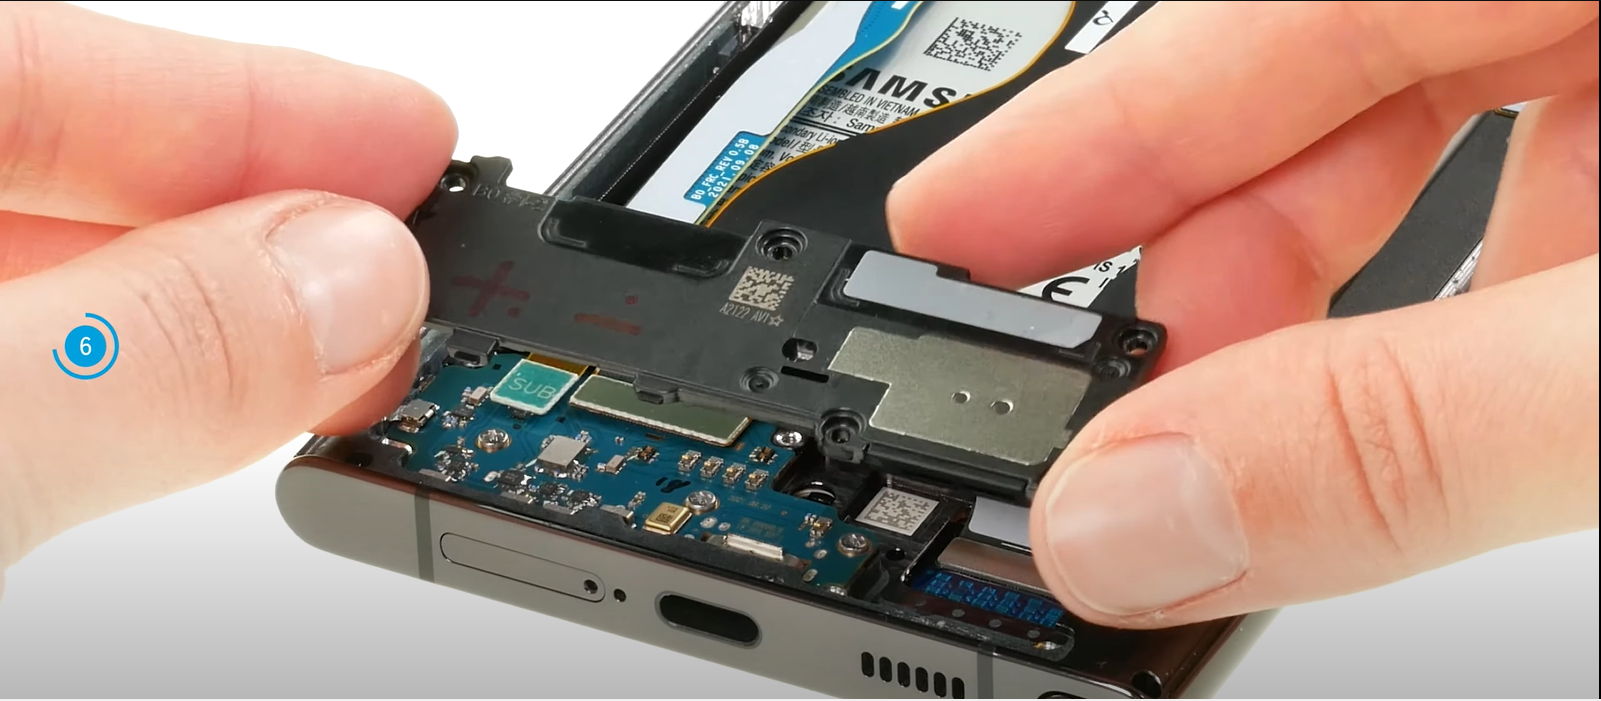
Using the spudger’s pointed end carefully insert it between the upper right corner of the loudspeaker and the frame. Apply upward pressure to unclip the loudspeaker from the bracket ensuring not to pry against the battery. For better leverage utilize the protrusions present in the frame which will help you separate the loudspeaker more effectively.
Remove the Charging Coil and Loudspeaker Assembly
Gently grasp and lift the NFC wireless charging coil and loudspeaker components away from the frame. Remember that the wireless charging coil securely holds these parts in place. Ensure a steady grip as you remove them.
Disconnect Battery Connector
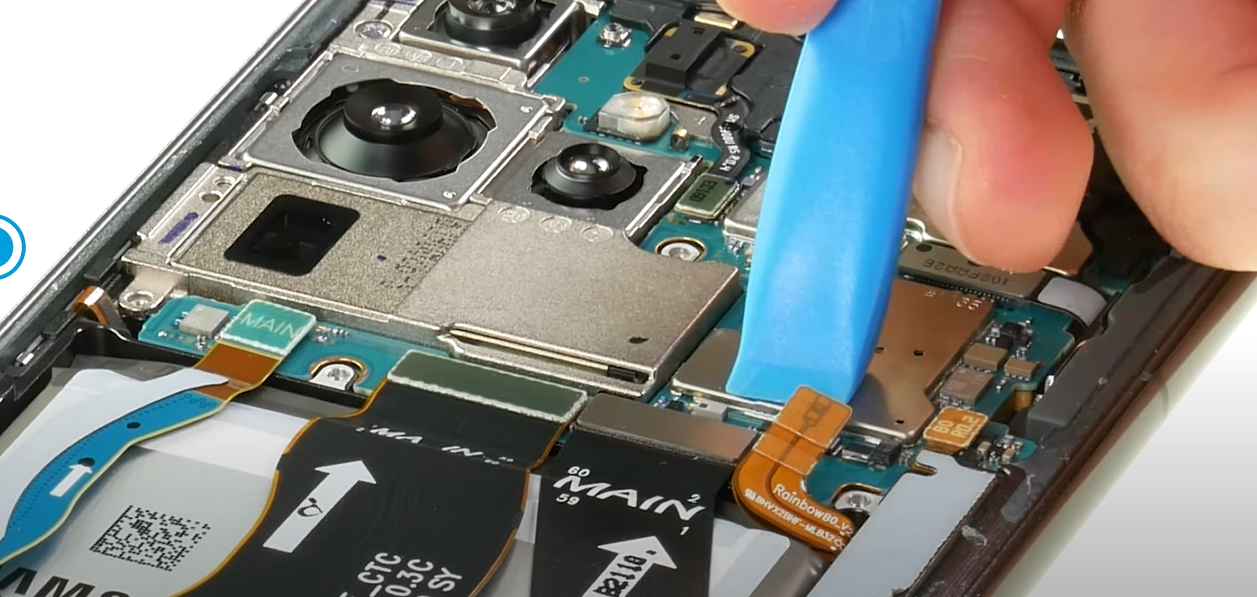
Insert the pointed tip of your spudger tool underneath the battery press connector. Carefully lift and separate the battery press connector from its socket, disconnecting it from the motherboard.
Disconnect The Lower 5g Mmwave Antenna
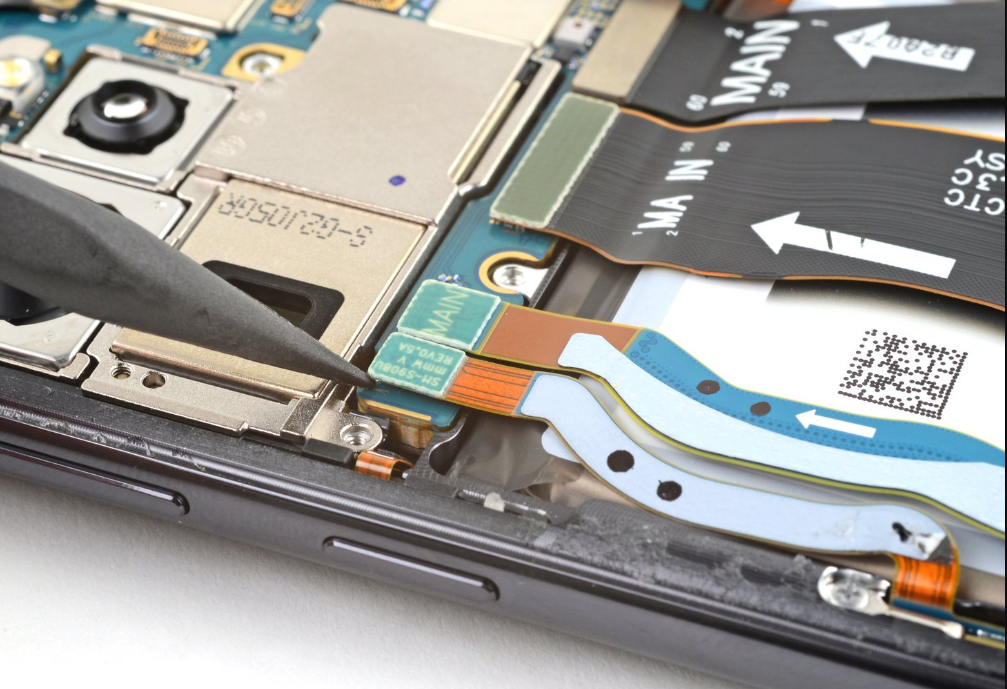
Gently insert the pointed tip of the spudger underneath the lower 5G mmWave antenna press connector. Apply slight upward pressure to disconnect the press connector from its socket separating it from the motherboard.
Unscrew The Lower 5g Mmwave Antenna And Remove
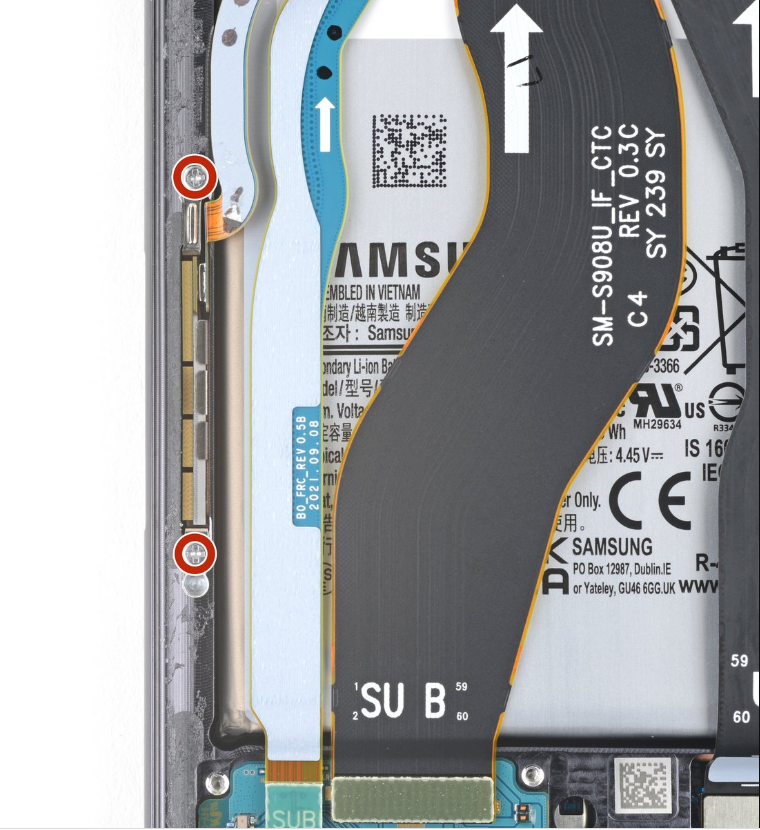
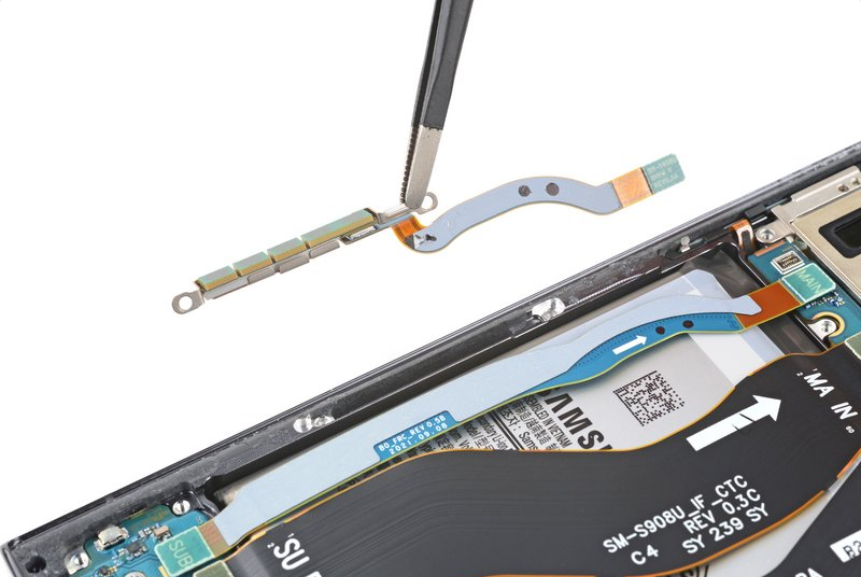
Using your Phillips screwdriver carefully unscrew and remove the two 3.5 mm-long screws. These screws secure the antenna bracket.
Carefully insert the pointed end of the spudger between the lower screw mount of the antenna bracket and the frame. Gently pry upward on the bracket to lift it making it easier to grip with tweezers or your fingers. Remove the lower 5G mmWave antenna cautiously, ensuring a smooth and steady extraction.
Disconnect the upper 5G mmWave antenna And Remove
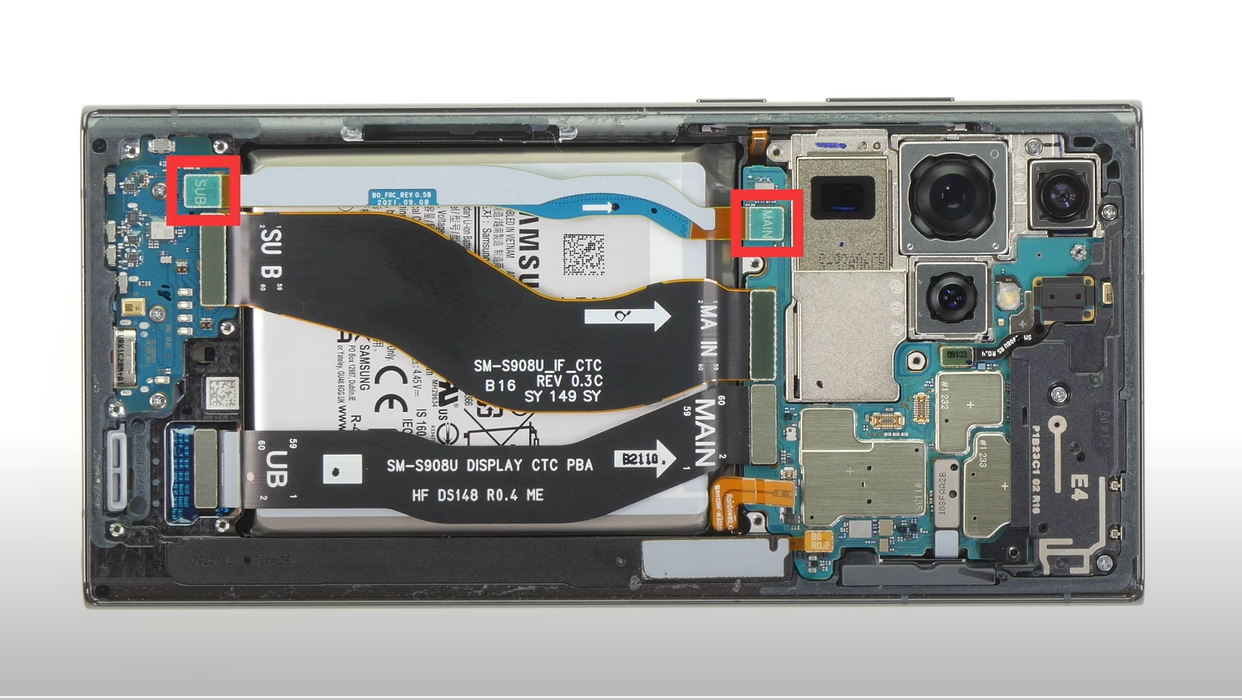
Gently use the pointed end of the spudger to lift and disconnect the connector of the upper 5G mmWave antenna.
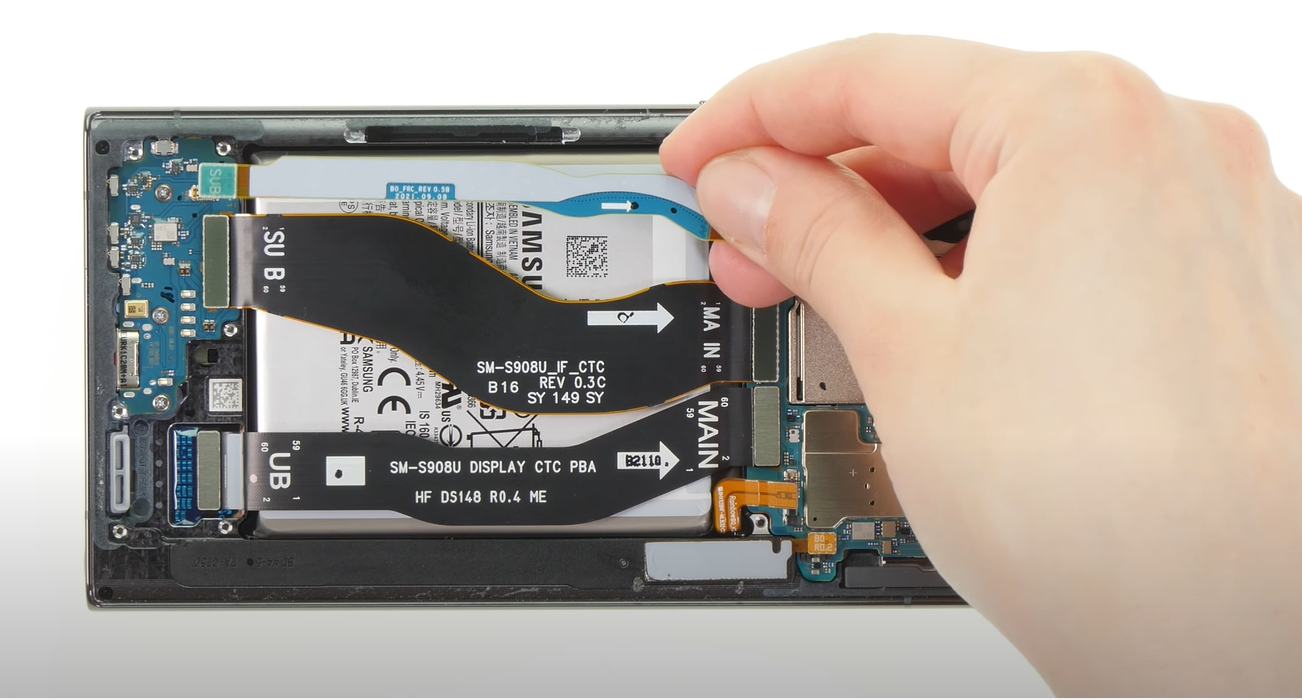
Now insert the pointed end of the spudger into the gap between the bottom edge of the 5G mmWave antenna and the motherboard. Carefully pry the antenna out of its recess until you can easily grasp it with your fingers or tweezers. If the antenna is stuck apply heat to soften the adhesive. Remove the upper 5G mmWave antenna cautiously ensuring a smooth and careful extraction.
Step#10 Disconnect The Interconnections And Remove Them
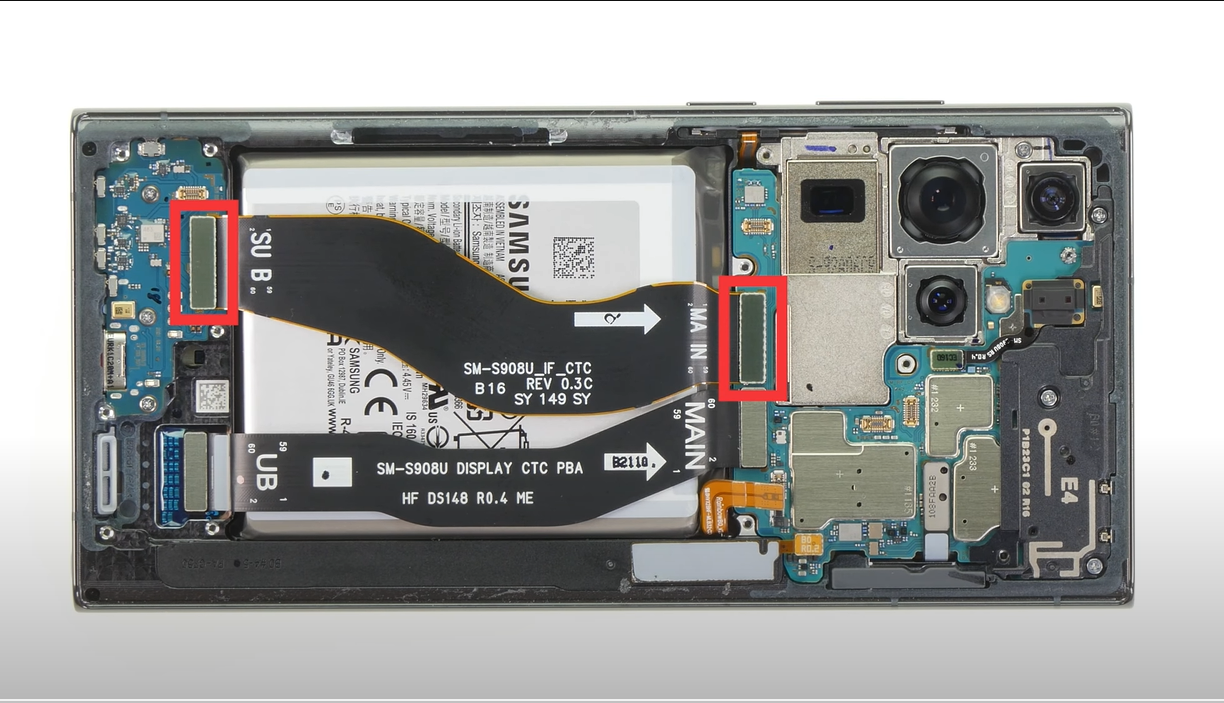
To disconnect the primary interconnect cable from the motherboard gently pry it up using the pointed end of your spudger. Similarly repeat the process for the secondary interconnect cable to the left of the primary line. Use the sharp end of the spudger to carefully lift and disconnect the primary interconnect cable from the charging board. Once disconnected grab and remove both interconnect cables from the frame ensuring a safe removal.
Step#11 Unscrew Charging Board
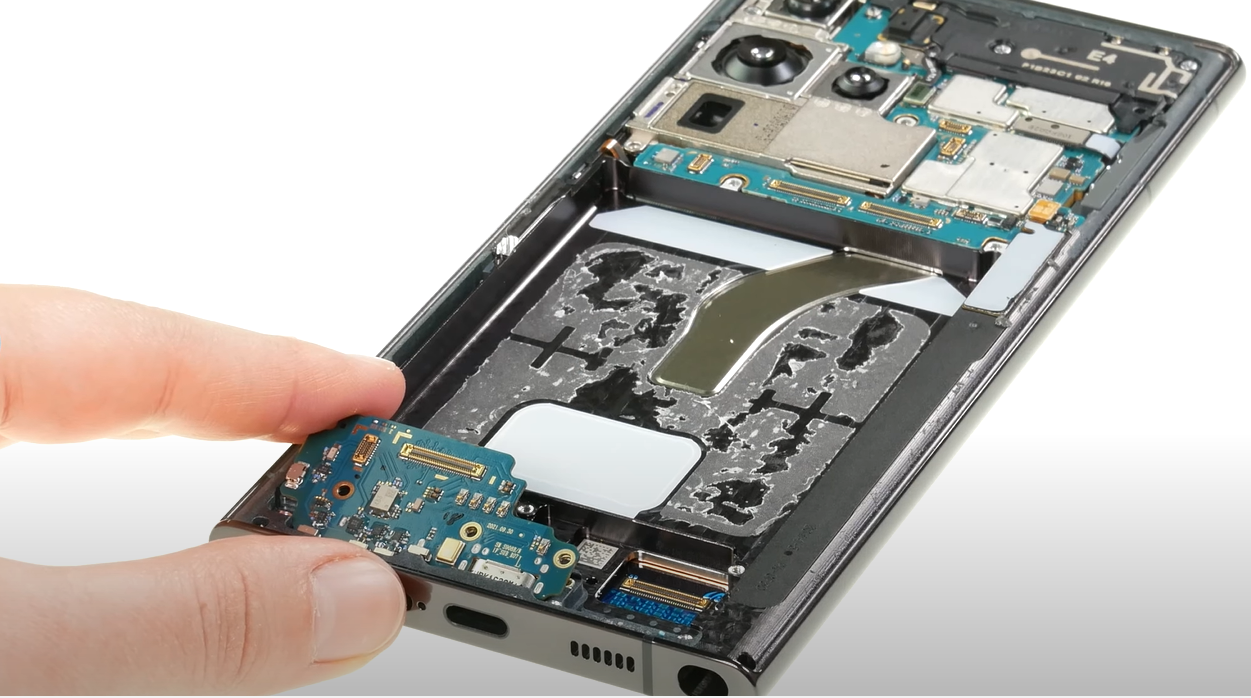
Using your Phillips screwdriver unscrew the three 3.5 mm-long screws that secure the charging board in place. Carefully pry up the charging board by inserting the pointed end of your spudger under it opposite the USB-C port. Lift the board until you can grip it, then remove it from its recess in the frame. Hold the charging board by its corners and slide it out of the recess. This will completely detach and remove the charging board from the Samsung Galaxy S22 Ultra.
Step#12 Disconnect The Laser AF Module
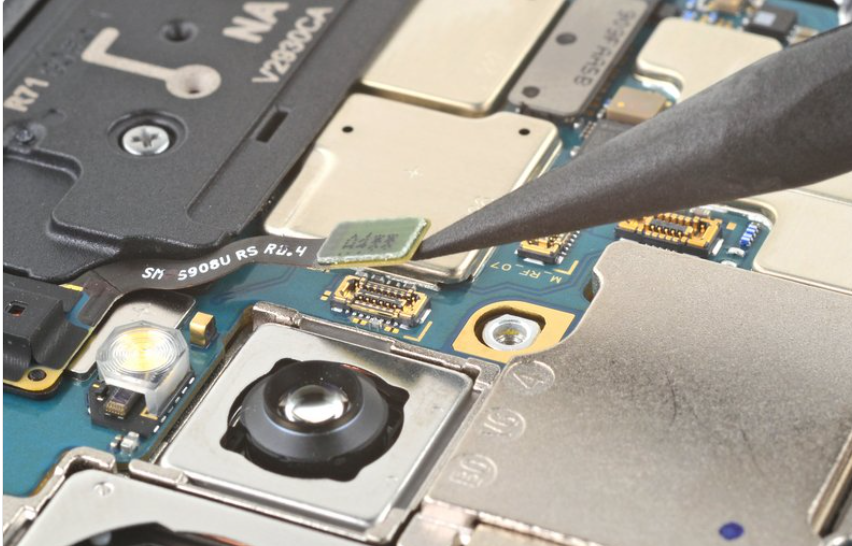
Take the pointed end of your spudger and gently pry up the press connector of the laser autofocus module. Carefully disconnect the connector by pulling it away from the module. You will detach the laser autofocus module from the Samsung Galaxy S22 Ultra.
Step#13 Open The MotherBoard Shield
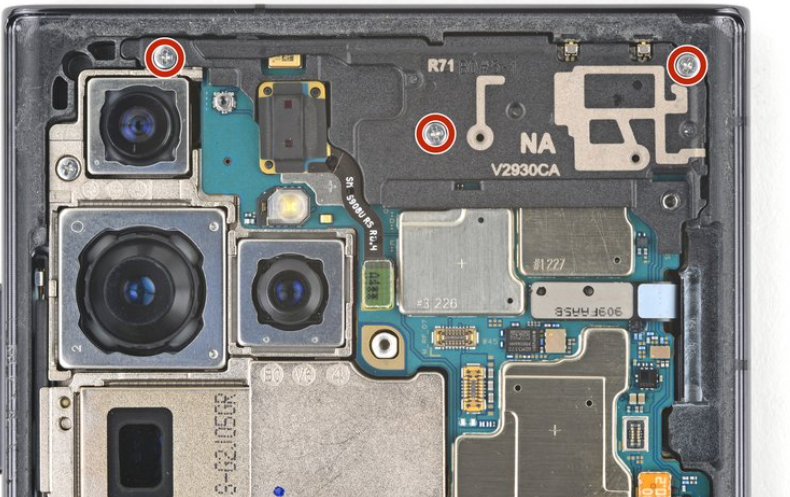
Take a Phillips screwdriver and remove the three 3.5 mm-long screws that secure the motherboard cover. Open each screw carefully and set them aside for later use. By removing these screws you can access the motherboard of your Samsung Galaxy S22 Ultra.
Remove Motherboard Cover And Laser AF Module
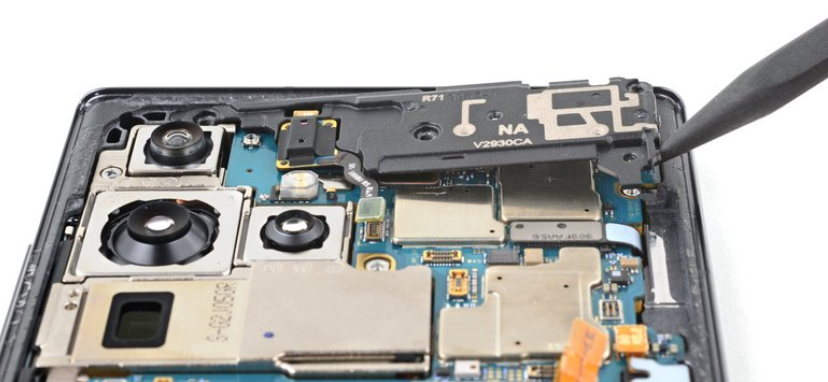
Take your spudger and insert its pointed end between the bottom right corner of the motherboard cover and the frame. Gently pry up on the cover to unclip it from the bracket. Once unclipped carefully remove the motherboard cover exposing the motherboard underneath. Additionally remove the laser autofocus (AF) module. Handle these components with care to avoid any damage.
Step#14 Disconnect Front Facing Camera And Finger Print Reader
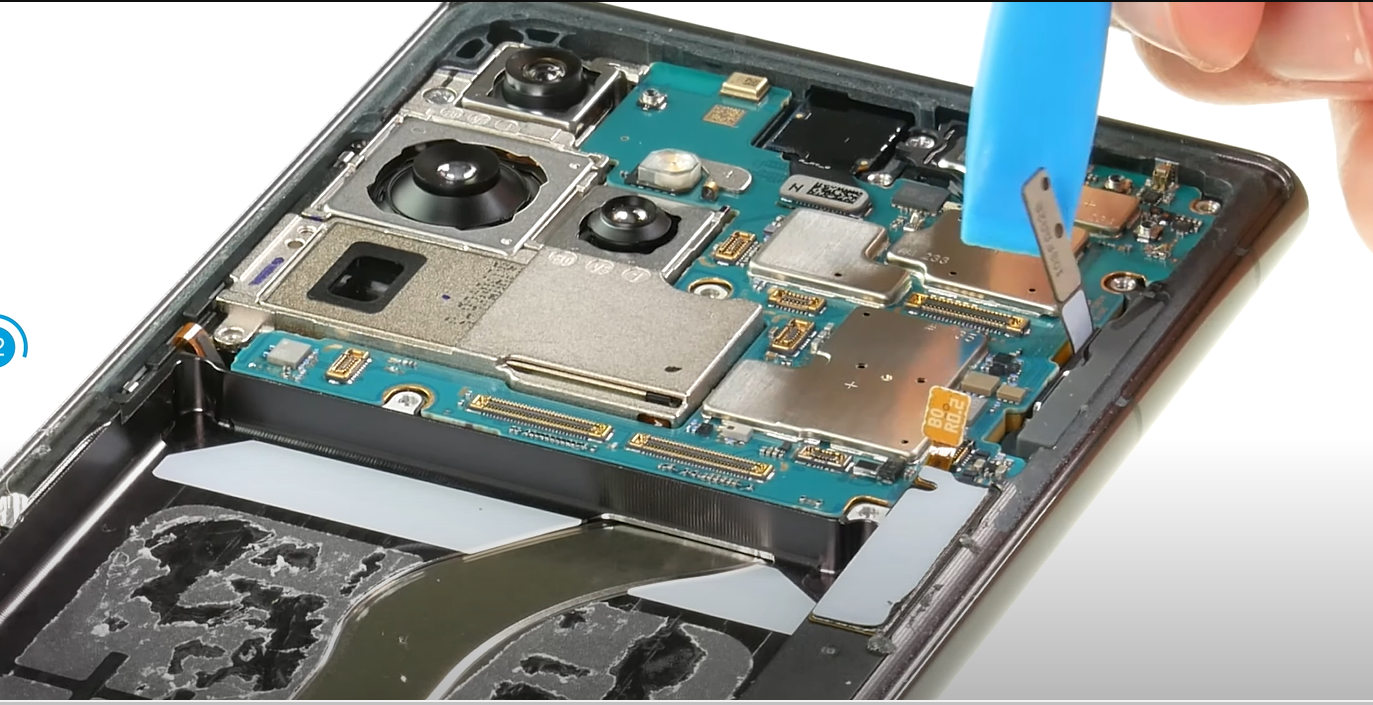
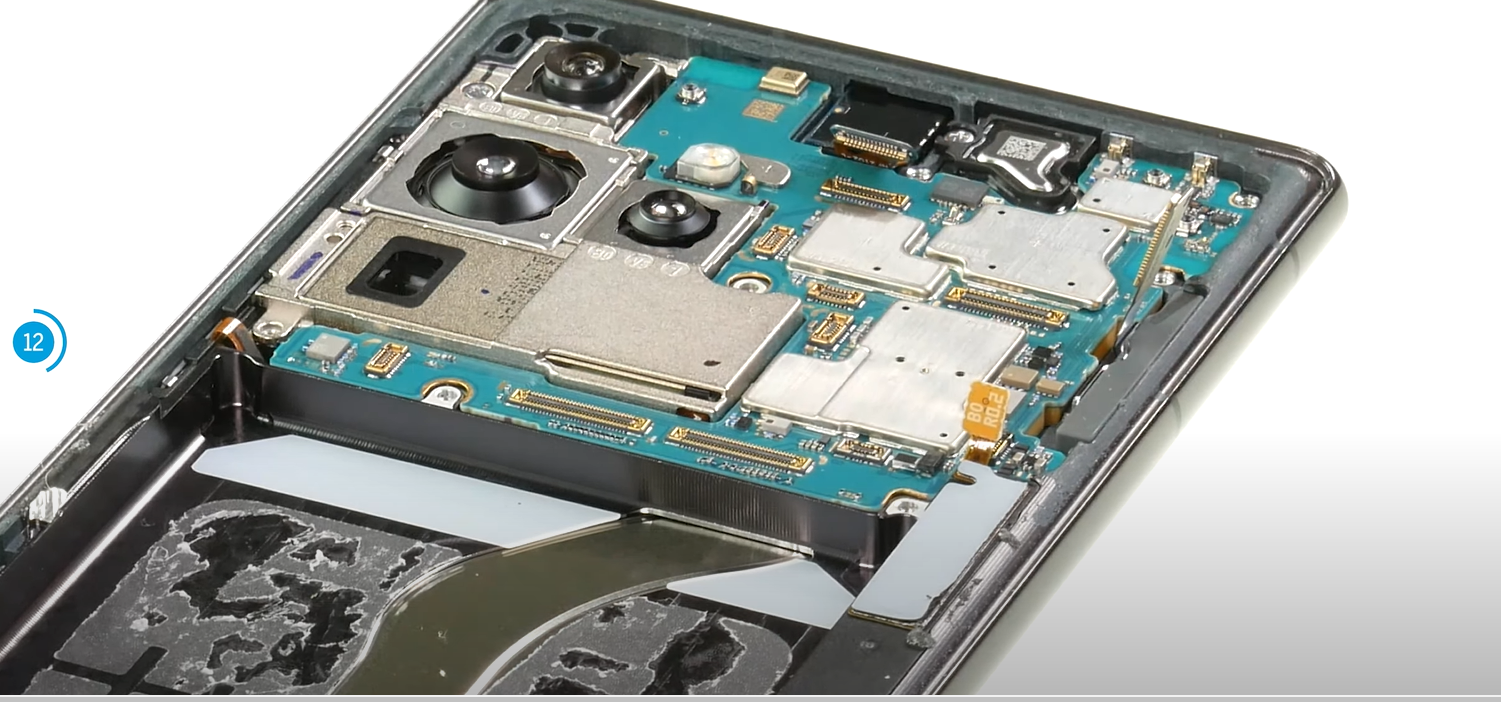
Carefully insert the pointed end of your spudger between the front-facing camera and its press connector. Apply gentle pressure to pry up and disconnect the connector. Similarly use the pointy end of your spudger to pry up and disconnect the press connector for the fingerprint reader. Take care not to damage the connectors or components while performing these steps. Proper handling is essential to ensure the smooth disconnection of the connectors without causing any harm.
Step15# Disconnect The Screen Connectivity And Disconnect the Stylus

With the spudger’s pointed end, gently pry up and disconnect the screen press connector. Locate the connector which is positioned parallel to the main connectors that were previously removed. You can disconnect it along with the other connectors or at this stage. Exercise caution while disconnecting to avoid damaging the connector or the screen. Take your time and ensure a secure disconnection to facilitate screen replacement.
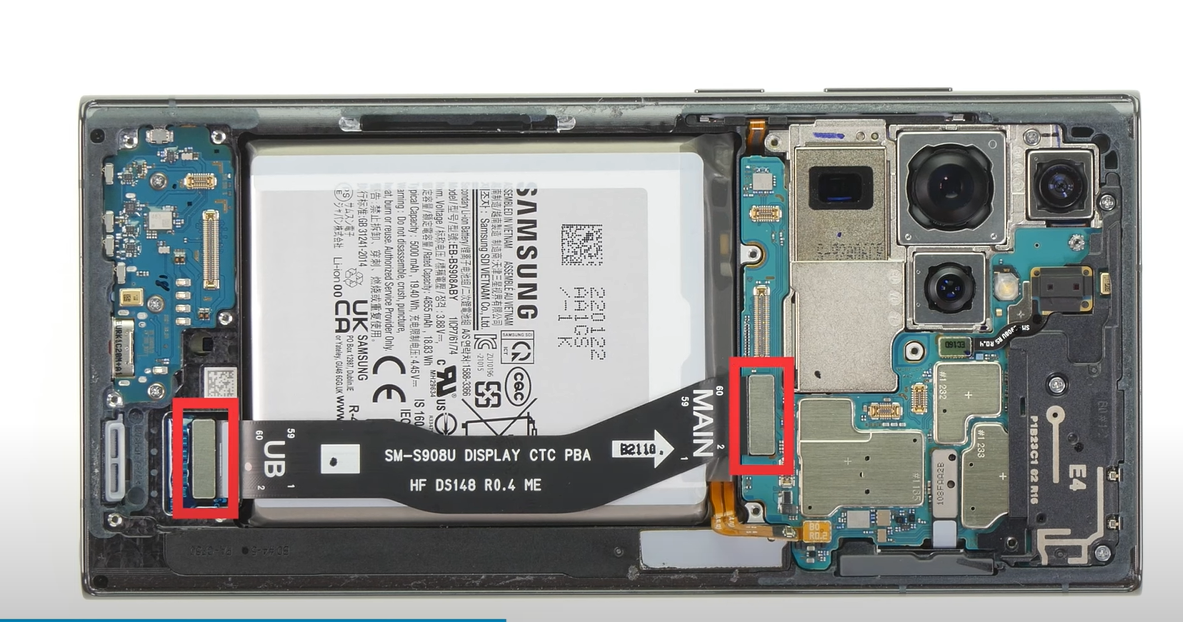
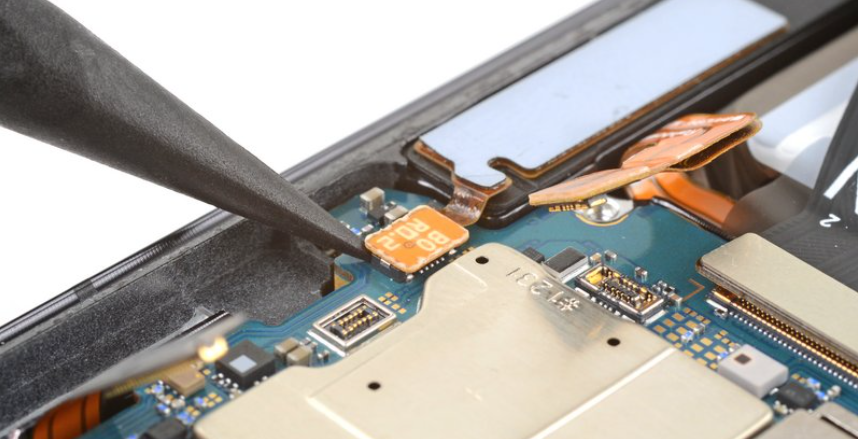
Now gently insert the pointed end of your spudger and pry up the stylus’ press connector to disconnect it. Take care to locate the connector and apply even pressure to avoid damaging the connector or the surrounding components. Ensure a secure disconnection to allow for the replacement of the stylus or any related repairs.
Step#16 Unscrew the Motherboard And Remove It
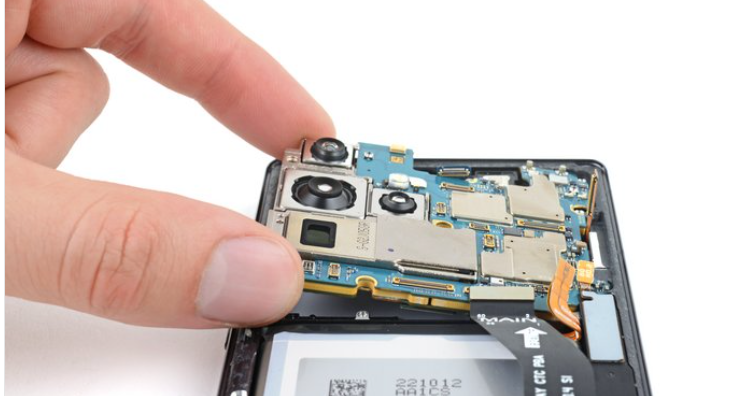
With your Phillips screwdriver carefully remove the 3.5 mm-long screws that secure the motherboard in place. Once the screws are removed position your spudger’s pointed end between the top left of the motherboard and the frame. Apply gentle pressure to pry the motherboard up until you can grip it with your fingers.
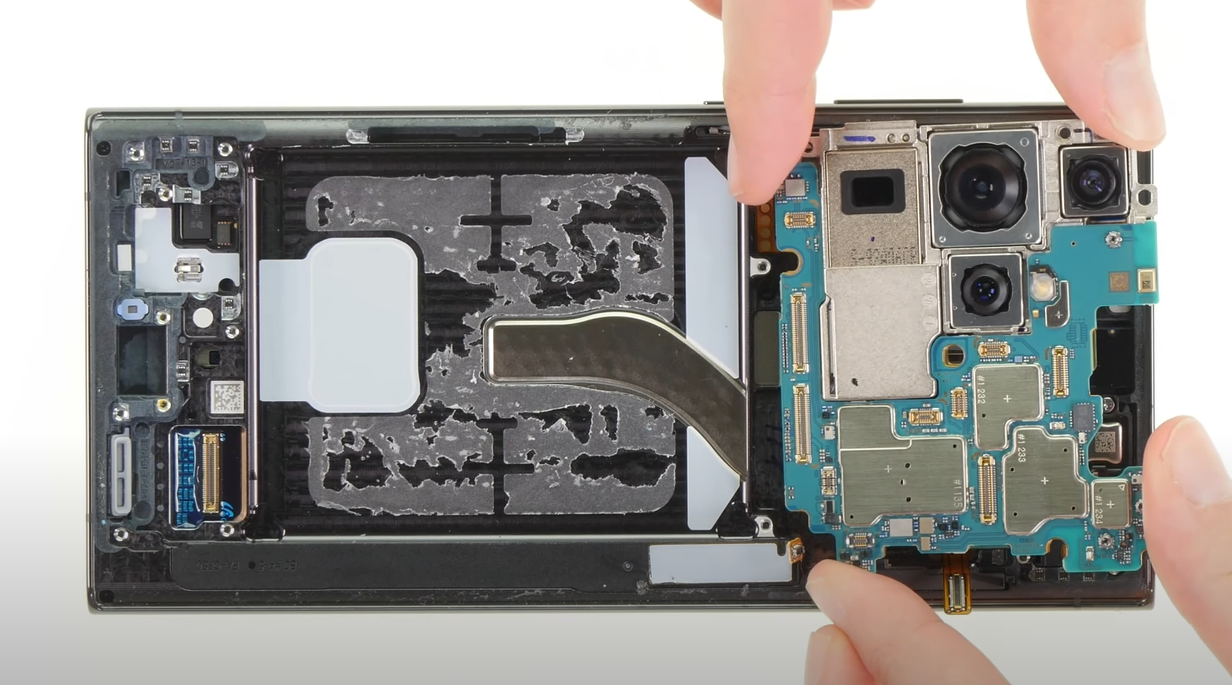
Avoid catching or tugging on any loose cables or connectors when removing the motherboard. Handle the motherboard by its left edge to avoid any potential damage. Slowly and steadily lift the motherboard away from the frame ensuring a smooth and controlled removal.
Remember to exercise caution and precision throughout this process to prevent accidental damage to the motherboard or other internal components. You can successfully remove it from the frame by being mindful of loose cables and handling the motherboard carefully. And then you can proceed with your Samsung Galaxy S22 Ultra screen replacement or any necessary repairs.
Step#17 Remove the earpiece speaker and vibrator
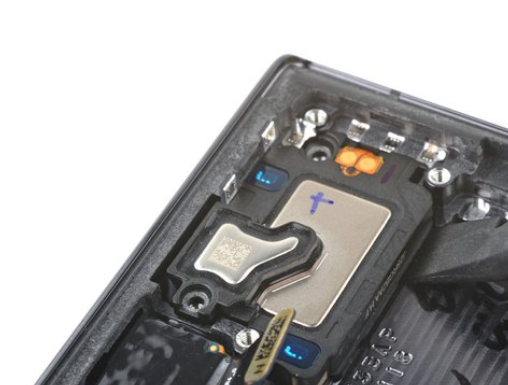
Remove the two 3.2 mm-long screws that secure the earpiece speaker and vibration motor in place using your Phillips screwdriver. Once the screws are removed position your spudger’s flat end underneath the earpiece speaker’s bottom edge and vibration motor.
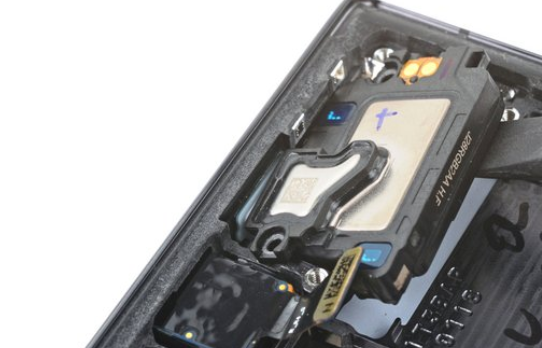
Apply gentle pressure to pry the earpiece speaker and vibration motor from their recess. Carefully lift them away from the frame to remove them completely. Do not apply excessive force to avoid damage to these components.
You can safely remove the earpiece speaker and vibrator from your S22 Ultra. You only need to follow these steps and use the appropriate tools. This will allow you to proceed with the screen replacement or any other necessary repairs easily and confidently.
Step#18 Remove The Front-Facing Camera
Add heat to the top of the screen using a hair dryer heat gun or hot plate. However it is crucial to exercise caution and not overheat the phone. Excessive heat can cause damage to the display.
Ensure you maintain a safe distance and move the heat source sweepingly to distribute the heat evenly. Keep a close eye on the temperature and avoid prolonged exposure to heat.
Remember the goal is to soften the adhesive that holds the screen in place making it easier to remove. After sufficient heating process the next step is screen replacement. By following these guidelines you can minimize the risk of heat damage. And it will also safely replace the screen of your Samsung Galaxy S22 Ultra.
Pry The Front-Facing Camera
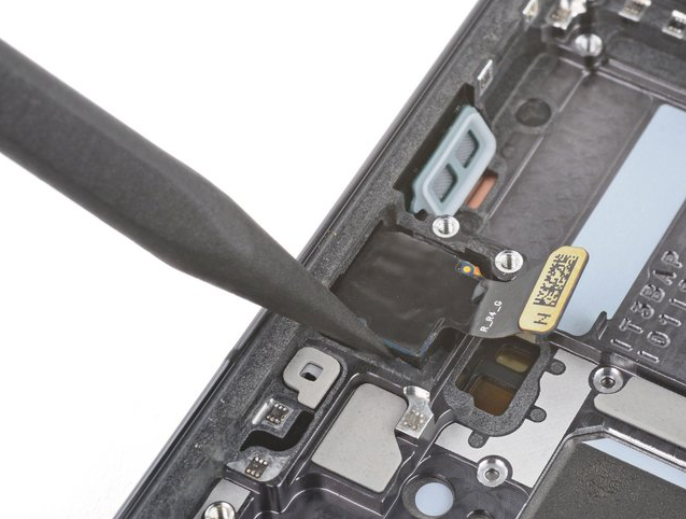
Please exercise caution when working with the adhesive securing the camera as it can be quite strong. Take your time and apply additional heat if you encounter resistance while removing the camera. During this process it is important to avoid separating the circuit board from the camera housing.
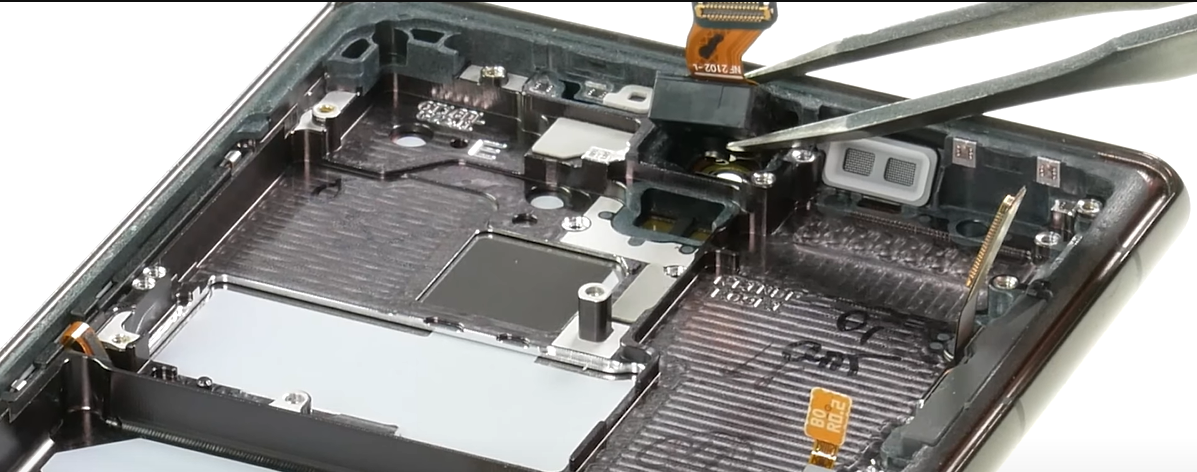
Using your spudger’s pointed end gently pry the front-facing camera from its recess. Be careful not to apply excessive force to prevent any damage.
If the camera remains stuck, you can use a SIM card eject tool to scrape away the epoxy carefully. This should help loosen the camera and facilitate its removal.
Remember to work slowly and be patient throughout this step to ensure a successful and damage-free camera removal process.
Remove The Front-Facing Camera
You will need a pair of blunt nose tweezers to remove the front-facing camera from its recess. Gently insert the tweezers into the recess carefully not damaging any surrounding components.
Using the tweezers carefully grab the front-facing camera and slowly lift it out of its position. Take extra care when handling the camera’s fragile cable to prevent tearing or damage.
Remember to work slowly and steadily ensuring a delicate touch throughout the process.
Step#19 Remove The Battery
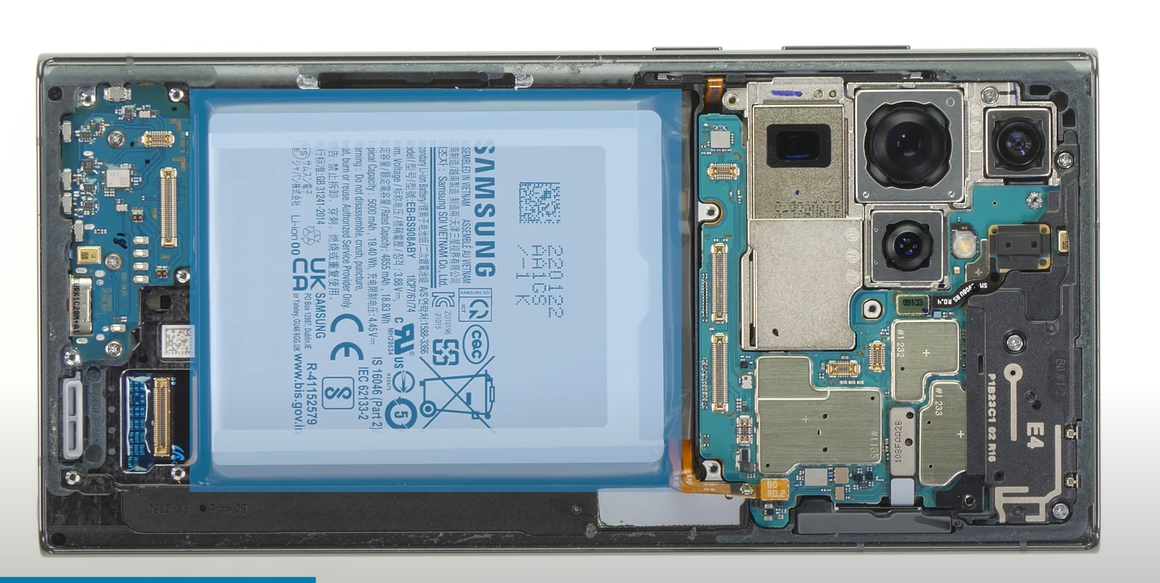
Start by ensuring you have already disconnected any cables or connectors that might be connected to it.
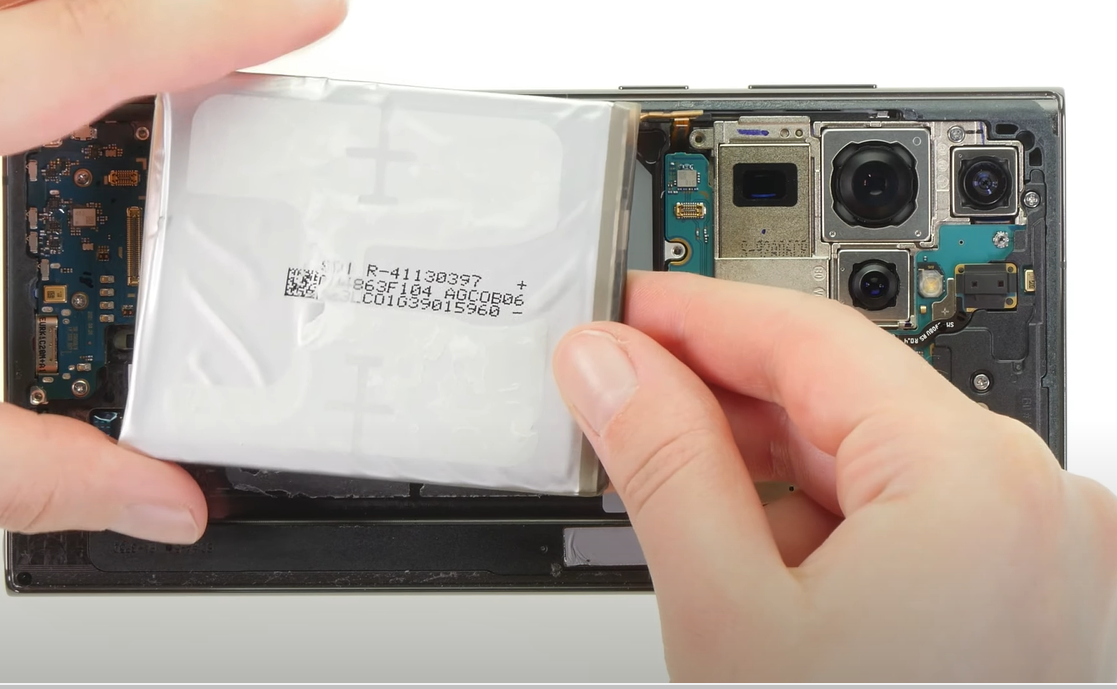
Hold your hands over the top of the frame providing support and carefully pull up the battery. Take your time and maintain a steady grip to avoid accidental drops or damage.
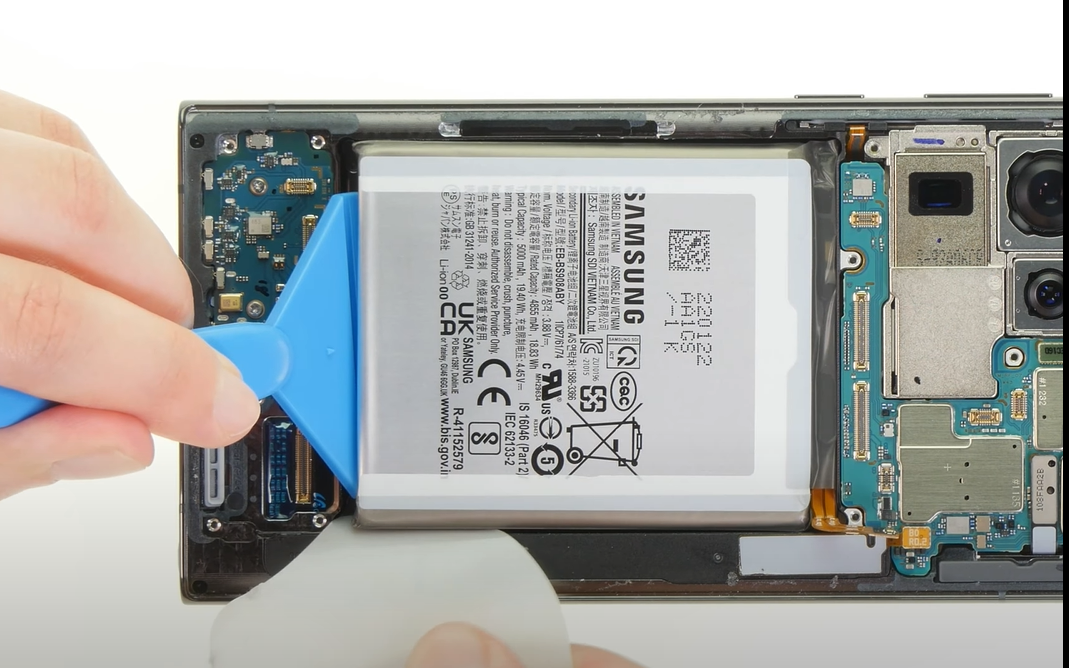
Remember to handle the battery carefully as it is a delicate component. Ensure you have a secure grip before lifting it out of the mobile.
After removing all the components of the Samsung Galaxy S22 Ultra, the old screen of the phone remains. It’s time to replace the Samsung S22 Ultra Screen with another one.
Step#20 Replacing the Screen Of the Samsung S22 Ultra and Reassembling The Phone
Preparing The New Display
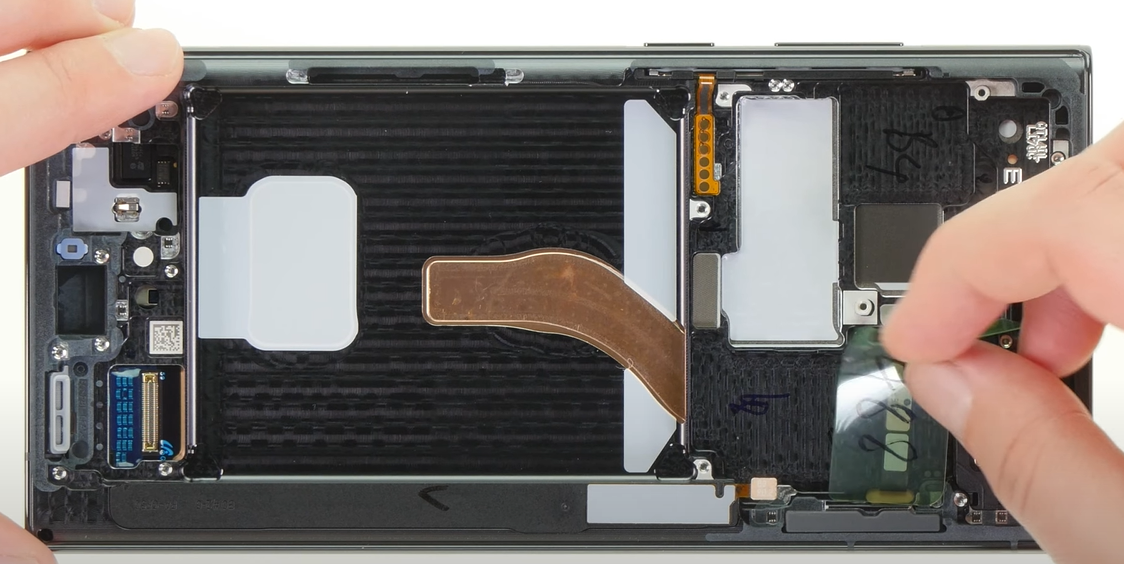
Remove all protective films from the inside of the replacement screen. Keep the film on the screen glass to prevent scratches until your repair process continues. Only remove it at the end to keep the screen safe.
Inserting The Front Camera
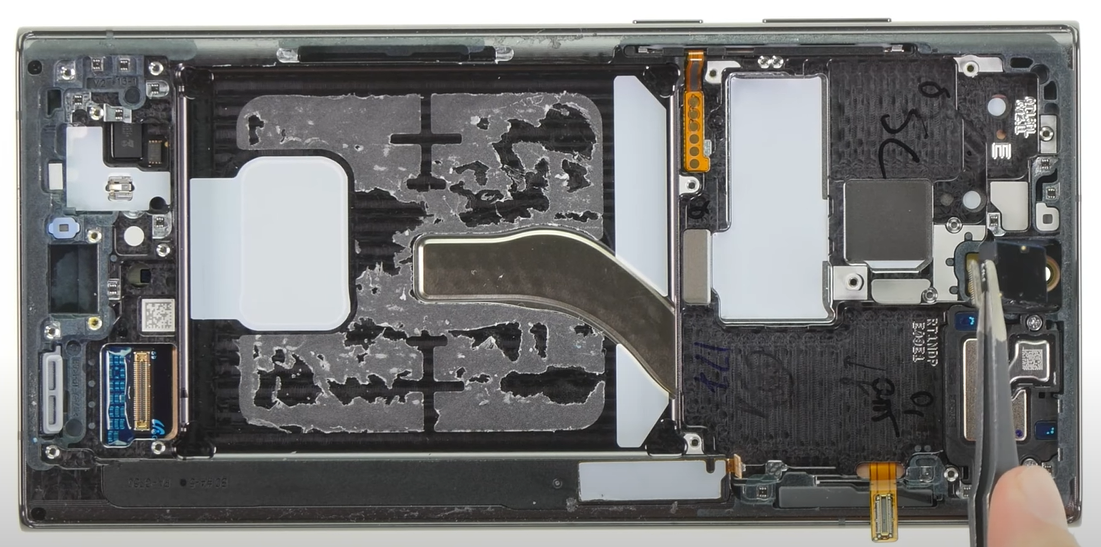
Place the front camera back in its guide. Press it firmly to ensure it is secure.
Installing The Motherboard
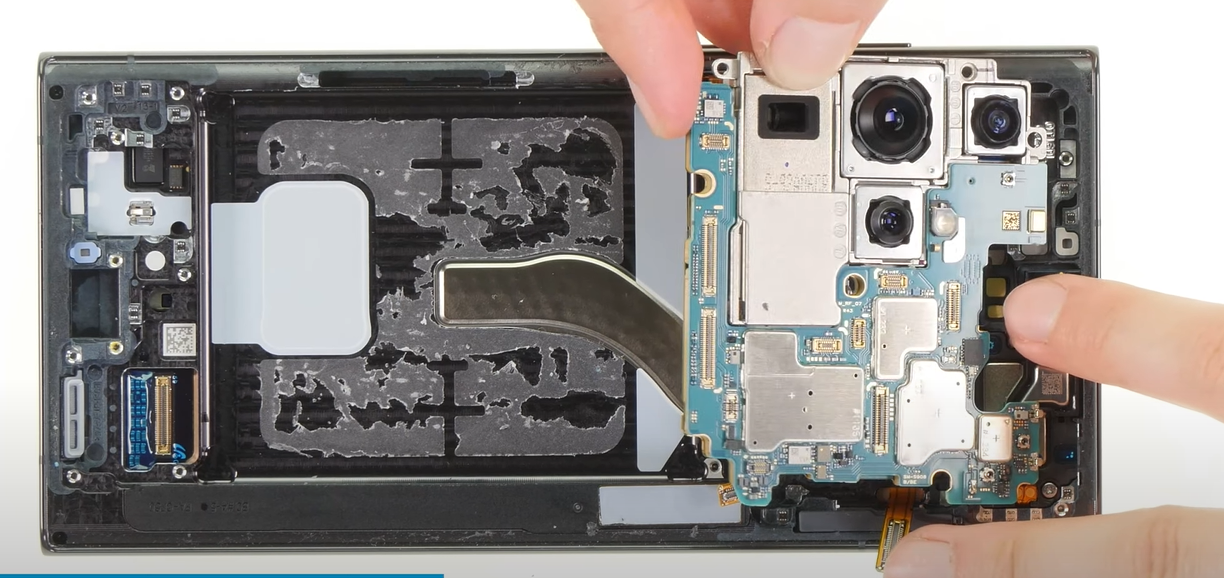
Be careful not to pinch any connectors when inserting the motherboard. If needed, hold them aside gently. Put the board back into your device, ensuring it sits level. Secure it with a single Phillips screw.
Rejoint The Connectors To The Motherboard
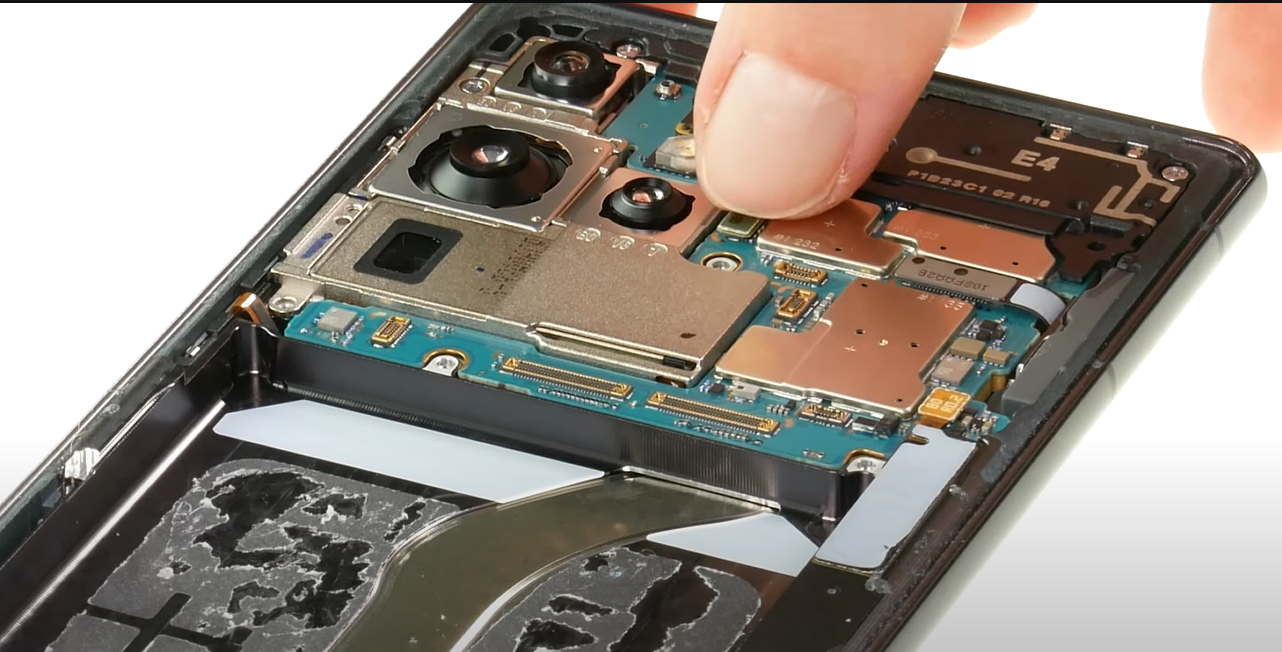
Be extremely cautious when attaching connectors and avoid applying excessive force. Damaging a connector can result in the malfunction of an entire component.
Reconnect the front camera and S Pen (stylus) by gently pressing their connectors onto the board. Ensure you hear and feel them click into place.
Cover The Board
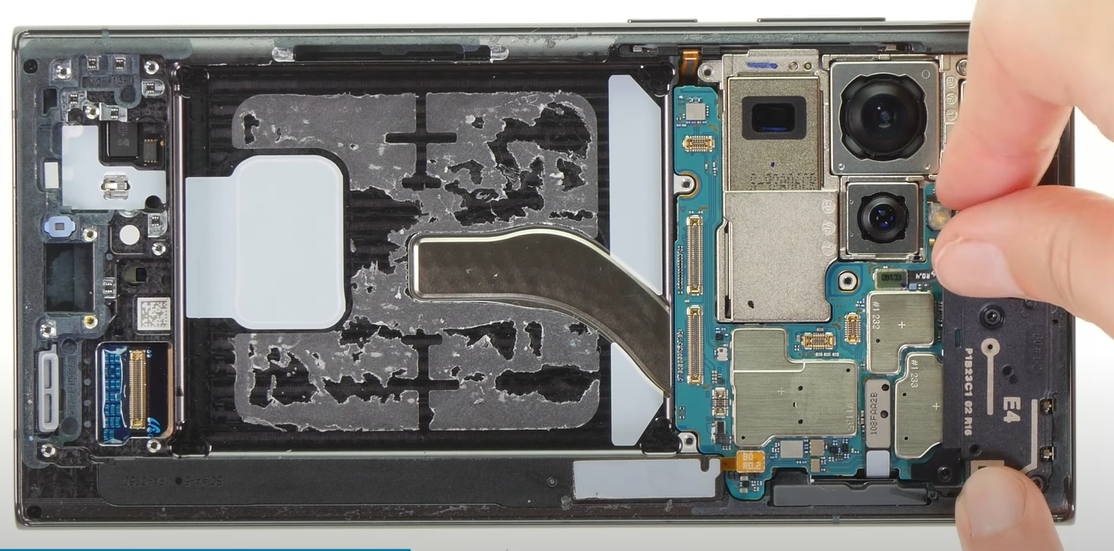
Make sure to listen and feel for the plastic lugs of the board cover snapping into the case frame. If they don’t, the motherboard might not be sitting completely flat.
- Put the board cover back onto the motherboard.
- Secure the cover with the three Phillips screws.
- Gently press its connector back onto the board.
Reinstall The Charging Board
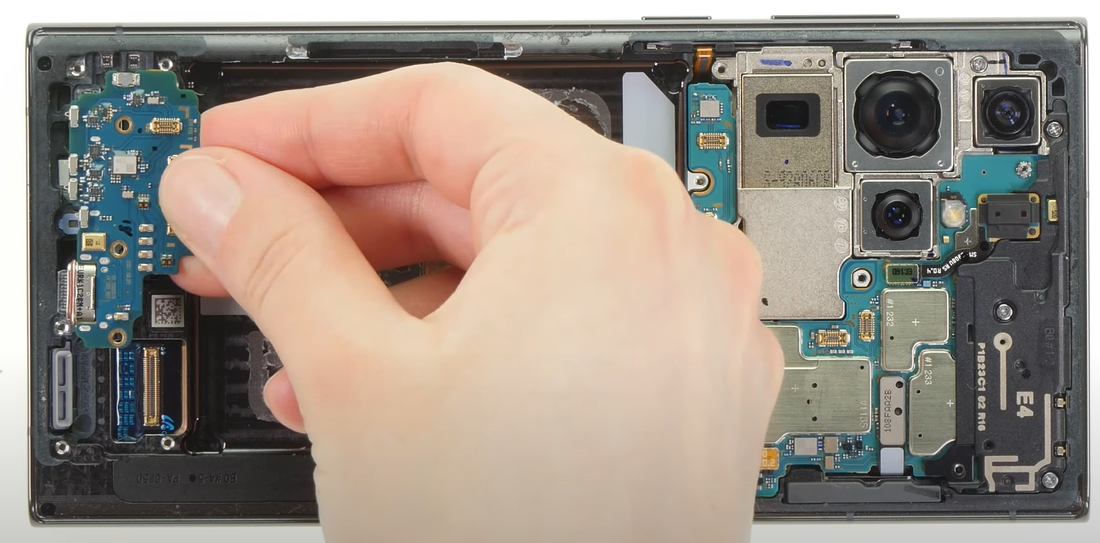
When returning the USB board, ensure that you properly insert the charging jack into the edge of the case.
- Put the USB board into the screen unit.
- Use three Phillips screws to secure it.
Insert The Battery Again
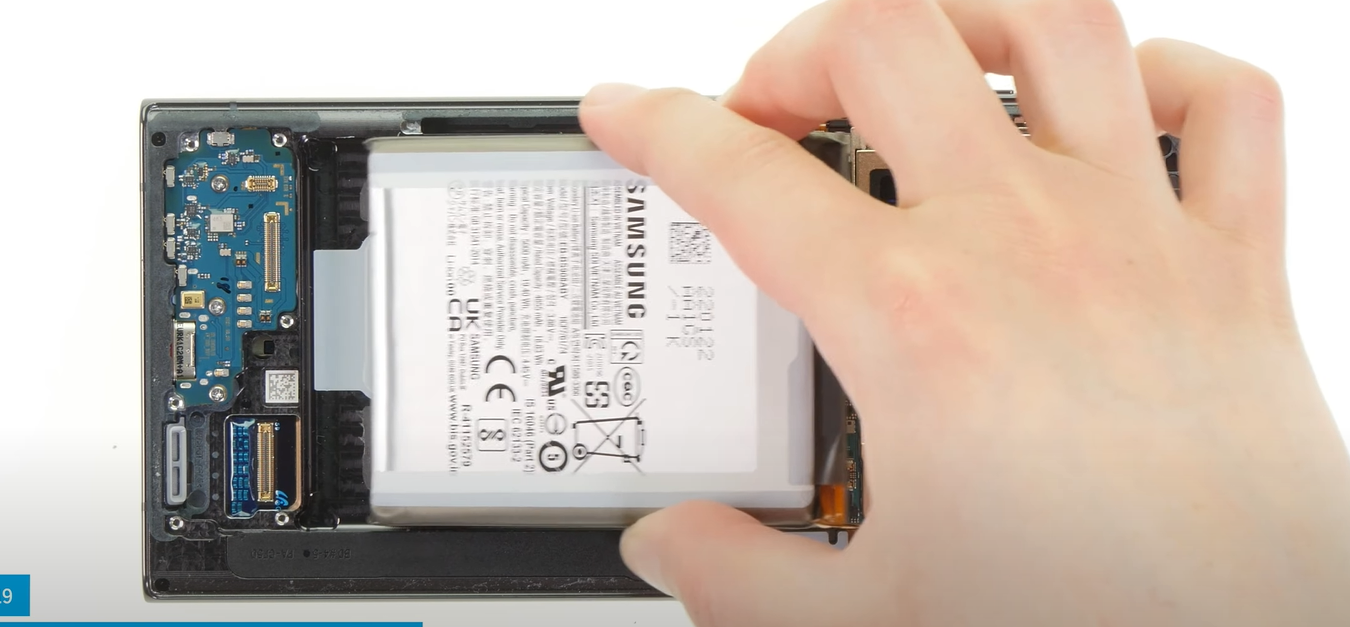
Position the battery in its guide and apply firm pressure to secure it. The adhesive residue on the back of the battery should provide ample support for reattachment.
Reconnect The Display And Screen Cable
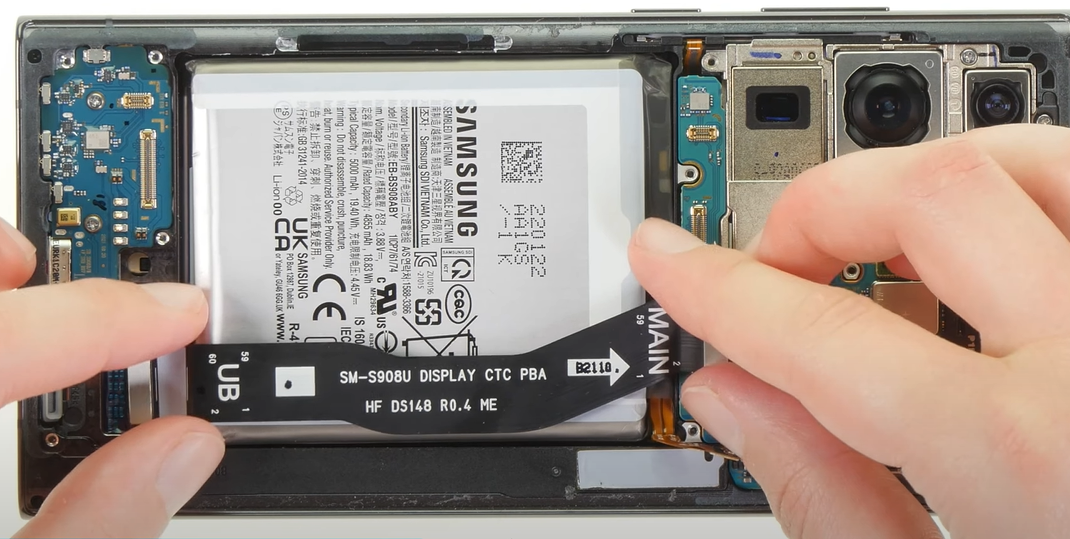
Ensure the proper setting of the alignment of the galaxy s22 ultra screen. Connect the two connectors on the cable to their respective slots on the motherboard. And then a separate slot in the screen unit.
Attach The Connectors
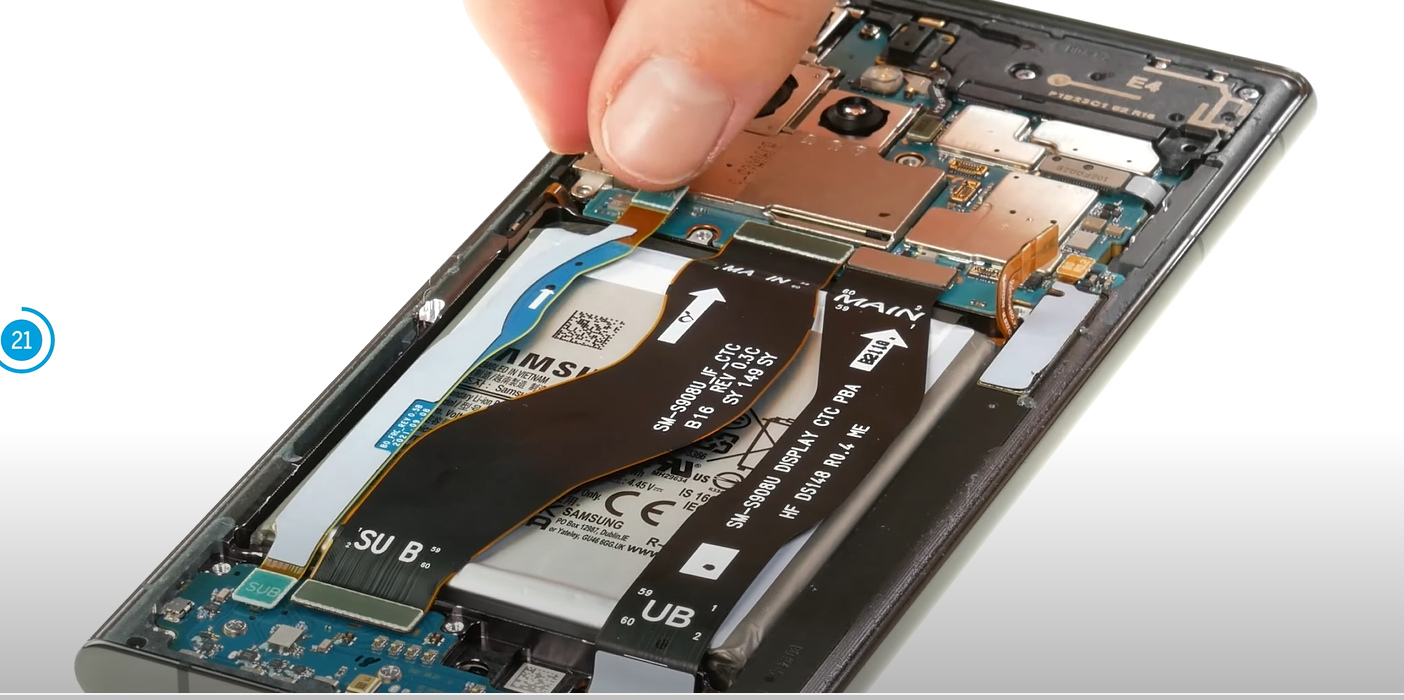
One by one, align the connecting cables within the device. Attach the connectors on each cable to their respective slots on the USB and motherboards.
Reinstall Speakers
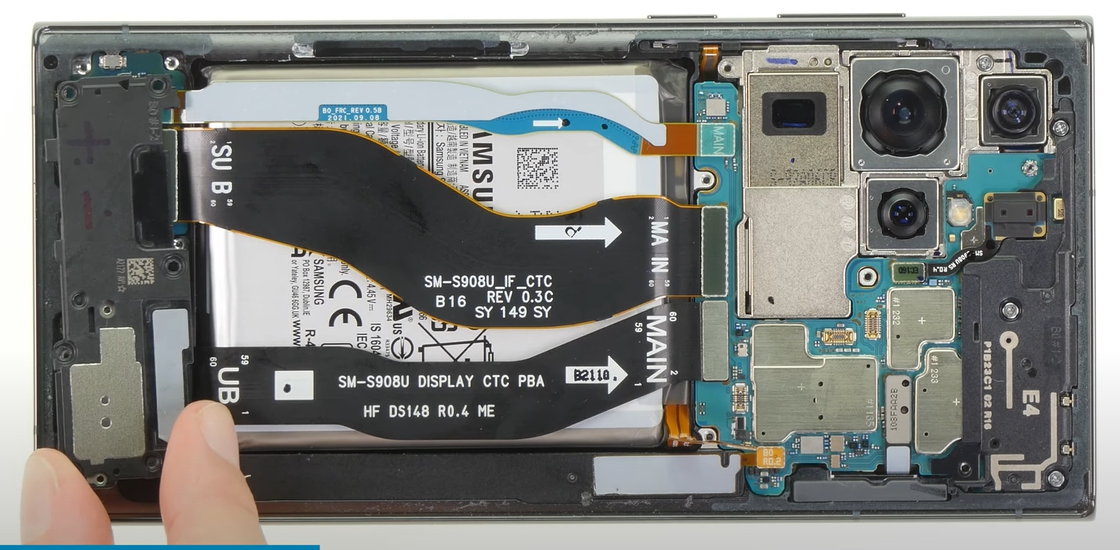
Return the speaker to its original position. Secure it by using the six Phillips screws.
Ensure that the speaker is level and that its plastic lugs fit snugly into the edge of the case.
Connect The Battery
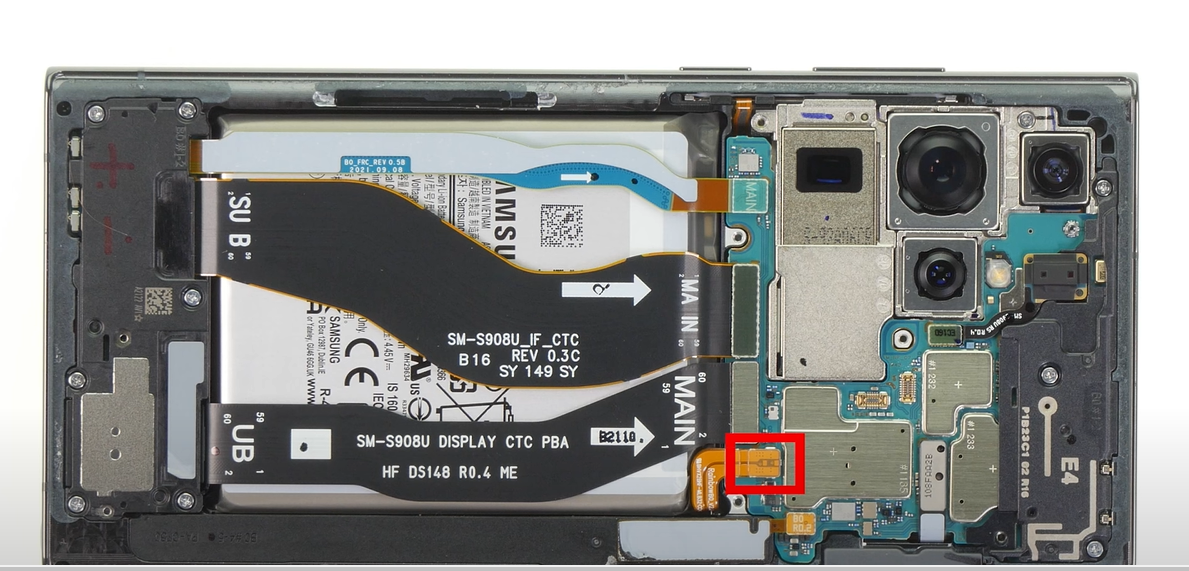
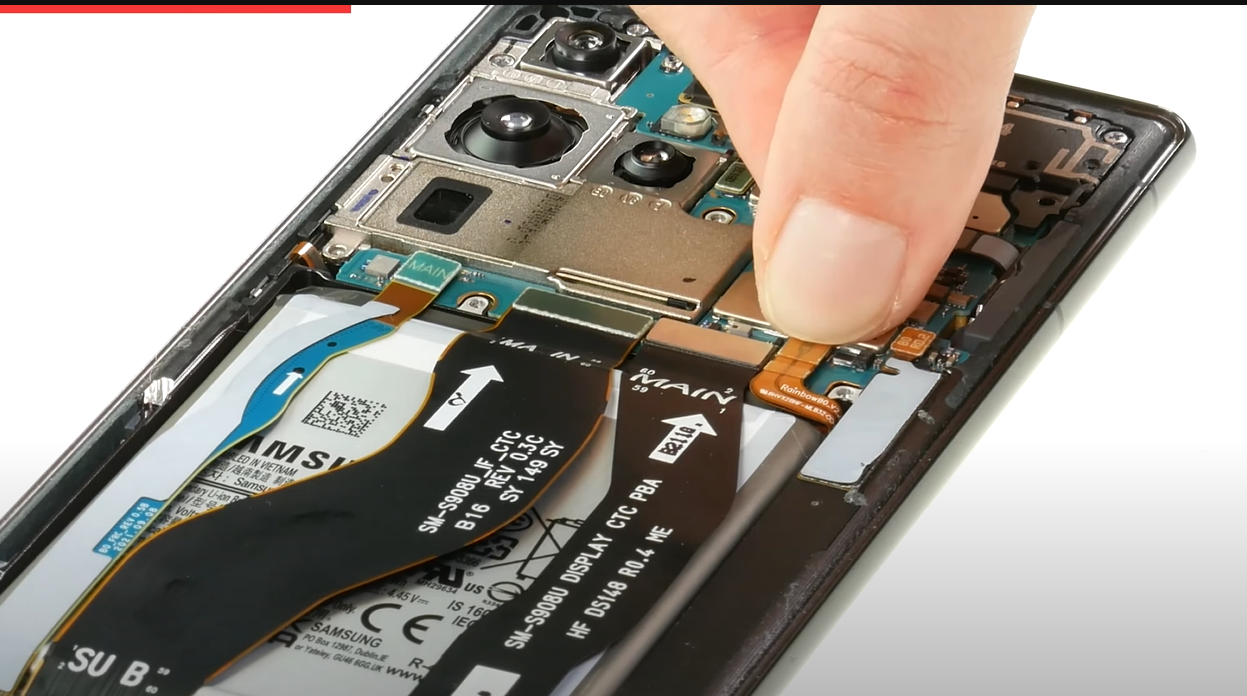
Connecting the battery as the final step is important to prevent any potential short circuits. Carefully press the battery connector onto the motherboard to reconnect it.
Install Wireless Charging Coil
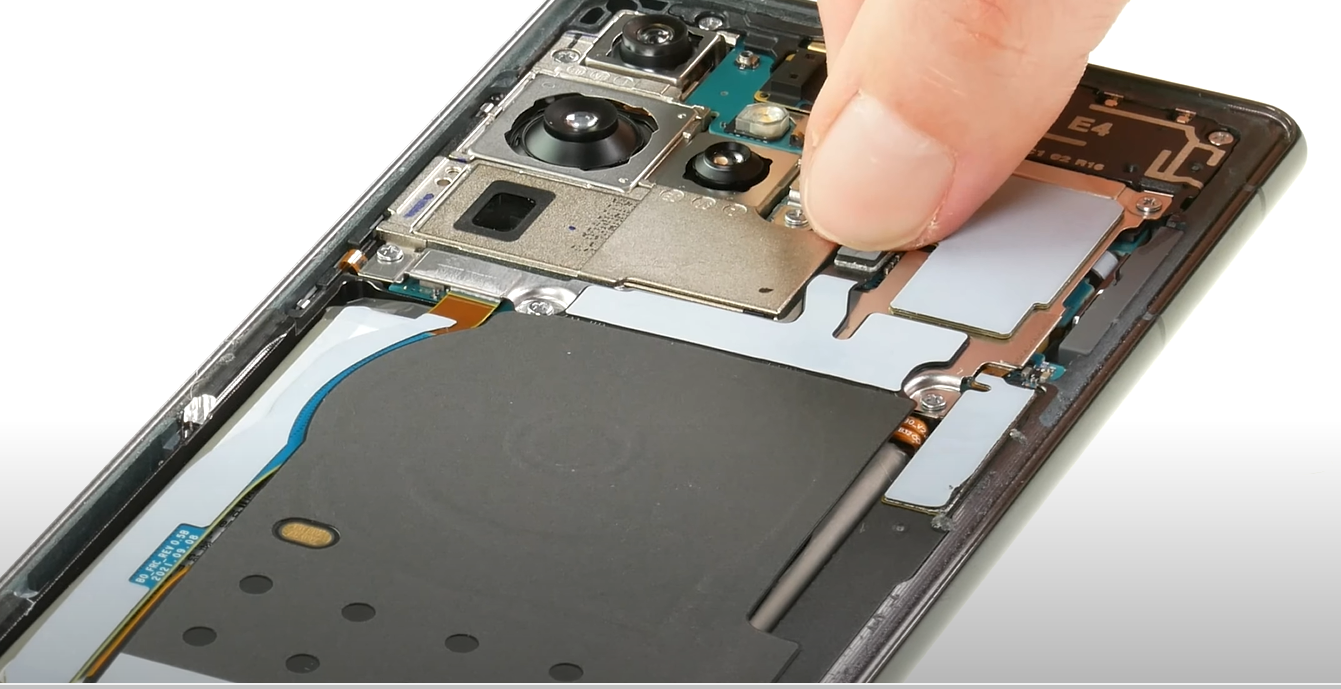
Align the charging coil over the motherboard, ensuring it matches the screw holes on the metal cover. Press the glued end firmly to provide a secure attachment. Use the five Phillips screws to tighten the cover and tighten them securely.
Connecting NFC antenna and charging coil
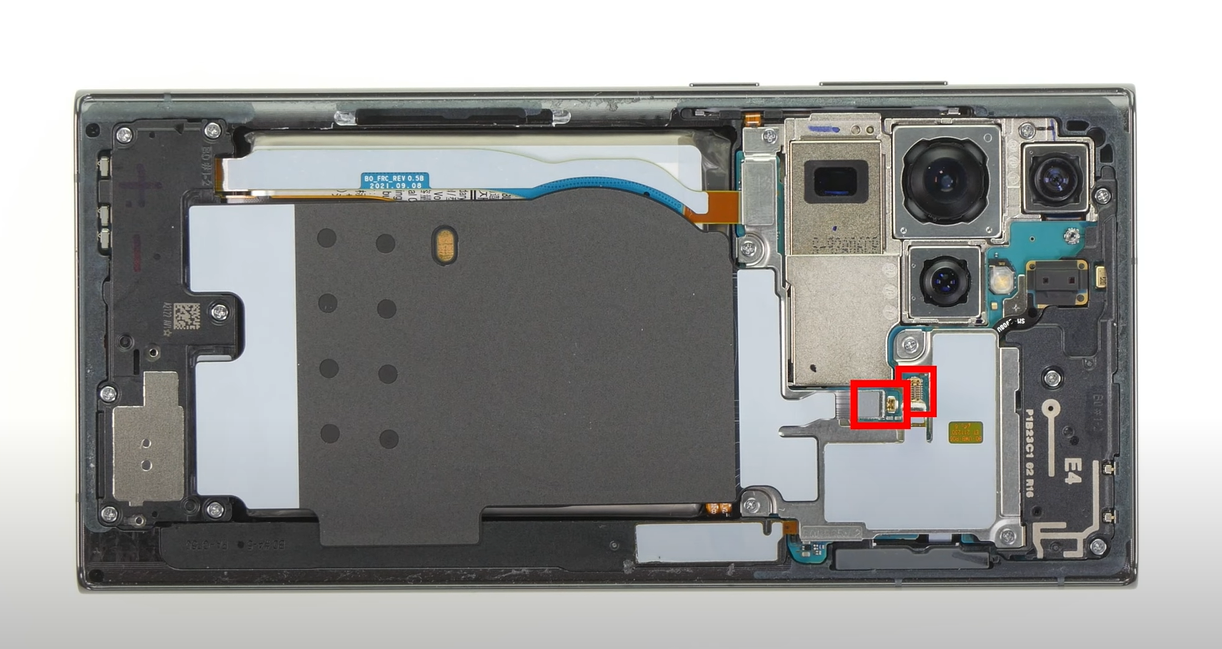
Press the connectors of the NFC antenna and charging coil onto the motherboard to reconnect them. Ensure a secure connection by applying gentle pressure.
Now the Samsung Galaxy S22 Ultra Screen has been replaced. Your phone is ready to check.
Step#21 Testing The New Screen
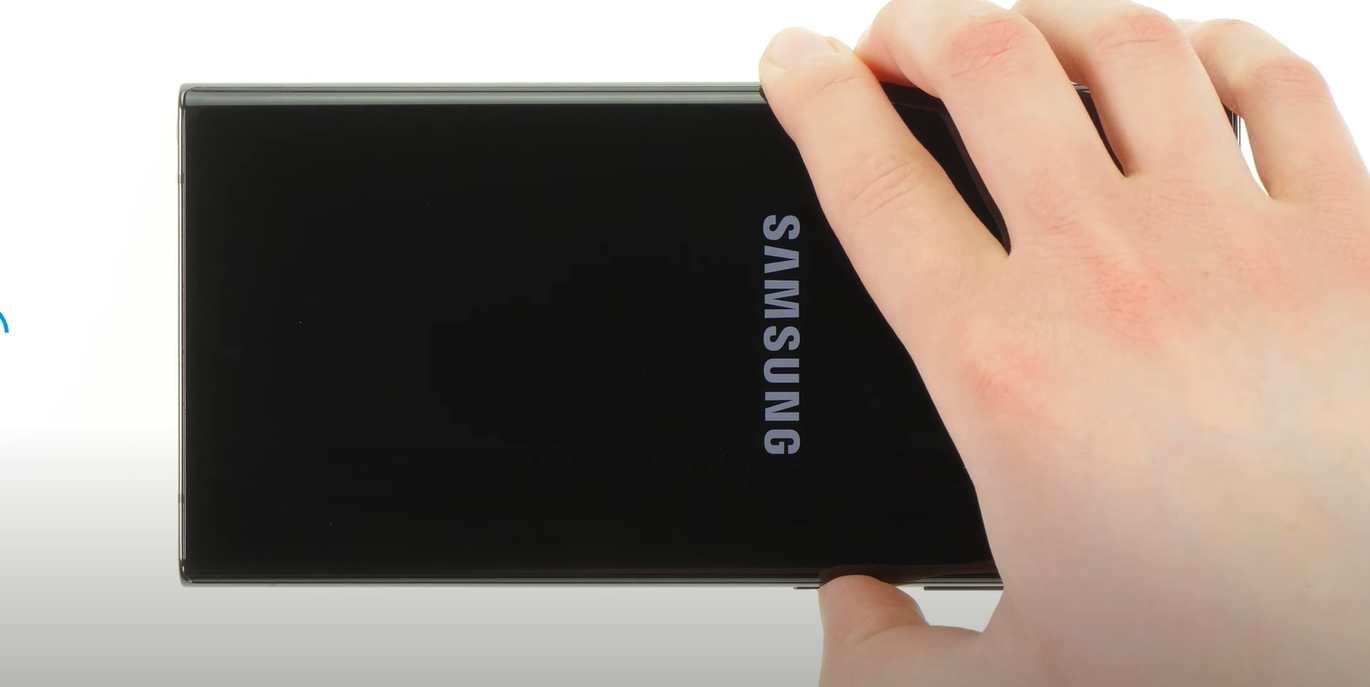
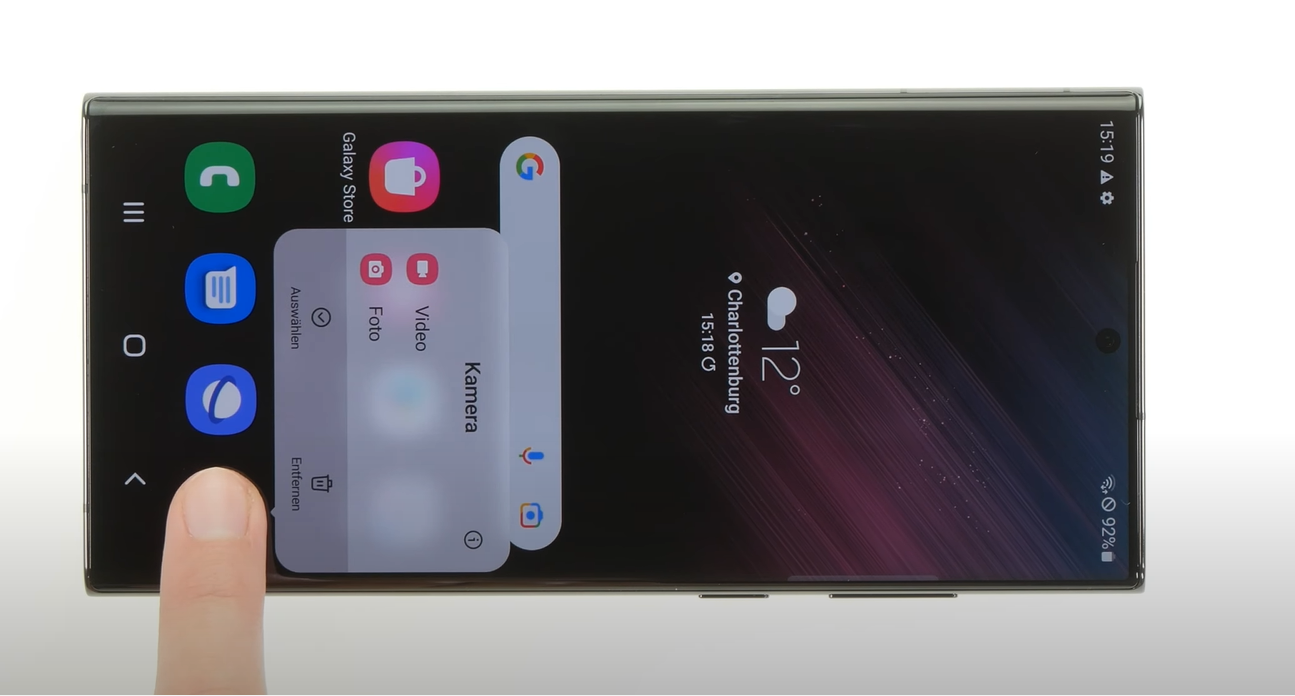
After completing the assembly, testing the replacement screen and other basic functions will also be helpful. Use the checklist provided and access the internal Samsung test menu by dialing #0#.
Switch on your Galaxy device to test the touch function, and try dragging an app across the screen. Double-check that all components are properly installed and attached if any issues arise.
Step#22 Attaching the back cover
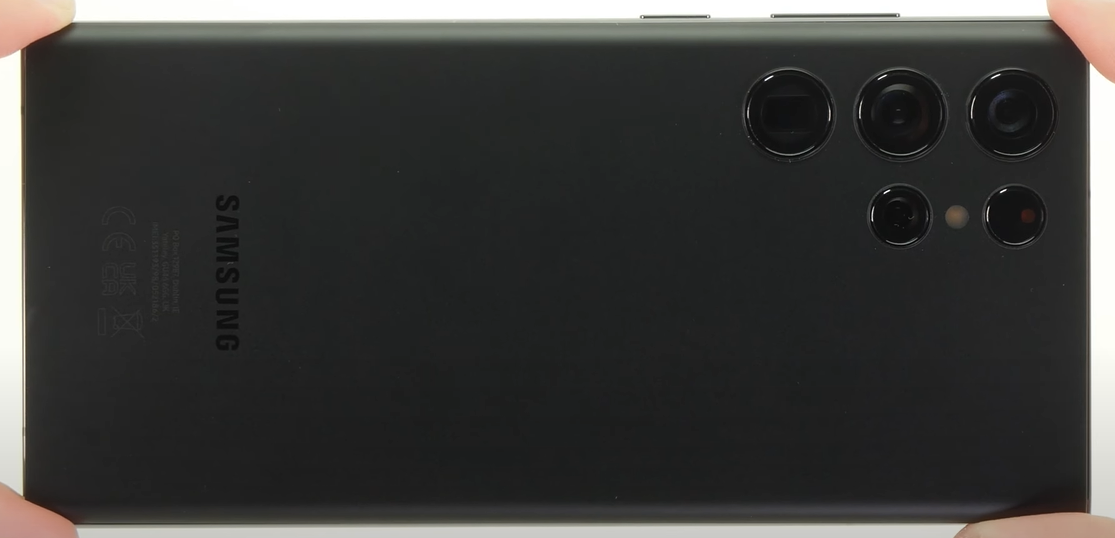
To ensure proper glue bonding, apply hot air along the edge of the back cover. Additionally, you can place some books on top of the device for a few minutes to provide pressure.
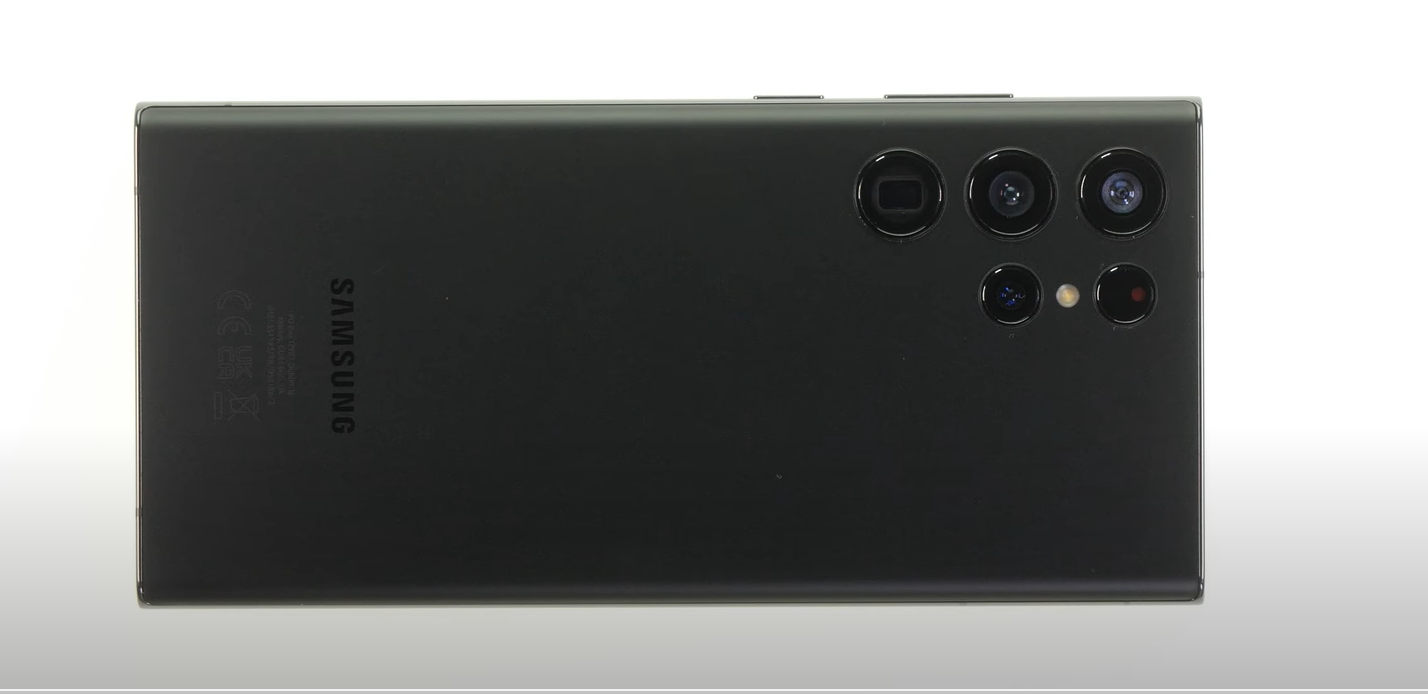
Press the back cover firmly onto your Galaxy S22 Ultra screen unit to complete the repair. This will close the device.
Conclusion
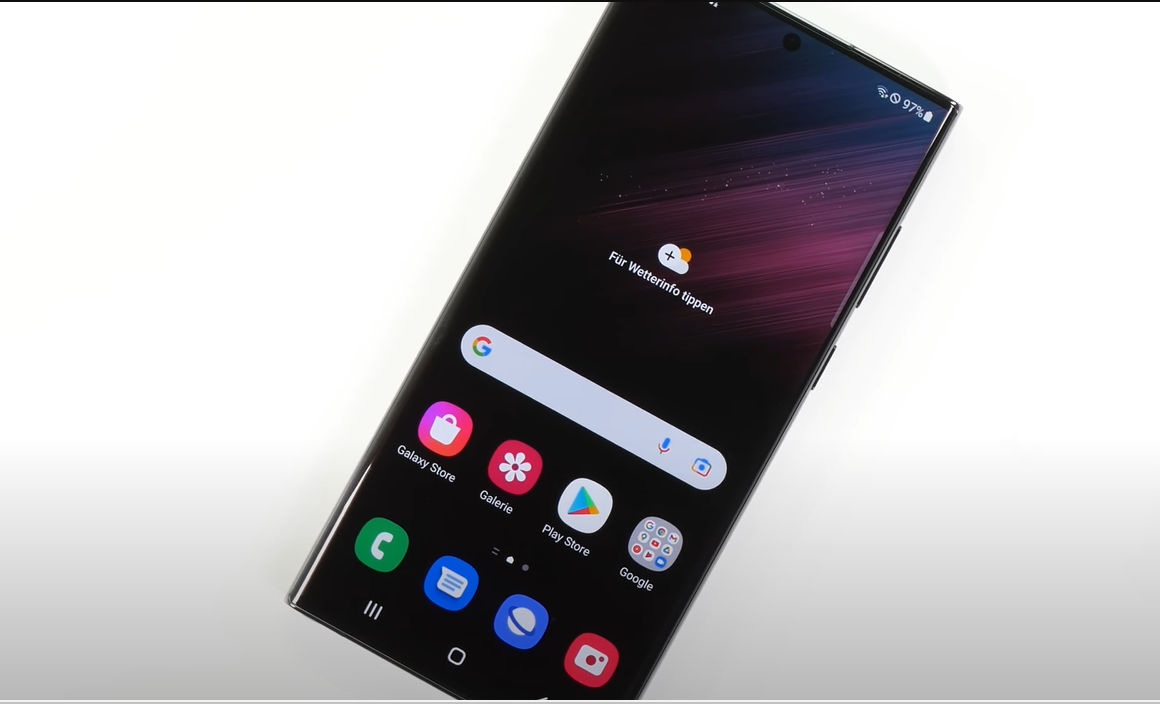
In the end we hope that this guide will help you replace the screen of your Galaxy S22 Ultra. The step-by-step instructions and taking the necessary precautions will help you at every stage. However throughout the repair we emphasized the importance of being careful with connectors, avoiding excessive force. And we also emphasize making sure proper alignment of components. Regular testing of the replacement screen and basic functions also helps verify the repair’s success.
Double-check all connections and installations if you encounter issues during testing or notice something not functioning properly. Following these guidelines will help ensure a successful screen replacement and restore the functionality of your Galaxy S22 Ultra.
Feel free to write in the comment below if you have further questions or concerns, and please seek additional assistance. Happy repairing!
