Presenting the iPhone 13 Pro Rear-Facing Camera Replacement Guide! Are you experiencing issues with your iPhone 13 Pro camera? Don’t worry we have got your solution! In this step-by-step guide we will take you through the process of replacing the rear-facing camera on your iPhone 13 Pro. So no more frustration of having bad images, dealing with blurry captures, and cracked lenses. Ultimately this guide will help you restore your iPhone 13’s camera functionality quickly and easily. Let’s get started!
iPhone 13 Pro Rear-Facing Camera Replacement
So before starting the step-by-step guide for iPhone 13 Pro rear-facing camera replacement we should know some precautions. Here is what you should keep in your mind.
Turn Off Your iPhone 13 Pro
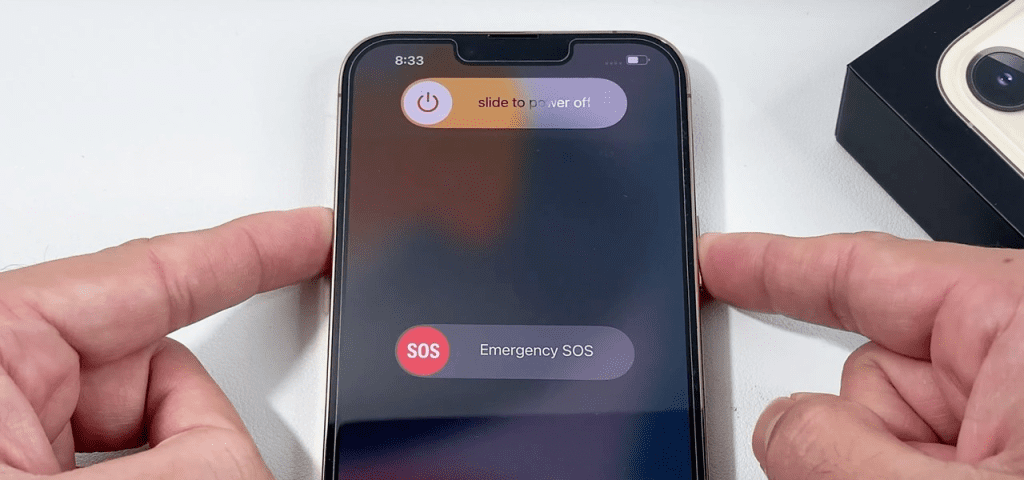
Firstly you have to make sure your iPhone is turned off. So that you can avoid any accidental damage or loss. Well to turn off your iPhone 13 Pro follow these steps.
*Press and hold the side button and one of the Volume buttons simultaneously until the power off slider appears on the screen.
*Slide the power-off slider from left to right to turn off your iPhone 13 Pro.
*Wait a few moments for the iPhone to power down completely.
Your iPhone 13 Pro is now turned off.
Gather Necessary Tools
Don’t forget to gather all the tools you will need. Here is the list of tools needed during the iPhone 13 Pro rear-facing camera replacement.
*Opening Picks
*Y000 screwdriver
*Scale
*Marker
*Suction Cup
*Spudger
*Tweezers
*Rear Facing Camera Replacement
*Safety Glasses
Clean Workspace
*Find a clean and bright place to work without any mess.
*Make sure the surface is balanced, smooth and flat so that nothing can move by mistake.
*Don’t work where it’s dusty or wet to keep everything safe.
*Keep your tools and parts in order and close to you.
*You can use a soft mat to stop the phone from slipping.
*Turn off any fans(slow down the speed) or air conditioners nearby to avoid blowing dust onto your workspace.
Essential Tips Before Starting the iPhone 13 Pro Rear-Facing Camera Replacement
*Please wear static because it can prevent static electricity by working on a non-metal surface.
*Take Your Time. Don’t rush! Take it slow and be careful.
*Follow the Guide! You should keep this guide nearby to help you through each step.
*Get the Right Part. It means you need to make sure you have theright camera replacement for your iPhone 13 Pro.
*It’s smart to back up your iPhone before you start just in case something goes wrong.
*Before you start it is compulsory to make sure your iPhone 13 Pro’s battery is not very charged. It is ideally less than 25%. If a battery is too full and gets poked accidentally, it can catch fire or explode. So it’s safer to have a low battery level when you start changing the rear-facing camera.
Now you can start from the first step of replacing the iPhone 13 pro rear-facing camera replacement.
Step #1. Remove The Pentalobe Screws
First of all you need to take out the two pentalobe P2 screws. Each screw measures 6.8 mm and you will find it at the bottom of your iPhone 13 Pro. However be mindful that opening the iPhone’s display will break its waterproof seals. So make sure to have new seals ready to replace them before moving on from this step. On the other hand if you choose not to replace the seals be careful to keep it away from any liquid exposure when reassembling your iPhone 13 Pro.
Step #2. Marking On The Opening Picks
Despite the fact it is important to avoid damaging your device. So you have to mark your opening pick correctly. Here’s how you can do it.
*Measure 3 mm from the tip of the opening pick and mark it with a permanent marker. This will serve as a guide to stop inserting the pick too far.
*Now you need to consider marking other corners of the pick with different measurements to provide additional guidance.
*Another option is to attach a coin to the pick and position it 3 mm from the tip. This temporary stopper can help stop the pick from going too deep into theiPhone 13 Pro.
Step #3. Tapping On The Cracked Screen
When you are working with the screen you have to be cautious. If the screen is damaged please protect yourself and stop further damage to your iPhone 13 Pro. Follow these steps.
*Please cover the cracked screen with clear packing tape. And make sure to overlap the strips until the entire screen is protected.
*Wear safety glasses to protect your eyes from broken pieces that might come out during the repair.
*If the suction cup doesn’t stick to the screen you can try a strong piece of tape. Just fold it into a handle to lift the screen instead.
*As a last resort you can use super glue to firmly attach the suction cup to the screen if other methods don’t work.
Step #4. Give Heat To The Bottom Edge
Certainly here are the steps for heating the bottom edge of your iPhone 13 Pro to remove the screen safely.
*So you have to use a hair dryer or heat gun to warm the bottom edge of theiPhone 13 Pro for about 90 seconds. Otherwise heat the phone until the screen feels slightly too hot to touch.
*Be sure to keep the hair dryer or heat gun moving. It is to avoid focusing heat in one spot for too long. Cause it could damage your iPhone.
Step #5. Place A Suction Handle On the iPhone 13 Pro Bottom Side Screen
Now you can learn how to create a slight gap between the screen and the frame using a suction handle.
*So pick a suction handle and place it on the bottom edge of the iPhone. But you need to be cautious and avoid placing it directly on the very edge of the glass.
*Now apply firm and constant pressure as you pull up on the suction cup. This action will help create a small gap between the screen and the frame. This step can make it easier to proceed with the repair.
Step #6. Insert An Opening Pick Into The Gap
*Now the next step is to gently insert an opening pickl under the edge of the screen.
*Here you should know that the adhesive holding the iPhone 13 Pro screenmight be strong. You may need to push a bit more to create a small gap. However if it’s too tough then you should heat the edge again for a while. At the same time move the screen gently up and down. This should loosen the adhesive and make it easier to slide in your opening tool.
*Well it is good to leave the opening pick under the screen.
Step #7. Give Heat To The Right Edge Of The Screen
*Now move to the right side of your iPhone. This is the side where you can see the power button.
*Use a heat gun or a hair dryer.
*Well keep heating it for about 90 seconds or until the screen feels too hot.
*Nevertheless make sure not to give heat on one spot for too long a period. This act can damage your iPhone.
Step #8. Slide The Opening Pick Into The Right Edge Of The Screen
*Now slide the second opening pick into the gap gently. This time you will insert a pick along the bottom right corner of your iPhone 13 Pro.
*Make sure to move it in the upward direction. And keep going on until you get to the top right corner.
*However remember not to insert the opening pick too far into the iPhone 13 Pro Screen. Otherwise the internal part of the phone can get damaged.
*Once you reach the top right corner keep the opening pick there to stop sticking the screen again.
Step #9. Give Heat To The Top Edge Of The Screen
*Now again use your heat gun or hair dryer and warm the top edge of the iPhone 13 Pro Screen.
*Remember to apply heat only for 90 seconds or until it feels hot when touched.
Step #10. Insert another Opening Pick
It’s time to separate the top edge’s adhesive.
*You need to insert another opening pick into the top edge of theiPhone 13 Pro screen.
*Please make sure to only insert the marked part of the pick to prevent internal damage.
*However move the opening pick to separate the adhesive and then leave the pick here.
Step #11. Give Heat To The Left Edge
It is the last time to have to use the heating tool for separating the screen of the iPhone 13 Pro.
*Move the heat gun or hair dryer to the left edge of theiPhone 13 Pro screen.
*As above give heat only for 90 seconds. Otherwise feel the warmth on the screen and should feel slightly too hot.
Step #12. Insert Opening Pick For Separating The Left Edge
*However insert the fifth opening pick into the screen.
*Move the opening pick up and down gently to separate the screen from the frame.
*And you can again leave this pick here for not sticking the screen again.
Step #13. Separate The Screen
*At this stage you have to be careful as you remove the screen
*Hold the two inserted picks and gently twist both picks at the same time.
*Apply gentle and even force.
*Well if you are feeling it’s still sticking to the frame don’t try harder. Please reheat the left side of the screen and try separating it again.
Information for the iPhone 13 Screen
However look carefully at the pictorial illustration. As you can see the iPhone 13 Pro has very sensitive cables along the left edge of the screen. So you have to insert the opening pick carefully so that you can avoid damaging your iPhone.
Step #14. Open The Screen
It’s time to open the screen when you have to make sure that the screen is completely separated.
*Now remove the suction tool and rotate the phone so that you can see the right side.
*Carefully lift the screen. This time you will be holding the screen with your thumb and first finger with both hands.
*Open the screen of the iPhone 13 Prolike a book.
*Don’t try to take off the display completely yet. It’s still connected to the iPhone by some delicate ribbon cables.
*However at this stage you have to place support for resting the opened display at a 90° angle.
*Keep the display propped up until you disconnect all the cables attached to the display.
Step #15. Open Screws Of The Battery Connector Cover
*Certainly use a small Y000 screwdriver to unscrew the three tiny screws (1.3 mm). These 3 screws hold the cover over the battery connector.
*Furthermore make sure to keep track of each screw you remove. If you put them back in the wrong spot can cause damage to your iPhone. So when reassembling ensure each screw goes back exactly where it is come from.
Step #16. Remove The Battery Connector
*Now you can remove the battery connector easily.
*Use tweezers to hold the battery connector.
Step #17. Disconnecting The Battery
*You can use a small tool called a spudger or even your fingernail to carefully lift the battery connector out of its socket on the logic board.
*However you have to be sure not to damage the black silicone seal that’s around this connector and others on the board. These seals help keep water and dust out. So it’s important to keep them intact.
Step #18. Disconnect The Display Cable
*You can use the pointy tip of a spudger or even your clean fingernail to carefully lift the display connector. This connector is attached to the socket on the logic board.
*Be careful not to push too hard. So you don’t break the connector or the logic board.
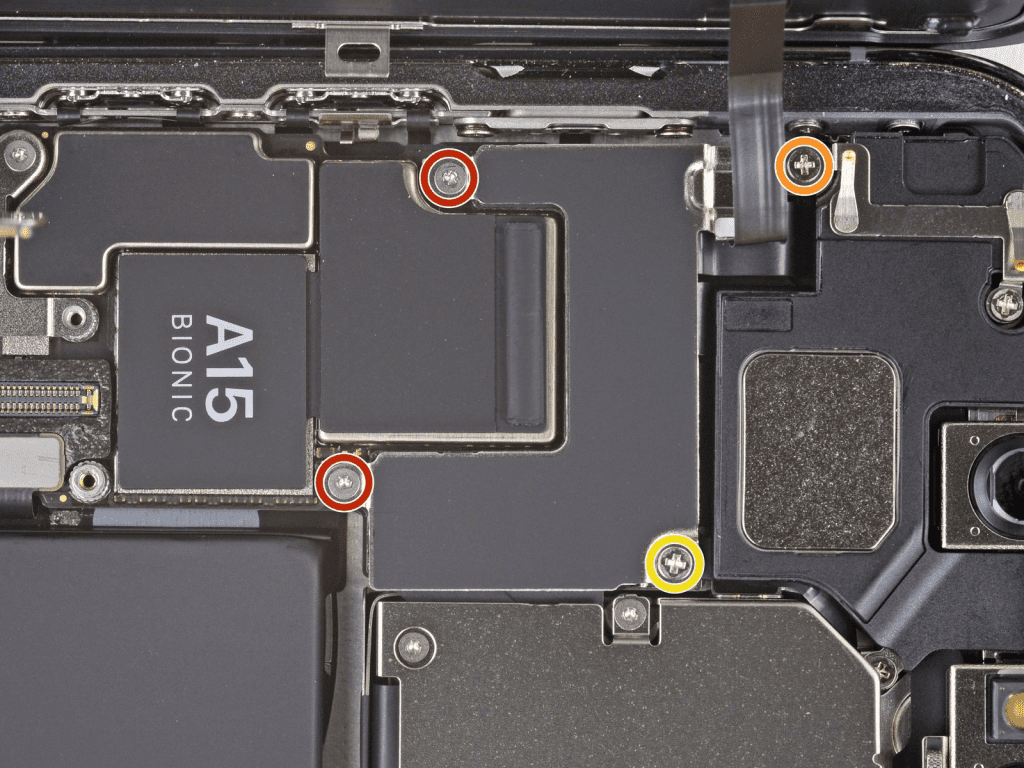
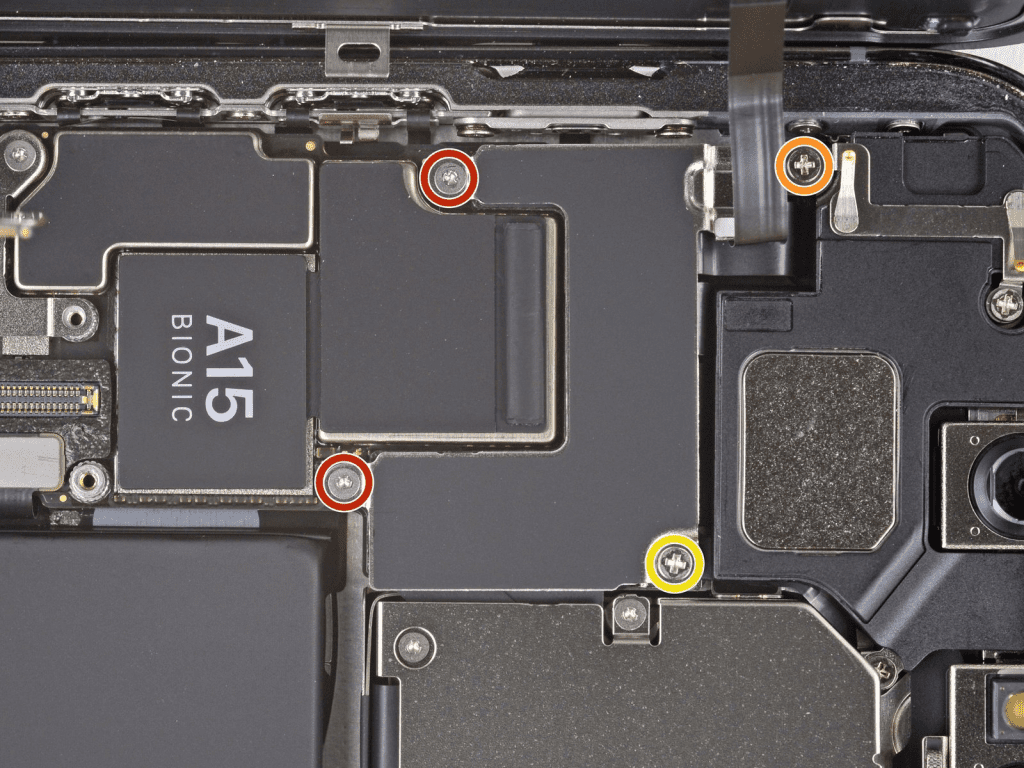
Step #19. Open Screws On The Front Sensor Connector Cover
You’ll need a Y000 screwdriver to take out two 1.1 mm screws located under the red circle in the picture. Then switch to a Phillips screwdriver to remove the last two screws.
*One 1.5 mm screw which you’ll find under the orange circle.
*Another screw marked in yellow measures 1.8 mm.
Step #20. Remove The Front Sensor Connector Cover
*Now again pick a pointed tweezer and hold the sensor connector cover.
*Carefully remove it.
Step #21. Disconnect The Front Sensor Assembly Cable Connector
*Thus you need to use the pointy end of a spudger tool to unplug the cable connector of the front sensor assembly.
*However be careful and avoid too much force. It will prevent any damage to the fragile connector during the disconnection process.
Step #22. Remove iPhone 13 Pro Screen
At this stage you can remove the iPhone 13 Pro Screen Completely.
Step #23. Open Camera Cover Screws
Use a Y000 screwdriver to take out the four screws holding the cover of the rear-facing camera sensor.
*Locate and unscrew three 1.4 mm screws marked in the red circle.
*Remove one 1.3 mm screw. You can see it’s orange.
*Use a Phillips screwdriver to extract one 1.6 mm screw in the yellow circle.
Step #24. Remove The Camera Cover
Now it is the time you can hold the camera cover with your fingers to remove it.
Otherwise you can use pointed-tip tweezers to remove the rear-facing camera cover.
Step #25. Disconnect The Camera Assembly From The Motherboard
*Carefully lift the camera cables off the logic board using the pointed end of a spudger.
*Make sure to lift them gently to avoid causing any damage to the cables or the logic board.
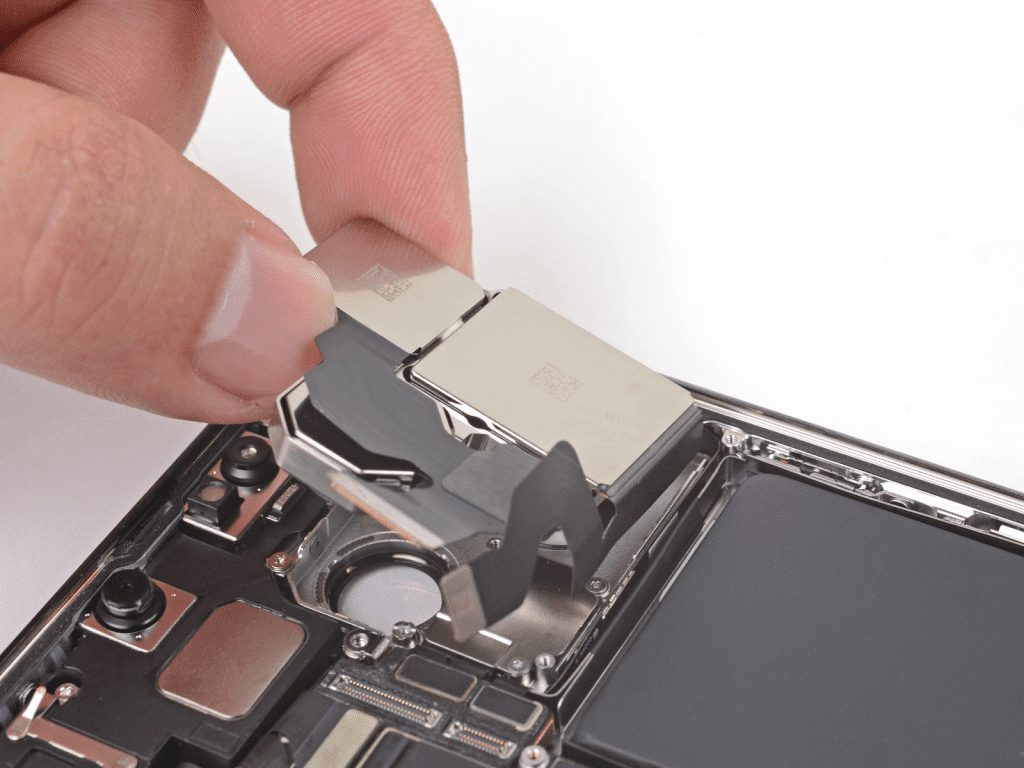
Step #26. Remove iPhone 13 Pro The Rear-Facing Cameras
*Carefully lift the camera out of the iPhone 13 Pro.
*Use the pointed end of a spudger.
*Be gentle to avoid causing any harm to the camera or the iPhone.
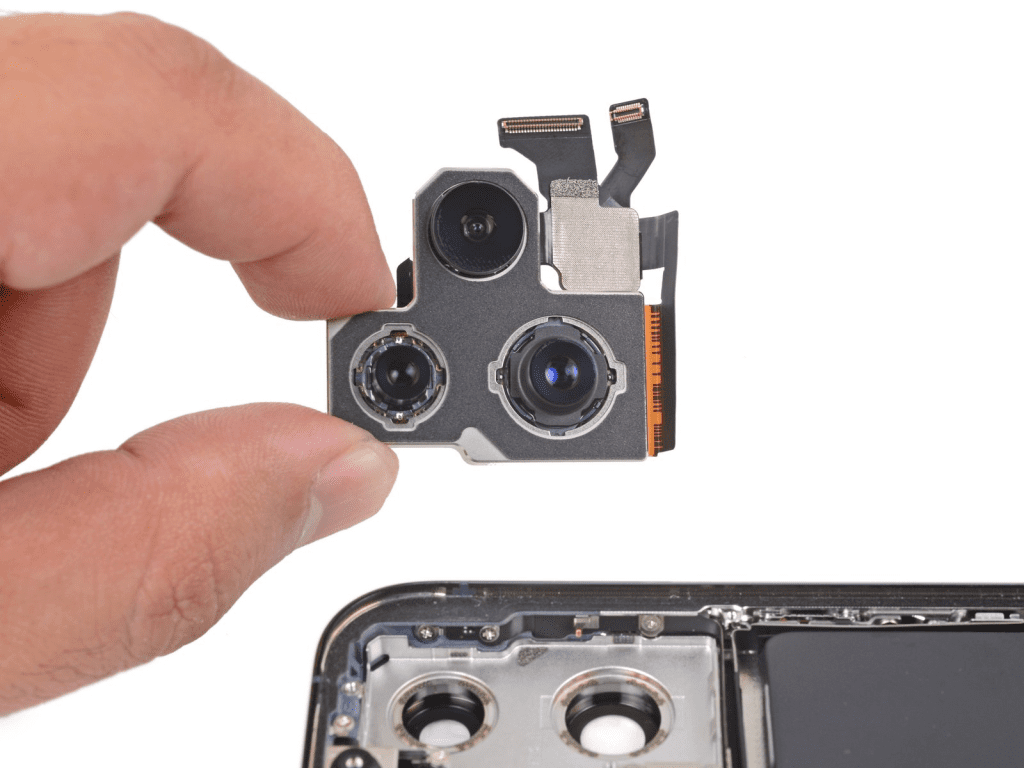
Step #27. Remove the iPhone 13 Pro All Three Rear-Facing Cameras
This step is just to make you understand that all the cameras of the iPhone 13 Pro will come out together.
Step #28. Install New Rear Facing Cameras Of The iPhone 13 Pro
Well this is the time when you will install the new cameras of the iPhone 13 Pro.
Make sure your hands are clean and the entire device is already wiped out of all the specks of dirt and dust.
Step #29. Insert Camera Assembly Cable Into The Gap
At this time you will insert the camera assembly cable. It is not very tough but you need to do it carefully.
*Insert the cable between the upper battery wall and the lower camera wall.
*Now make sure they fit nicely and are in the right position.
Step #30. Connect The Two Camera Cables to The Logic Board
*Now you see the cables are settled perfectly. It’s time to connect both the camera cables to the logic board.
*Listen to the snug-fit sound to make sure the camera is connected.
Step #31. Reinstalling The Camera Module Cover
*When you are putting the camera module cover back in place make sure the lip along the right edge slides under the phone’s body. Because this helps it fit snugly and stay aligned.
*Now fasten the screws following the size.
*Also double-check that all the screws are tight to keep the cover secure and ensure the camera works properly.
*We noted the sizes of the screws when we removed them. It’s important to carefully store the screws separately and remember their respective sizes to ensure they are correctly placed during reassembly.
Step #32. Connect The Front Sensor Cable
*Now this very important point. Here you have to place the display 90° with the phone’s frame.
*Here you will have to adjust a cup, book, or box to support the display so that you can connect the cables.
*Now carefully connect the front sensor assembly cable connector.
*Press it with the help of your thumb and listen to the snug fit sound.
Step #33. Place The Front Sensor Connector Cover
*Cover the front sensor connector with the cover.
*Here you can use tweezers for holding the front sensor connector cover and place it correctly.
Step #34. Secure Sensor Connector With The Screws
*Use a screwdriver to put back the three screws. They are different sizes 1.1 mm, 1.5 mm, and 1.8 mm.
*Make sure you tighten each screw well so they don’t get loose.
*Before you finish check that the cover is in the right place. Then tighten the screws carefully to avoid any problems.
Step #35. Connect The Display Cable
*Use the pointy part of the spudger or your finger to carefully put the display connector back into its place on the logic board.
*Carefully attach the connector to connect it to the logic board.
Step #36. Connect The Battery Cable
Now the last connection is the battery cable. So carefully press the battery cable after placing it on its socket.
Step #37. Place The Battery Cover
Use the tweezers or you can hold the battery cover with your finger and thumb and place the cover to secure the cables.
Step #38. Fasten Battery Cover Screws
At this stage secure the battery connector cover with the screws. Here you will need a Y000 screwdriver for fastening the three 1.3 mm screws.
Step #39. Reassembling the Display of iPhone 13 Pro
*Put the display in the right spot and make sure the clips on the top edge match up.
*Gently press the top part in first then push down the rest of the display firmly.
*If it doesn’t click easily check if the clips are bent or damaged.
Step #40. Switch On The iPhone 13 Pro To Check
*Press and hold the power button until the Apple logo appears on the screen.
*Allow the iPhone to boot up completely.
*Test the rear-facing cameraby opening the camera app and taking a photo.
*Check for any abnormalities in the camera’s functionality or image quality.
*Ensure that all other features of the iPhone are working correctly such as the touchscreen and other camera functions.
*If everything appears to be in working order you have successfully replaced the rear-facing camera.
Conclusion
Congratulations! On your successful iPhone 13 Pro Rear-Facing Camera Replacement. We hope you have learned a lot from this guide. Because it covers everything you need to know about replacing the iPhone 13 Pro rear-facing camera. We have also included some helpful tips to make things easier for you. So we hope you followed everything carefully and fixed your iPhone 13 Pro camera. That’s all for now. See you in another guide till then enjoy taking amazing pictures with your iPhone 13 Pro.
