Need to replace your iPhone 14 screen? Follow our step-by-step easy guide to iPhone 14 Screen Replacement.
Here is a step-by-step easy guide to replace the damaged screen of iPhone 14.
Step 1 Gather The Necessary Tools

Collect all these tools to replace the screen of your iPhone 14:
*Opening Pick
*Suction Cup
*Screwdriver set
*Hot Gun or Hair dryer
*Spudger
*A pair of tweezers
*Packing Tape
*Adhesive Tape
*New iPhone 14 Screen Replacement
Step 2 Prepare Your iPhone 14

")
Turn off your iPhone by following these steps:
Method 1
*Open Settings
*Go to General
*Choose Shut Down
Method 2
*Press and hold the Power Button and Volume Up Button together.
The Power OFF option appears.
*Slide it to the right to Power OFF.
Step 3 Remove The Pentalobe Screws


*There are two 6.8 mm-long pentalobe screws at the bottom edge of the iPhone 14.
*Remove these screws.
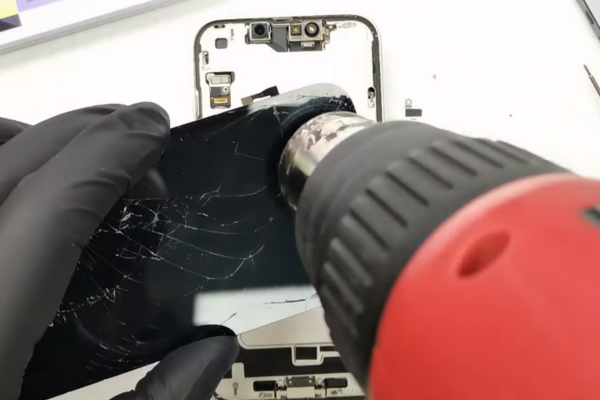
Step 4 Heat The iPhone Screen

*Take a hot air gun or hair dryer.
*Adjust medium heat settings on the hot gun or hair dryer.
*Heat all sides of the screen for at least 3 to 5 minutes to melt the adhesive glue.
*Do not overheat the iPhone.
Important Tips
*Apply transparent packing tape on the cracked screen of iPhone 14 to avoid any physical harm.
*Wear Safety glasses to protect your eyes.
Step 5 Apply A Suction Cup


*Apply a suction cup on the lower edge of the screen.
*Gently pull the handle of the suction cup.
*A Gap will appear between the screen and the iPhone 14 body.
Step 6 Insert The Opening Pick

*Take a plastic opening pick or tool.
*Mark 3mm on the opening pick.
*Insert the pick in the gap between the screen and the iPhone 14 frame.
Important Tip
Do not insert the pick more than 3mm inside the gap. There are two cables on the left side of the iPhone. 14. If you insert the pick more than 3mm, you may accidentally damage these delicate cables.
Step 7 Slice The Adhesive From All Sides


*Move the pick from one corner of the iPhone to the other until you cut the adhesives from all sides.
Step 8 Prop Up The Screen


*Hold the screen in your fingers.
*Gently prop up the screen from the upper and lower edges.
*Hold the screen vertically to disconnect the two cables connected to the phone frame.
Step 9 Unfasten The Display Cable Bracket


*Unscrew the 0.9 mm long screw securing the display connector bracket.
Step 10 Remove The Bracket

*Use a pair of tweezers or your fingers to remove the display cable bracket.
Step 11 Disconnect The Display Cable

*Disconnect the display cable with the help of a spudger.
Step 12 Unfasten The Front Sensor Connector Cover


*Unscrew the 0.9 mm-long screws securing the front sensor connector bracket.
Step 13 Remove The Front Sensor Connector Cover

*Hold the screw hole end of the connector bracket with a pair of tweezers.
*Lift the bracket to separate the front sensor connector bracket.
Step 14 Detach The Front Sensor Cable

*Use a spudger to disconnect the front sensor cable.
Step 15 Remove The Screen Of Your iPhone 14

*After disconnecting the display and front sensor cables, separate the screen from the iPhone 14.
Step 16 Unfasten The Front Sensor Bracket

*The upcoming steps will explain how to transfer the front sensor assembly to the new screen.
*You can skip these steps. If your iPhone 14 screen replacement comes with a front sensor assembly
*Unfasten the two 1.4 mm-long screws securing the sensor assembly bracket.
Step 17 Remove The Front Sensor Bracket

*Take a pair of tweezers to remove the front sensor bracket.
Step 18 Heat The Front Sensor Assembly
*Heat the front sensor assembly for 1 to 2 minutes.
Step 19 Disconnect The Ambient Light Sensor

*Use an opening pick to pry the ambient light sensor from its recess.
Step 20 Disconnect The Proximity Sensor

*Pry up the proximity sensor from the screen with the help of an opening pick.
*Hold the proximity sensor cable and separate it from the screen.
Step 21 Detach The Microphone

*Insert an opening pick under the microphone cable.
*Now, slide the pick around the microphone to separate its adhesive.
Step 22 Remove The Front Sensor Assembly

*Insert a plastic pick under the front sensor assembly.
*Slide the pick to separate it from the frame.
Step 23 Reassemble Your iPhone 14

")
*Attach the sensors and microphone to their slots in the new screen replacement.
*Use new adhesive tape to re-adhere all the components to their place.
*Connect the Front sensor and Display cables to the iPhone.
*Fasten the Front sensor and Display cable brackets.
*Attach the new screen to your iPhone 14.
Bottom Line
Congratulations! You have successfully learned how to replace the iPhone 14 screen with our easy step-by-step guide. Turn on your iPhone 14 and enjoy using it.
Admin


