Do you want to replace the damaged rear camera of your Microsoft Surface Pro X? Follow our easy step-by-step guide to replace the rear camera of your Microsoft Surface Pro X.
Learn how you can replace your Surface Pro X’s rear camera step-by-step.
Step 1 Power Off The Microsoft Surface Pro X

")
To Turn Off your Microsoft Surface Pro X:
*Select Start
*Choose Power option
*Select Shut down
*Press and hold the power button for 4 seconds.
*Then swipe down.
Alternative Method
*Hold the power button for 10 seconds until the screen turns off.
Step 2 Open The Kickstand

*Gently lift the kickstand to a 90° angle. It becomes perpendicular to the Surface of the Microsoft Surface Pro X.
Step 3 Open The SSD And SIM Card Door


*Locate the small hole in the bottom right corner of the SSD and SIM card door.
*Insert a SIM card ejecting tool or a paperclip into the hole.
*Press the SIM Ejecting tool into the hole to open the door.
Step 4 Remove The SSD And SIM Card Door

*Hold The SSD and SIM Card Door in your fingers and separate it from the Surface.
Step 5 Remove The SSD Screw


*Unscrew the 2.4 mm screw securing the SSD with the help of a screwdriver.
Step 6 Remove The SSD


*Pry up the SSD with the help of a spudger or your fingers.
*Now, remove the SSD.
Step 7 Tape The Screen


*If the display screen of your Microsoft Surface Pro X is cracked or damaged, cover the whole screen with transparent packaging tape strips.
*The tape will protect your screen glass from further damage.
Step 8 Heat All Sides Of The Microsoft Surface Pro X

")
Take a hot gun or hairdryer to heat the Surface Pro X.
Heat all sides of the tablet for 5 minutes to melt and soften the adhesive.
Step 9 Apply A Suction Cup

*Place your tablet in a facing-up position.
*Apply a suction cup to the display screen near the right-side speaker grille.
Step 10 Insert An Opening Pick

*Hold and gently pull up the suction cup.
*You will observe a gap between the screen and the frame.
*Enter a plastic opening tool or pick in the gap.
*Only insert the pick up to 2mm inside the gap.
*Leave the pick inside the gap.
Step 11 Cut The Screen Adhesive


*Move the opening pick from one corner of the screen to the other. Keep moving the pick all around the edges of the screen until you cut adhesives from all sides.
Step 12 Open The Surface


*Gently pull up the top edge of the screen and hold it at a 30° angle with the frame.
*Rotate the screen in such a way that the screen should be perpendicular to the frame.
*Now, rotate the screen at 90°.
*Place the screen on the frame.
Step 13 Remove The Display Cable Shield


*Use a pair of tweezers to pry up and separate the display cable shield.
Step 14 Disconnect The Screen


*Use a spudger to disconnect the screen cable press connector.
Step 15 Remove The Screen

*Hold the screen with your fingers and remove it from the frame.
Step 16 Speaker Grille Information

The speaker grilles may be attached to the tablet’s frame or the screen. You can follow these steps to remove the left and right speaker grille:
*Take an opening pick.
*Cut the adhesive under the right-side grille with the opening pick. Separate the speaker grille.
*Now, cut the adhesive under the left grille and remove it.
Step 17 Screen Adhesive Information


Follow these steps to replace the screen adhesive:
*Apply a few drops of concentrated isopropyl alcohol to the adhesive.
*Remove the adhesive with the flat end of a spudger.
*Using a lint-free cloth, wipe away any remaining adhesive.
*Let the surface dry completely before applying the new adhesive.
Step 18 Remove The Heat Sink Stickers

*Hold the heat sink stickers in your fingers.
*Slowly peel off the sticker.
Step 19 Remove The Screw Stickers


*You will observe four small black stickers covering the screws in the center of the heat sink.
*Remove these stickers from the screws with the help of a pair of blunt tweezers or a plastic opening tool.
Step 20 Unfasten The Heat Sink Screws


There are 14 screws securing the heat sink to the frame. Unscrew these screws with the help of screwdrivers:
*Eight 2.2 mm long screws
*One 2.0 mm long screw
*One 3.2 mm long screw
*Four 2.5 mm long screws
Step 21 Remove The Heat Sink


*Use an opening pick to slice the thermal plastic between the heat sink and the CPU.
*Insert the plastic pick up to 2 mm under the heat sink at its bottom edge. Move the opening pick to the left side to cut the adhesive.
*Hold the heat sink with your fingers on both sides. Rotate the heat sink clockwise to remove it from the foam adhesive strip.
*Separate the heat sink from the Surface.
Step 22 Remove The Foam Adhesive


*Use your fingers to remove the foam adhesive strip from the Surface.
Step 23 Remove The Rear Camera Shield

*Insert the pointed arm of a pair of tweezers under one edge of the rear camera shield.
*Pry up the corner to separate it from the frame.
*Now, repeat this step for all the other three corners.
*After separating all four corners, remove the rear camera shield from the frame.
Step 24 Disconnect The Rear Camera

*Pry up the rear camera press connector with a spudger to disconnect it from its socket.
Step 25 Remove The Front Facing Sensor Bar Screws

*Unfasten the eight 5.5 mm long screws securing the front-facing sensor bar with a screwdriver.
Step 26 Detach The Front Facing Sensor Bar

*Pry up the right side of the sensor bar with a spudger.
*Detach it from the frame.
*Remove the left side of the sensor bar using a spudger.
*Hold the sensor bar perpendicular to the frame while lifting it.
Step 27 Unfasten The screws Of The Rear Camera
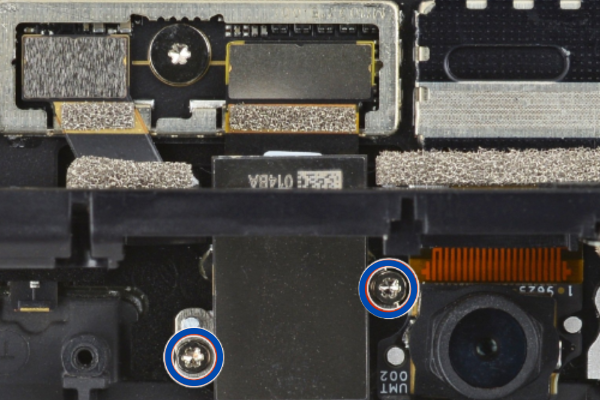
*Unscrew the two 1.7 mm long screws securing the rear camera.
Step 28 Remove The Rear Camera

*Pry up the rear camera with a spudger.
*Hold the rear camera in your fingers to remove it.
Step 29 Insert New Rear Camera

*Install a new Rear Camera in your Microsoft Surface Pro X.
Step 30 Reassembling Your Microsoft Surface Pro X

*To reassemble your Microsoft Surface Pro X, repeat all the above steps in reverse order.
Final Verdict
Congratulations! You have successfully learned how to replace the rear camera of your Microsoft Surface Pro X. Turn on your Surface Pro X and enjoy using your new rear camera.
Admin


