Is your iPad 10’s battery malfunctioning? You need to know how to fix it! That is why presenting an iPad 10 battery replacement step-by-step guide. Actually the iPad 10 has a big 28.6Wh battery. Of course that’s important for how well it works. If the battery malfunctions it is hard to perform log time tasks or use data internet or Wi-Fi. But don’t worry! There are ways to get the iPad 10 battery fixed.
However you can ask Apple for help, go to a special repair shop, or try fixing it yourself with online instructions. But fixing it yourself can be risky if you don’t have the right tools. Also remember that Apple might not cover the cost of fixing it unless you bought special AppleCare+ insurance. So think about how much it will cost, how long it will take, and how good the service is before you decide where to get it fixed. Anyhow let’s start this step-by-step guide for iPad 10 battery replacement.
How to Start iPad 10 Battery Replacement

Although it is right that before opening the iPad 10 for battery replacement you should know the key points. The iPad 10’s battery is amazingly powered and any wrong step can steal the perfection of performance. So you have to follow every step with consideration.
Gathering Tools

Before you start it is important to make sure that you have everything you need. Here is the list of what you will need.
- battery replacement that is manufactured for your iPad 10
- Small tools with fine points
- Heat gun or hairdryer
- Suction cups or a plastic opening tool
- Wristband
- Safety glasses
However having these tools ready will make replacing the iPad 10 battery easier and safer. Now let’s move to the steps of replacing the iPad 10 battery.
Step #1. Switch Off The iPad 10

First of all start with getting your iPad 10 powered off. With this step you can protect your iPad 10 from further issues, electric damage, and fire catching. Here is how you can switch off your iPad 10.
- Find the buttons on the side of youriPad.
- Press and hold the power button and the volume down button at the same time.
- Keep holding them until you see a slider on the screen.
- Slide the slider to the right to turn off your iPad
Step #2. Protecting the Cracked Glass

Before you start the repair it’s important to stop any further damage and ensure your safety.
- Cover the cracked display with clear packing tape. For this you can overlap the strips until the entire screen is covered.
- This helps stop glass shards from spreading and provides support while you work.
- Follow the guide carefully but be prepared for the glass to continue cracking during the repair.
- You may need to use a metal prying tool or plastic opening pick to remove the glass.
- Wear safety glasses to shield your eyes and take care not to damage the LCD screen of your iPad 10.
Step #3. Apply Heat Around The Screen

Now it’s time to apply heat on the edges of the screen. Here you have to be very careful because giving excessive heat to the screen can cause further damage. So follow these instructions for securely separating the screen.
- Use a hairdryer or heat gun to heat the iPad 10 screen’s This helps loosen the glue.
- Put suction cups on the screen’s corners and pull gently to create a gap.
- Insert a plastic tool into the gap and gently pry the screen from the frame.
- Take your time to avoid breaking the screen or frame. Apply more heat if needed.
- Once the glue loosens carefully lift off the screen of the iPad 10.
Step #4. Insert The Opening Pick and Lift The Screen


However please make sure that the screen is completely loose and separated from all sides so you can lift the screen.
- Hold the screen with your thumb and 1st finger and lift the screen carefully.
- Remember one thing at this stage you can fully remove the screen from the iPad. The screen is still attached to the connecting cables.
Step #5. Sport The Glass Screen
Certainly you have to use both hands so can not hold the screen with your hands until detaching the cables.
- There is the need to support your glass screen with the box or anything that is not harmful to the device.
- Again give heat on the top edge of the screen if you find it still sticking.
Step #6. Unfastening The Screws


Now it’s time to remove all the screws that are holding the display.
- Firstly please choose the right screwdriver for theiPad 10 screen removal.
- Here you find 10 screws gradually open all the screen’s screws.
- Make to place the screws separately and securely.
Step #7. Pry Up The Display


However after removing all the screws you have to pry up the display. Please follow these instructions.
- Use a suitable prying tool to remove the display.
- Apply it on the screw points.
- Be very careful and gentle when working with the display. Any harsh touch can damage the display.
- It will take some time to come out but do not apply pressure
Step #8. Lift The Display

It is the time to lift the display. Be gentle and careful not to damage the iPad 10 screen.
- Please remember the display will not get separated completely. Because there are cable connections.
Step #9. Remove Battery Connection Sheild

However it is suggested that we should disconnect the battery first. Cause it can prevent the risk of further damage.
- To disconnect the battery we have to remove the steel shield on the connection.
- Unfasten a screw securing the shield on the battery connection cable.
- After removing the screw you can pick it up with your finger and keep it aside.
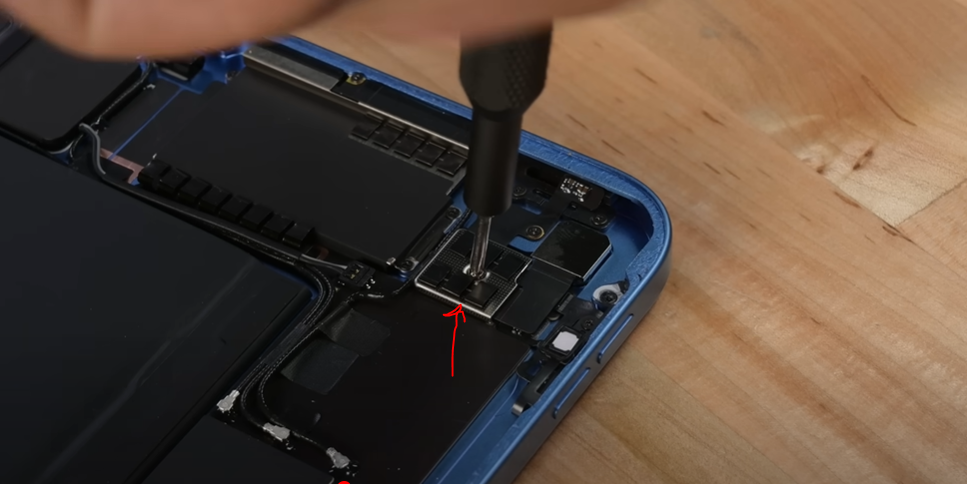
Step #10. Disconnect the Battery Connector

Well now you can disconnect the battery connection of the iPad 10.
- For the disconnection you will need a flat and thin tip of the spudger.
- Otherwise you can use your thumb nain.
- Gently insert the nail or spudger into the connection. And with applying some pressure you disconnect the battery of the iPad 10.
Step #11. Remove the Motherboard Connection With the Display


When the cable of the battery will remove you have to open the screw on the shield of the display connection.
- Firstly unfasten the screw on the shield.
- Remove the shield using your finger.
- Disconnect the connection from the motherboard of thedisplay of the iPad 10.
- Now you can separate it completely from the device.
Step #12. Disconnect The Display Assembly


There are three cables that connect the display assembly to the logic board.
- These cables control
- The Digitizer
- Ambient Light Sensor
- And Display Data.
- To disconnect them you will need to remove the shield covering the connection points.
- Unscrew and set aside the screws holding the shield in place.
- Then carefully remove the shield using tweezers.
- Once the shield is off you will see the connection points.
- Use a plastic tool to gently detach each cable from the logic board.
- Handle the cables with care to avoid any damage to them or the connectors.
- Make sure all three cables are completely disconnected before moving on with the repair.
Step #13. Separate the Screen

However this is the time you can remove the screen from the iPad frame.
- For this you have to pull the glass display very carefully and with gentle hands.
- Remove the screen and keep it securely aside.
Step #14. Clean the Old Adhesive

Well the display assemblies are removed and the adhesive can clean very easily.
- For this cleaning you will need a pointed tip spudger.
- Gently slide it on the edges and remove the old adhesive.
Step #15. Accessing The Battery Of The iPad 10
Firstly it’s important to understand that accessing the battery requires removing the logic board.
Secondly to remove the logic board, we must detach all connections connected to it. Don’t worry it’s a simple process! Just follow the steps.
Step #16. Remove the Front-Facing Camera

- For removing the front-facing camera you only need to disconcert it from the logic board.
- After disconnecting the front-facing camera you can pick and remove it with the help of pointed tweezers.
Step #17. Remove the Touch ID

- Certainly to remove the touch i ID from the logic board you have to open the screw securing it.
- Now set aside the touch ID cover shield and disconnect it from the logic board.
Step #18. Disconnect the Rear Camera

Well here is one more thing to disconnect that is rear camera of the iPad 10.
- Disconnect the rear camera from the logic board using a spudger.
- All of here you have to remove the rear camera too.
Step #19. Unfastening the Screws of the USB-C port

Now for removing the logic board first you will need to open the screws securing the USB-C port.
Step #20. Disconnect the Speaker Cables

So disconnect the speaker cable.
- Again use a spudger for prying the speaker connection.
- With the gentle push you can disconnect the speaker ribbon cable.
Step #21. Disconnecting Antennas


Remove the antenna cable connection with the help of praying tools.
Step #22. Remove the Logic Board


Now after disconnecting all the cables and connections to the logic board you can remove the logic board.
- This is very simple but needs care while pulling the logic board.
- With the gentle pull the logic board can come out.
- The USB-C port is attached to the logic board and it will come out along with it.
- You need to be gentle and careful when pulling the logic board and USB-C port.
- Double-check that all the connections are removed.
Step #23. Battery Removal of the iPad 10


Accessing the battery becomes simple once the logic board is removed.
- To remove the battery there are pulling tabs that assist in pulling it out.
- Gently pull both tabs to release the battery easily.
- Next, use an opening pick to insert it under the battery from the top.
- With your thumb and fingers carefully lift the battery out of the iPad 10 frame.
Step #24. Replace the New iPad 10 Battery


Now it’s time to install the new battery in the iPad 10.
First apply new pullable adhesive in the same area under the battery.
Carefully place the battery back in its original position.
Gently press down on the battery to secure it, but be cautious not to apply too much pressure.
Remember to read the safety precautions for handling the battery.
Step #25. Place The Logic Board

Carefully put the logic board back in the iPad frame.
- Make sure it fits right and lines up with the connectors and screw holes. Such as checking the screw holes of the USB-C port.
- Connect all cables you disconnected earlier.
- Use the screws to hold the logic board in place.
- Check everything is secure before moving on.
Step #26. Place the Front-Facing and Rear-Facing Camera

- It is time to fit the front-facing and rear-facing camera in its original places.
- Then attach the connection cable to the logic board.
Step #27. Reinstall the Screen


It’s time for reconnecting the Screen. Here are instructions to follow.
- Start by reconnecting the screen to the iPad’s logic board.
- Make sure the connections are secure and properly aligned.
- Carefully lay the screen back in its place on the iPad.
- Press down gently on the edges of the screen to make sure it adheres properly to the frame.
- Take your time and make sure the screen is firmly attached before moving on to the next step.
Step #28. Check the Screen Responsiveness

- Turn on the iPad to check how the screen works.
- Touch and swipe the screen to see if it responds correctly.
- Look at the screen to make sure there are no strange colors or spots.
- Make sure every part of the screen works including the edges.
- Take your time to test the screen well before finishing the repair.
Step #29. Seal the iPad


- Confirm that the screen is functioning properly.
- Apply gentle pressure along the edges of the iPad to secure the adhesive.
- Make sure that the screen is firmly attached to the frame.
- Take your time to ensure a proper seal for long-lasting results.
- Once satisfied your iPad 10 battery replacement is complete and ready for use.
Conclusion
Fantastic! You have done a great job! Hopefully your iPad 10 battery replacement has been completed successfully. We expect that this step-by-step guide for iPad 10 battery replacement has helped you at every stage. Well we have mentioned all the necessary tips and precautions for replacing your iPad 10’s battery in this guide. We also have written about the tools that you will need during this process.
Further if have any questions or suggestions please write us in the comment section. We will surely respond to your comments. See you in the next guide!
Admin


